RSMamba在服务器的环境配置与复现
环境配置
https://github.com/KyanChen/RSMamba/blob/release/README_zh-CN.md
注意
我的服务器的cuda的驱动版本是11.6,且不能更新服务器的驱动,不然服务器会崩溃
但是Mamba论文里安装的cuda驱动要求至少都是11.8,因此用cudatoolkit来在虚拟环境中模拟安装新版本的cuda
conda activate rsmamba conda install cudatoolkit==11.8 -c nvidia 经过这一步骤就相当于在rsmamba环境中有了cuda11.8
环境配置
安装miniconda(服器有)
- 创建虚拟环境rsmamba
conda create -n rsmamba python=3.11 -y conda activate rsmamba 安装pytorch(2.0.1版本,因为cuda11.8可适配2.0.1)
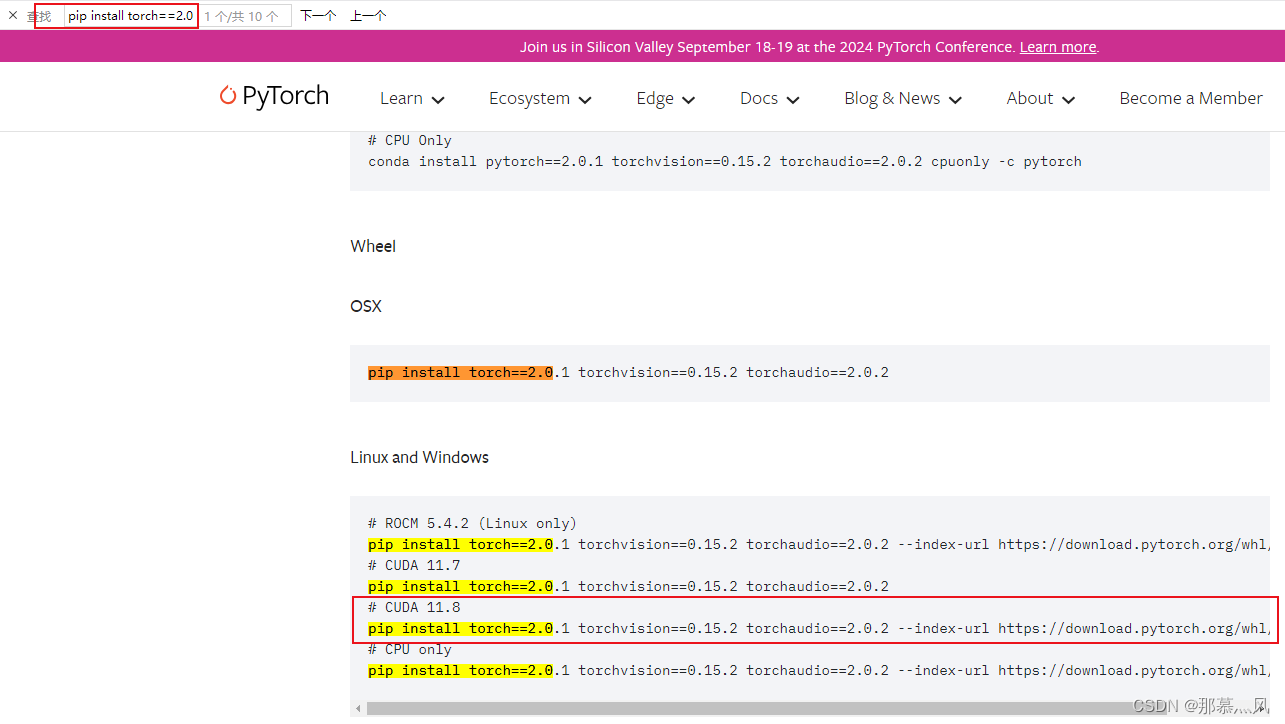
进入pytorch官网:https://pytorch.org/get-started/previous-versions/
按下ctrl + f 进入网页搜索:pip install torch==2.0.1,即可得到与2.0.1版本适配的torchvision版本和torchaudio版本:
安装mmcv(服务器直接用pip或者mim都安装不上去,只能用.whl,注意选择py3.11+cuda11.8+linux)
博客:https://blog.csdn.net/sjjg129/article/details/131581187
轮子:https://download.openmmlab.com/mmcv/dist/cu117/torch2.0.0/index.html
下载完后用filezilla将文件传输到服务器的对应路径下,然后cd到该路径
pip install .whl的文件名 安装其他依赖项
前两个可以直接安装
pip install -U mat4py ipdb modelindex pip install transformers==4.39.2 后面两个直接安装安不上,需要用.whl文件安装
博客:https://blog.csdn.net/JJ9845324/article/details/139563142
causal-conv1d:https://github.com/Dao-AILab/causal-conv1d/releases
mamba-ssm:https://github.com/state-spaces/mamba/releases
rsmamba的训练
数据集的准备按照github准备即可,这里选用的是aid数据集,上传到服务器
配置文件
选用aid的base模型的config文件:rsmamba_aid_b.py
_base_ = [ '_base_/rsmamba_default_runtime.py', '_base_/datasets/aid_bs64_pil_resize_autoaug.py', # '_base_/datasets/aid_dataset.py', '_base_/schedules/aid_schedule.py', ] work_dir = '/home/data/yc/yh/RSMamba/work_dirs/rsmamba_aid_b' ## 训练结果的保存位置 data_root = '/home/data/yc/yh/AID' ## 数据集文件夹 code_root = '/home/data/yc/yh/RSMamba/datainfo/AID' ## 数据集的处理代码,选用rsmamba自带的代码即可 batch_size = 16 ## 修改一下代数,原本为500,本代码的学习率是从10开始变化的,因此要大于10 train_cfg = dict(max_epochs=100, val_interval=20) vis_backends = [dict(type='LocalVisBackend'), # dict(type='WandbVisBackend', init_kwargs=dict(project='rsmamba', group='AID', name='rsmamba_aid_b')) ] visualizer = dict(type='UniversalVisualizer', vis_backends=vis_backends) num_classes = 30 ## aid数据集是30个类 data_preprocessor = dict( num_classes=num_classes, ) # model settings model = dict( type='ImageClassifier', backbone=dict( type='RSMamba', arch='b', pe_type='learnable', path_type='forward_reverse_shuffle_gate', cls_position='none', # 'head', 'tail', 'head_tail', 'middle', 'none' out_type='avg_featmap', img_size=224, patch_size=16, drop_rate=0., patch_cfg=dict(stride=8), init_cfg=[ dict( type='Kaiming', layer='Conv2d', mode='fan_in', nonlinearity='linear') ]), neck=None, head=dict( type='LinearClsHead', num_classes=num_classes, in_channels=192, init_cfg=None, loss=dict( type='LabelSmoothLoss', label_smooth_val=0.1, mode='original'), ), train_cfg=dict(augments=[ dict(type='Mixup', alpha=0.8), dict(type='CutMix', alpha=1.0) ]), ) train_dataloader = dict( batch_size=batch_size, dataset=dict( data_name='AID', data_root=data_root, ann_file=code_root+'/train.txt', ), ) val_dataloader = dict( batch_size=batch_size, dataset=dict( data_name='AID', data_root=data_root, ann_file=code_root+'/val.txt', ) ) test_dataloader = val_dataloader 训练
先看看服务器哪些GPU在用:
nvidia-smi 直接用github中的方法:
CUDA_VISIBLE_DEVICES=1 python tools/train.py configs/rsmamba/name_to_config.py # name_to_config.py 为你想要使用的配置文件 报错为没有规定configs/rsmamba/_base__/datasets路径下的aid_bs64_pil_resize_autoaug.py文件中的scale具体大小:
把scale的大小改为和config文件中的大小224即可
# dataset settings dataset_type = 'RSClsDataset' data_preprocessor = dict( num_classes=30, # RGB format normalization parameters mean=[101.02608706, 103.9996994, 93.50157708], std=[40.36728927, 37.11132278, 35.90649976], # convert image from BGR to RGB to_rgb=True, ) bgr_mean = data_preprocessor['mean'][::-1] bgr_std = data_preprocessor['std'][::-1] train_pipeline = [ dict(type='LoadImageFromFile'), dict( type='RandomResizedCrop', scale=224, ## 修改,原为scale=img_size crop_ratio_range=(0.4, 1.0), backend='pillow', interpolation='bicubic'), dict(type='RandomFlip', prob=0.5, direction='horizontal'), dict(type='RandomFlip', prob=0.5, direction='vertical'), dict( type='AutoAugment', policies='imagenet', hparams=dict( pad_val=[round(x) for x in bgr_mean], interpolation='bicubic')), dict(type='PackInputs'), ] test_pipeline = [ dict(type='LoadImageFromFile'), dict( type='ResizeEdge', scale=256, edge='short', backend='pillow', interpolation='bicubic'), dict(type='CenterCrop', crop_size=224), dict(type='PackInputs'), ] train_dataloader = dict( batch_size=64, num_workers=8, dataset=dict( type=dataset_type, ann_file='train.txt', pipeline=train_pipeline), sampler=dict(type='DefaultSampler', shuffle=True), ) val_dataloader = dict( batch_size=64, num_workers=8, dataset=dict( type=dataset_type, ann_file='val.txt', pipeline=test_pipeline), sampler=dict(type='DefaultSampler', shuffle=False), ) val_evaluator = dict( type='SingleLabelMetric', num_classes=30, ) test_dataloader = val_dataloader test_evaluator = val_evaluator 测试
将新建的待测试图片放入新建的文件夹 RSMamba/demo/aidtest(服务器端),在新建输出的文件夹RSMamba/demo/aidrezult,利用github中的测试方法:
CUDA_VISIBLE_DEVICES=1 python demo/image_demo.py ${IMAGE_DIR} configs/rsmamba/name_to_config.py --checkpoint ${CHECKPOINT_FILE} --show-dir ${OUTPUT_DIR} # IMAGE_DIR 为你想要预测的图像文件夹,name_to_config.py 为你想要使用的配置文件,CHECKPOINT_FILE 为你想要使用的.pth文件,OUTPUT_DIR 为预测结果的输出路径