使用Nginx正向代理通过互联网区服务器使内网服务器访问互联网
创始人
2025-01-16 19:07:20
0次
一、资源准备
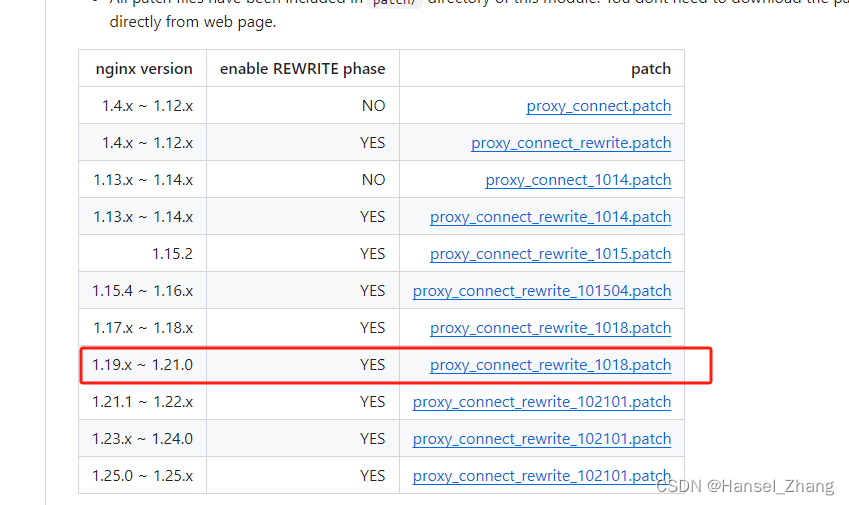
1.nginx-1.20.2
2.proxy_connect_rewrite_1018.patch
3.nginx版本和patch版本要对应
二、资源部署(互联网区服务器)
1.将nginx资源与patch资源进行解压
tar -xf nginx.tar.gz unzip ngx_http_proxy_connect_module-master.zip 2.将ngx_http_proxy_connect_module-master 改名为ngx_http_proxy_connect_module
mv ngx_http_proxy_connect_module-master ngx_http_proxy_connect_module3.nginx安装要先安装gcc
yum -y install make gcc openssl openssl-devel pcre-devel zlib zlib-devel4.查看正向代理模块proxy_connect_rewrite_1018.patch的位置
ll ../ngx_http_proxy_connect_module/patch/5.导入模块
patch -p1 < /nginx/ngx_http_proxy_connect_module/patch/proxy_connect_rewrite_1018.patch 6.编译
--prefix 代表nginx安装的路径(我的nginx-1.20.2已经改名为nginx),--with-http_ssl_module 安装ssl,--with-http_stub_status_module查看nginx的客户端状态
./configure --add-module=/nginx/ngx_http_proxy_connect_module --prefix=/usr/local/nginx --with-http_ssl_module --with-http_stub_status_module 7.安装nginx 安装位置根据 编译时配置的–prefix=
cd /usr/local/nginxmake && make install 8.配置nginx.conf文件
#user nobody; worker_processes 1; #error_log logs/error.log; #error_log logs/error.log notice; #error_log logs/error.log info; #pid logs/nginx.pid; events { worker_connections 1024; } http { include mime.types; default_type application/octet-stream; #log_format main '$remote_addr - $remote_user [$time_local] "$request" ' # '$status $body_bytes_sent "$http_referer" ' # '"$http_user_agent" "$http_x_forwarded_for"'; #access_log logs/access.log main; sendfile on; #tcp_nopush on; #keepalive_timeout 0; keepalive_timeout 65; #gzip on; server { #代理后端口 listen 9090; charset utf-8; # dns resolver used by forward proxying resolver 114.114.114.114; # forward proxy for CONNECT request proxy_connect; #设置为all,允许转发所有的端口 proxy_connect_allow all; proxy_connect_connect_timeout 10s; proxy_connect_read_timeout 10s; proxy_connect_send_timeout 10s; # forward proxy for non-CONNECT request location / { if ($scheme = 'http') { proxy_pass http://$host$request_uri; } if ($scheme = 'https') { proxy_pass https://$host$request_uri; } proxy_set_header Host $host; proxy_buffers 256 4k; proxy_max_temp_file_size 0k; } } # another virtual host using mix of IP-, name-, and port-based configuration # #server { # listen 8000; # listen somename:8080; # server_name somename alias another.alias; # location / { # root html; # index index.html index.htm; # } #} # HTTPS server # #server { # listen 443 ssl; # server_name localhost; # ssl_certificate cert.pem; # ssl_certificate_key cert.key; # ssl_session_cache shared:SSL:1m; # ssl_session_timeout 5m; # ssl_ciphers HIGH:!aNULL:!MD5; # ssl_prefer_server_ciphers on; # location / { # root html; # index index.html index.htm; # } #} } 如果没有代理端口要求可直接复制使用,此处代理端口为9090
9.访问互联网测试,出现以下互联网区的正向代理就成了
curl -I http://www.baidu.com/ -v -x 127.0.0.1:9090 curl -I https://www.baidu.com/ -v -x 127.0.0.1:9090 HTTP/1.1 200 Connection Established Proxy-agent: nginx HTTP/1.1 200 OK Accept-Ranges: bytes Cache-Control: private, no-cache, no-store, proxy-revalidate, no-transform Connection: keep-alive Content-Length: 277 Content-Type: text/html Date: Sun, 12 Feb 2023 09:31:07 GMT Etag: "575e1f60-115" Last-Modified: Mon, 13 Jun 2016 02:50:08 GMT Pragma: no-cache Server: bfe/1.0.8.18 三、内网服务器配置
1.编辑全局配置
vim /etc/profile# 这里的地址要写代理的服务器IP地址+代理端口 export http_proxy=互联网区服务器IP:9090 # 这里的地址要写代理的服务器IP地址+代理端口 export https_proxy=互联网区服务器IP:9090如果互联网区服务器的IP+端口还做了安全网闸代理,则替换为代理后的
使配置生效
source /etc/profile2.访问互联网测试
curl -I http://www.baidu.com -v -x http://互联网区IP:9090 HTTP/1.1 200 Connection Established Proxy-agent: nginx HTTP/1.1 200 OK Accept-Ranges: bytes Cache-Control: private, no-cache, no-store, proxy-revalidate, no-transform Connection: keep-alive Content-Length: 277 Content-Type: text/html Date: Sun, 12 Feb 2023 09:31:07 GMT Etag: "575e1f60-115" Last-Modified: Mon, 13 Jun 2016 02:50:08 GMT Pragma: no-cache Server: bfe/1.0.8.18 出现上述画面则代表成功了!
额外测试:
telnet 互联网区服务器IP 代理端口
curl www.baidu.com
curl指令可以通,telnet也没问题,但java程序使用htttpClient调用失败:java.net.ConnectException或jUnknownHostException可参考以下文章:
Linux系统curl指令可以通,telnet也没问题,但java程序使用htttpClient调用失败:java.net.ConnectException或jUnknownHostException-CSDN博客
相关内容
热门资讯
为了进一步!微信小程序免费黑科...
为了进一步!微信小程序免费黑科技透视,新道游app辅助器教材教程(有挂规律)1、玩家可以在微信小程序...
如何分辨真伪!新超凡软件辅助,...
【福星临门,好运相随】;如何分辨真伪!新超凡软件辅助,微乐陕西小程序脚本,新版2025教程(原来有开...
实测发现!微乐贵阳捉鸡麻将挂软...
您好:微乐贵阳捉鸡麻将挂软件这款游戏可以开挂的,确实是有挂的,很多玩家在这款游戏中打牌都会发现很多用...
带你了解!牛总管一定要牛辅助,...
带你了解!牛总管一定要牛辅助,雀友会潮汕图片辅助器,wepoke教程(原来有开挂辅助神器)是一款可以...
推荐十款!爱玩联盟辅助下载,悟...
推荐十款!爱玩联盟辅助下载,悟空大厅微信辅助,解说技巧(原来有开挂辅助黑科技);推荐十款!爱玩联盟辅...
最新技巧!雀友会辅助潮汕麻将脚...
最新技巧!雀友会辅助潮汕麻将脚本,微信小程序微乐怎么才能发好牌,2025版教程(原来有开挂辅助助手)...
玩家亲测!欢乐达人脚本,wep...
玩家亲测!欢乐达人脚本,wepoker插件下载,科技教程(原来有开挂辅助app);作为系统规律正版授...
推荐攻略!悟空大厅辅助助手下载...
推荐攻略!悟空大厅辅助助手下载安装,hhpoker是正规的吗,揭秘教程(原来有开挂辅助器);是一种具...
玩家必看!花花生活圈私人局辅助...
玩家必看!花花生活圈私人局辅助器,新青鸟辅助,高科技教程(原来有开挂辅助器);AI辅助机器人普及解说...
技术分享!兴动平台辅助下载,财...
技术分享!兴动平台辅助下载,财神十三张脚本辅助,wepoke教程(原来有开挂辅助挂);最新版2026...