yolov5使用flask部署至前端,实现照片\视频识别
创始人
2025-01-16 17:34:27
0次
大半年前初学yolo flask时,急需此功能,Csdn、Github、B站找到很多教程,效果并不是很满意。
近期做项目碰到类似需求,再度尝试,实现简单功能,分享下相关代码,仅学习使用,如有纰漏,望多包涵。
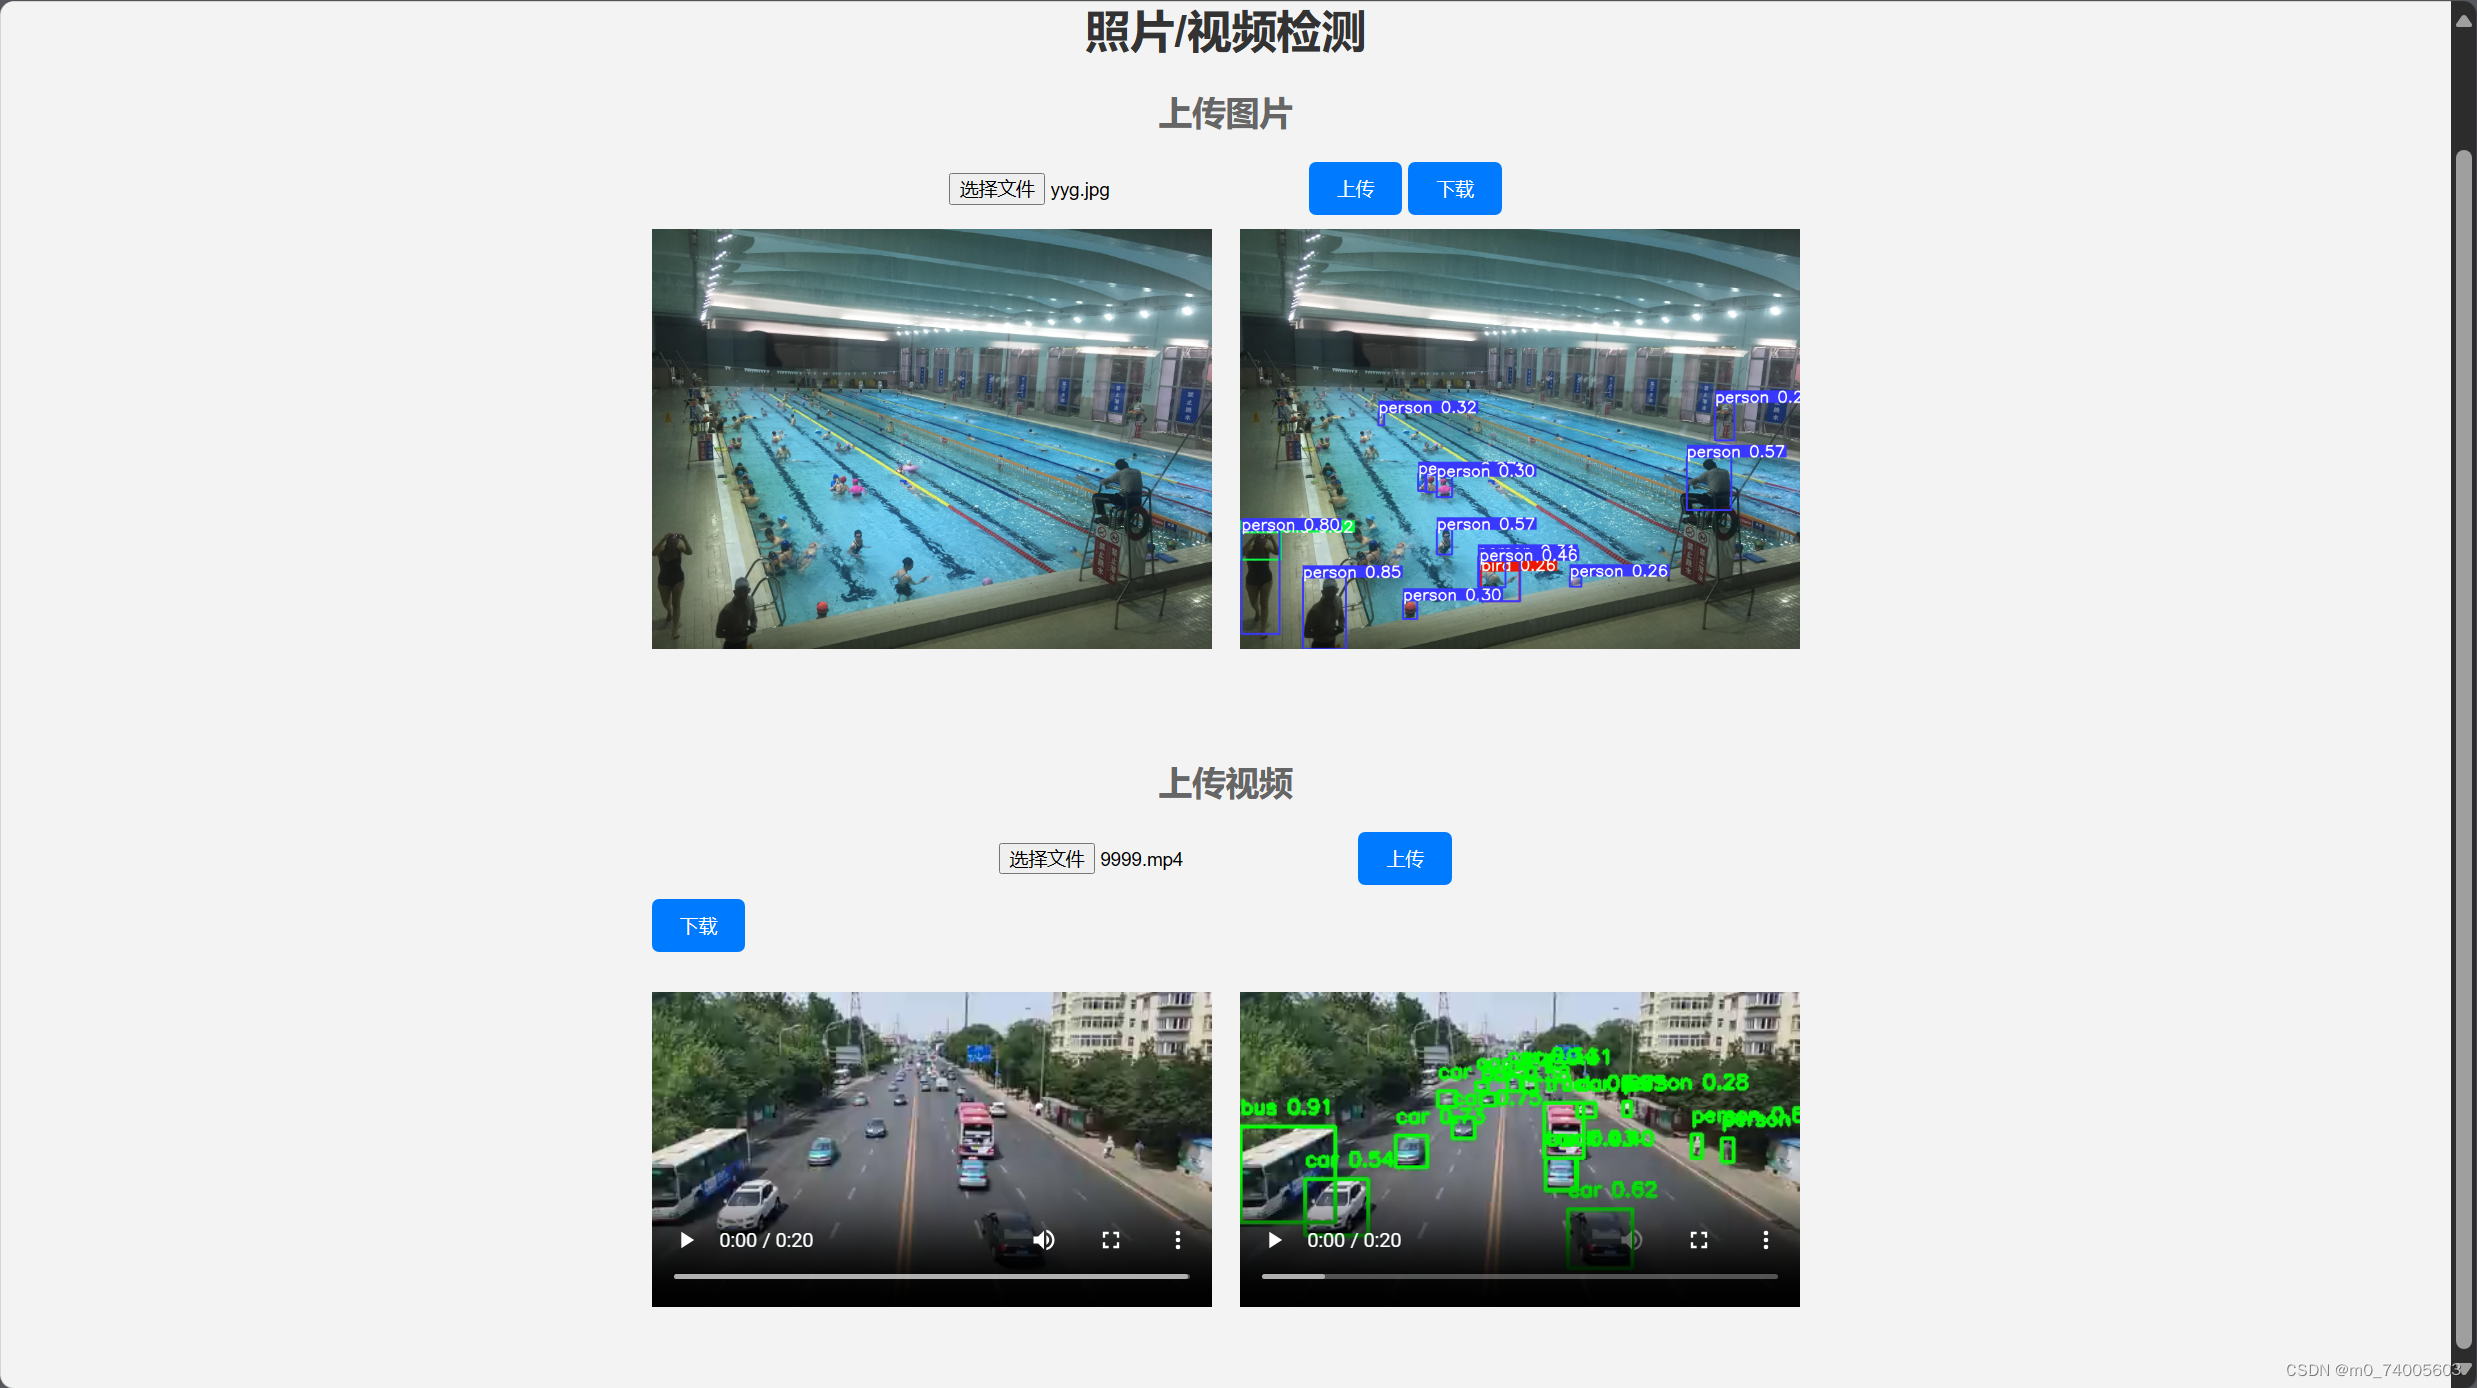
实现功能:
可更换权重文件(best.py)
上传图片并识别,可以点击图片放大查看
上传视频并识别
识别后的文件下载功能

效果图如上
文件结构如下:
project/
static/空
templates/
index.html
app.py
相关代码:
app.py
import cv2 import numpy as np import torch from flask import Flask, request, jsonify, render_template import base64 import os from datetime import datetime from werkzeug.utils import secure_filename app = Flask(__name__) # 全局变量:模型和模型权重路径 model = None # 提前加载模型 # 提前加载模型 def load_model(): global model global new_filename # 拼接权重文件的完整路径 model = torch.hub.load("E:\\pythonProject2\\flaskProject\\yolov5-master", "custom", path='weight/'+new_filename, source="local") # 路由处理图片检测请求 @app.route("/predict_image", methods=["POST"]) def predict_image(): global model # 获取图像文件 file = request.files["image"] # 读取图像数据并转换为RGB格式 image_data = file.read() nparr = np.frombuffer(image_data, np.uint8) image = cv2.imdecode(nparr, cv2.IMREAD_UNCHANGED) results = model(image) image = results.render()[0] # 将图像转换为 base64 编码的字符串 _, buffer = cv2.imencode(".png", image) image_str = base64.b64encode(buffer).decode("utf-8") # 获取当前时间,并将其格式化为字符串 current_time = datetime.now().strftime("%Y%m%d%H%M%S") # 构建保存路径 save_dir = "static" filename, extension = os.path.splitext(file.filename) # 获取上传文件的文件名和扩展名 save_filename = f"{filename}_{current_time}{extension}" save_path = os.path.join(save_dir, save_filename) cv2.imwrite(save_path, image) return jsonify({"image": image_str}) # 函数用于在视频帧上绘制检测结果 def detect_objects(frame, model): results = model(frame) detections = results.pred[0] # 这里假设只有一张输入图片 # 在帧上绘制检测结果 for det in detections: # 获取边界框信息 x1, y1, x2, y2, conf, class_id = det[:6] # 在帧上绘制边界框 cv2.rectangle(frame, (int(x1), int(y1)), (int(x2), int(y2)), (0, 255, 0), 2) # 在帧上绘制类别和置信度 label = f'{model.names[int(class_id)]} {conf:.2f}' cv2.putText(frame, label, (int(x1), int(y1) - 10), cv2.FONT_HERSHEY_SIMPLEX, 0.5, (0, 255, 0), 2) print(f'Confidence: {conf:.2f}') return frame # 路由处理视频检测请求 @app.route("/predict_video", methods=["POST"]) def predict_video(): global model # 从请求中获取视频文件 video_file = request.files["video"] # 保存视频到临时文件 temp_video_path = "temp_video.mp4" video_file.save(temp_video_path) # 逐帧读取视频 video = cv2.VideoCapture(temp_video_path) # 获取视频的帧率和尺寸 fps = video.get(cv2.CAP_PROP_FPS) width = int(video.get(cv2.CAP_PROP_FRAME_WIDTH)) height = int(video.get(cv2.CAP_PROP_FRAME_HEIGHT)) # 视频写入对象 output_video_filename = f"output_video_{datetime.now().strftime('%Y%m%d%H%M%S')}.mp4" output_video_path = os.path.join("static", output_video_filename) fourcc = cv2.VideoWriter_fourcc(*"avc1") # 使用 H.264 编码器 out_video = cv2.VideoWriter(output_video_path, fourcc, fps, (width, height)) # 逐帧处理视频并进行目标检测 while True: ret, frame = video.read() if not ret: break # 进行目标检测 detection_result = detect_objects(frame, model) # 将处理后的帧写入输出视频 out_video.write(detection_result) # 释放视频对象 video.release() out_video.release() return jsonify({"output_video_path": output_video_filename}) @app.route("/upload_weight", methods=["POST"]) def upload_weight(): global new_filename # 获取上传的权重文件 weight_file = request.files["weight"] # 获取上传文件的原始文件名 original_filename = secure_filename(weight_file.filename) # 提取文件名和扩展名 filename, extension = os.path.splitext(original_filename) # 构造新的文件名,加上当前时间戳 current_time = datetime.now().strftime("%Y%m%d%H%M%S") new_filename = f"best_{current_time}.pt" # 拼接权重文件的保存路径 save_path = os.path.join("E:\\pythonProject2\\flaskProject\\weight\\", new_filename) # 保存权重文件 weight_file.save(save_path) # 加载模型 load_model() return jsonify({"message": "Weight file uploaded successfully and model loaded"}) @app.route("/") def index(): return render_template("index.html") if __name__ == "__main__": app.run(debug=True) index.html
Object Detection 上传权重文件
× 照片/视频检测
上传图片
![]()
![]()
上传视频
使用说明:
将index.html放入templates文件夹中
运行app.py
model = torch.hub.load("E:\\pythonProject2\\flaskProject\\yolov5-master", "custom", path='weight/'+new_filename, source="local")注意此处加载模型路径更改为自己的
如果模型读取不到,csdn上有相关解决方法
此处的best.py上传路径也要更改成自己的
save_path = os.path.join("E:\\pythonProject2\\flaskProject\\weight\\", new_filename)使用说明:
先上传本地的模型,上传成功后等待模型加载,再上传照片/视频
如有问题,可联系作者,随时讨论。
相关内容
热门资讯
玩家必看科普!易趣麻将辅助器,...
玩家必看科普!易趣麻将辅助器,约战竞技场辅助脚本(有挂开挂辅助脚本);无需打开直接搜索加薇13670...
透明讲解!西兵互娱辅助,hhp...
透明讲解!西兵互娱辅助,hhpoker辅助,大神讲解(有挂开挂辅助神器);无需打开直接搜索打开薇:1...
第六操作!海米大厅辅助,蜜瓜大...
第六操作!海米大厅辅助,蜜瓜大厅辅助视频(有挂开挂辅助器)1、下载安装好蜜瓜大厅辅助视频,进入游戏主...
7小时了解!九游辅助真的假的,...
7小时了解!九游辅助真的假的,雀神广东定制插件辅助(有挂开挂辅助器);无需打开直接搜索加(薇:136...
我来教教大家!四川游戏家园辅助...
我来教教大家!四川游戏家园辅助软件合法吗,葫芦娃辅助软件(有挂开挂辅助下载)1、下载安装好四川游戏家...
透视了解!天道手游辅助,hhp...
您好:hhpoker辅助软件是真的么这款游戏可以开挂的,确实是有挂的,很多玩家在这款游戏中打牌都会发...
2指南书!微信微乐小程序辅助器...
2指南书!微信微乐小程序辅助器免费安装,广东雀神智能插件安装包(有挂开挂辅助挂);无需打开直接搜索加...
第七阶段指导!情怀娱乐辅助器,...
第七阶段指导!情怀娱乐辅助器,越乡游破解(有挂开挂辅助挂);无需打开直接搜索加(薇:13670430...
一分钟秒懂!微信广东雀神挂件辅...
您好:微信广东雀神挂件辅助这款游戏可以开挂的,确实是有挂的,很多玩家在这款游戏中打牌都会发现很多用户...
透视代打!德州透视竞技联盟,w...
透视代打!德州透视竞技联盟,we-poker软件,透明挂教程!(有挂开挂辅助平台)1、下载安装好德州...
