单片机学习笔记——入门51单片机
一、单片机基础介绍
1.何为单片机
单片机,英文Micro Controller Unit,简称MCU 。内部集成了中央处理器CPU、随机存储器ROM、只读存储器RAM、定时器/计算器、中断系统和IO口等一系列电脑的常用硬件功能 单片机的任务是信息采集(依靠传感器)、处理(依靠CPU)和硬件设备(例如电机,LED等)的控制 。单片机跟计算机相比,单片机算是一个袖珍版计算机,一个芯片就能构成完整的计算机系统。但在性能上,与计算机相差甚远,但单片机成本低、体积小、结构简单,在生活和工业控制领域大有所用。 同时,学习使用单片机是了解计算机原理与结构的最佳选择。
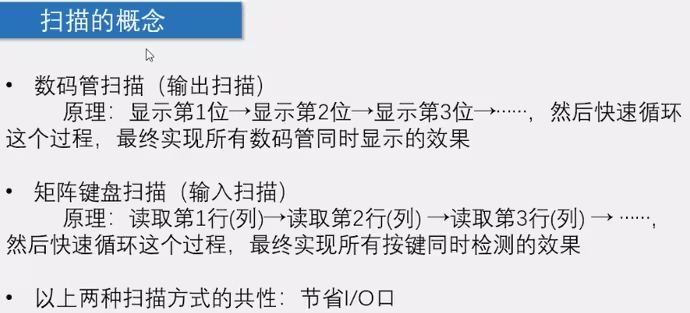
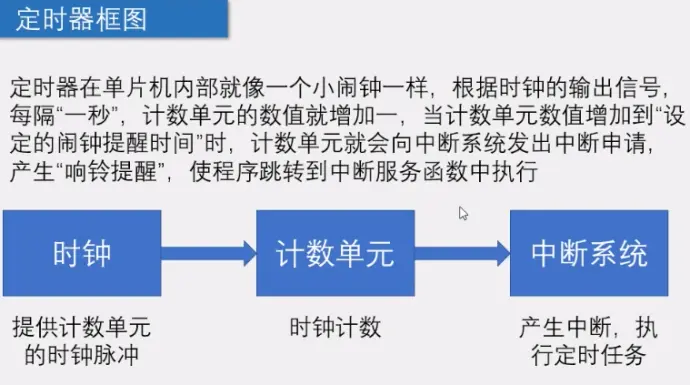
单片机工作的基本时序
我们都知道在学校是通过铃声来控制所有班级的上下课时间,我们都知道单片机执行指令的过程就是从ROM取出一条指令执行来完成它在各个地方的作用,那它什么时候取指令这个是顺序呢?这里引入一个时序的周期,每访问一次ROM的时间,就是一个机器周期的时间。
1个机器周期 = 6个状态周期 = 12个时钟(振荡)周期
时钟周期:即单片机的基本时间单位,若晶体的频率=12MHZ,那时钟周期 = 1/12MHZ,一个时钟周期 = 1/12MHZ = 1/12000 000每秒
机器周期:即12x1/12 000 000 =0.000001s = 1us,访问一次ROM取指令的时间就是1us
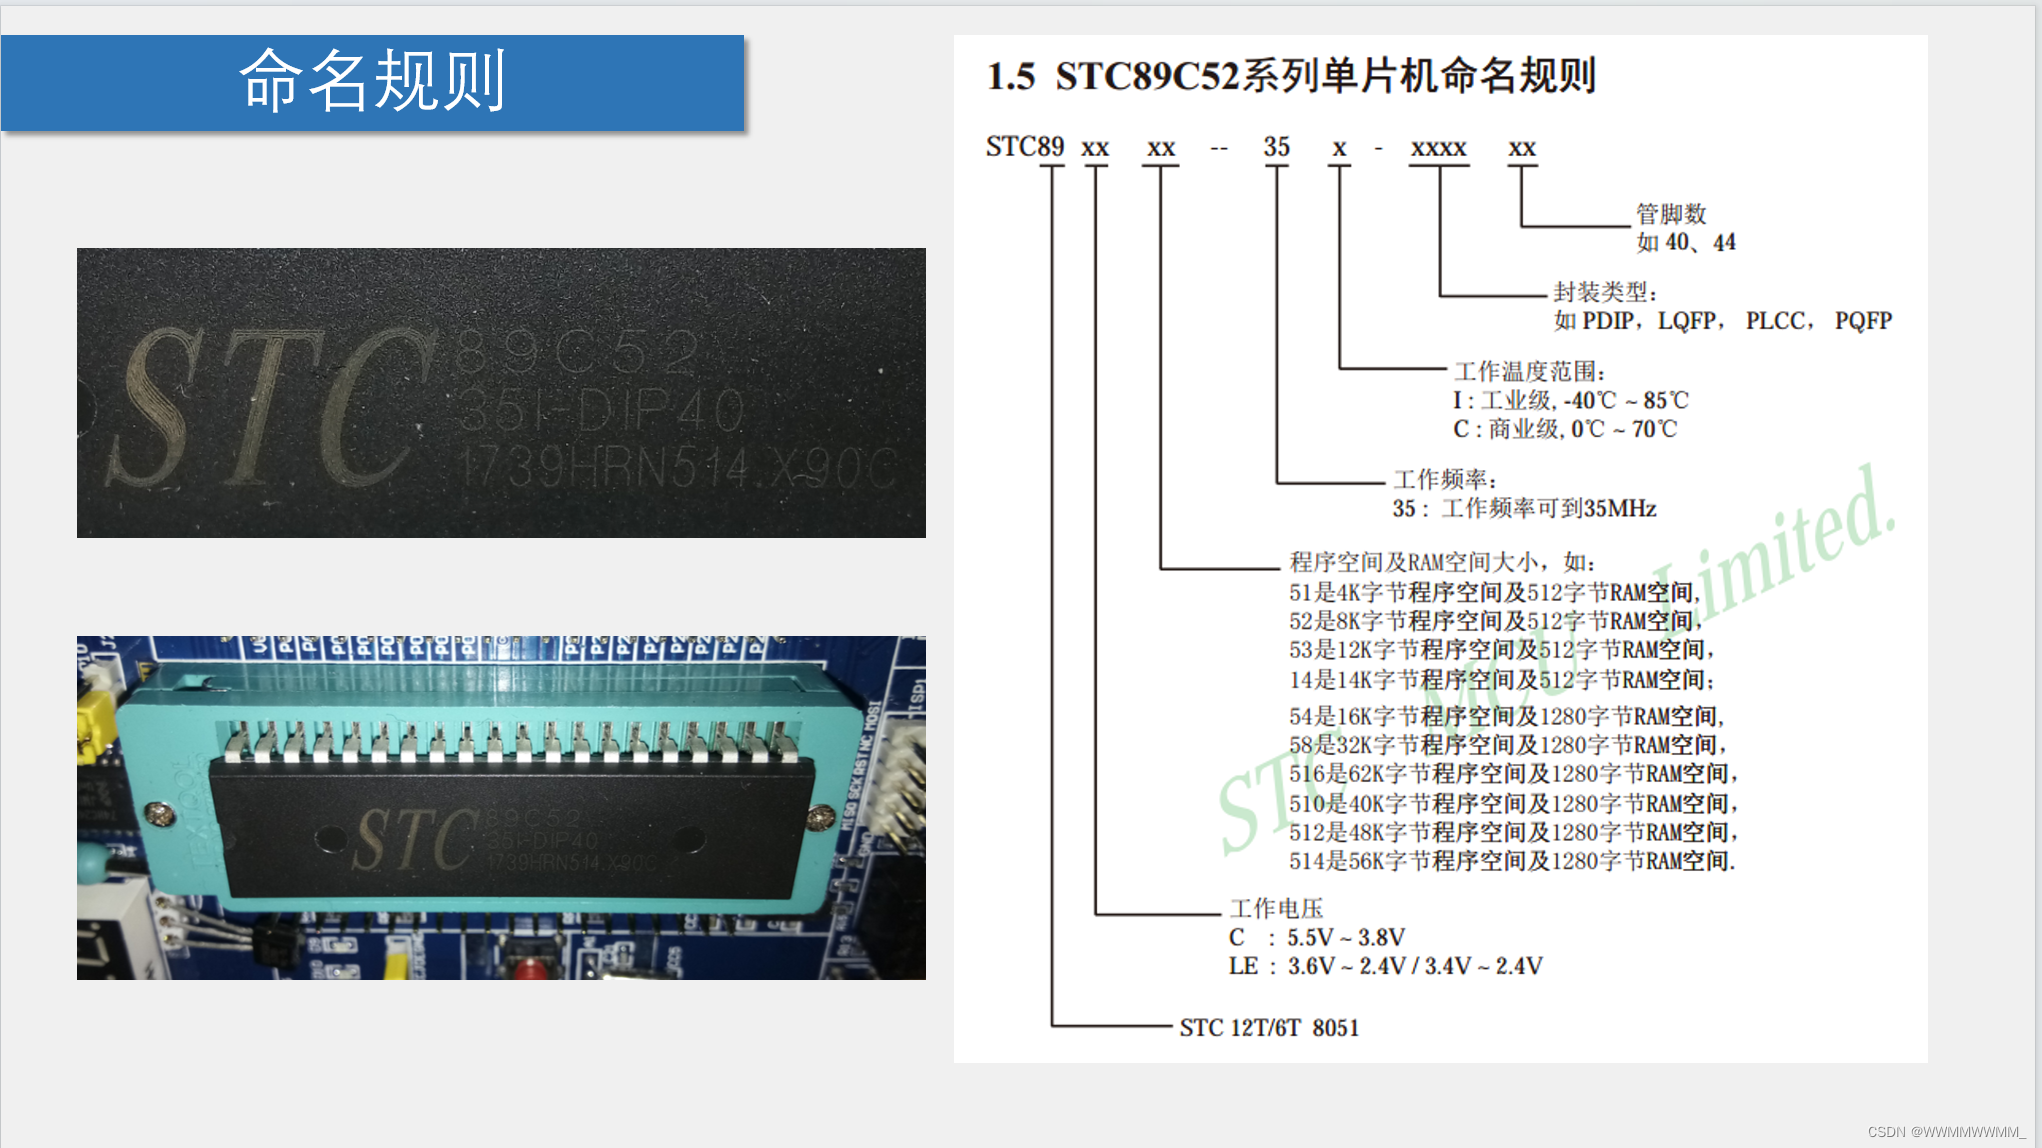
2.单片机命名规则
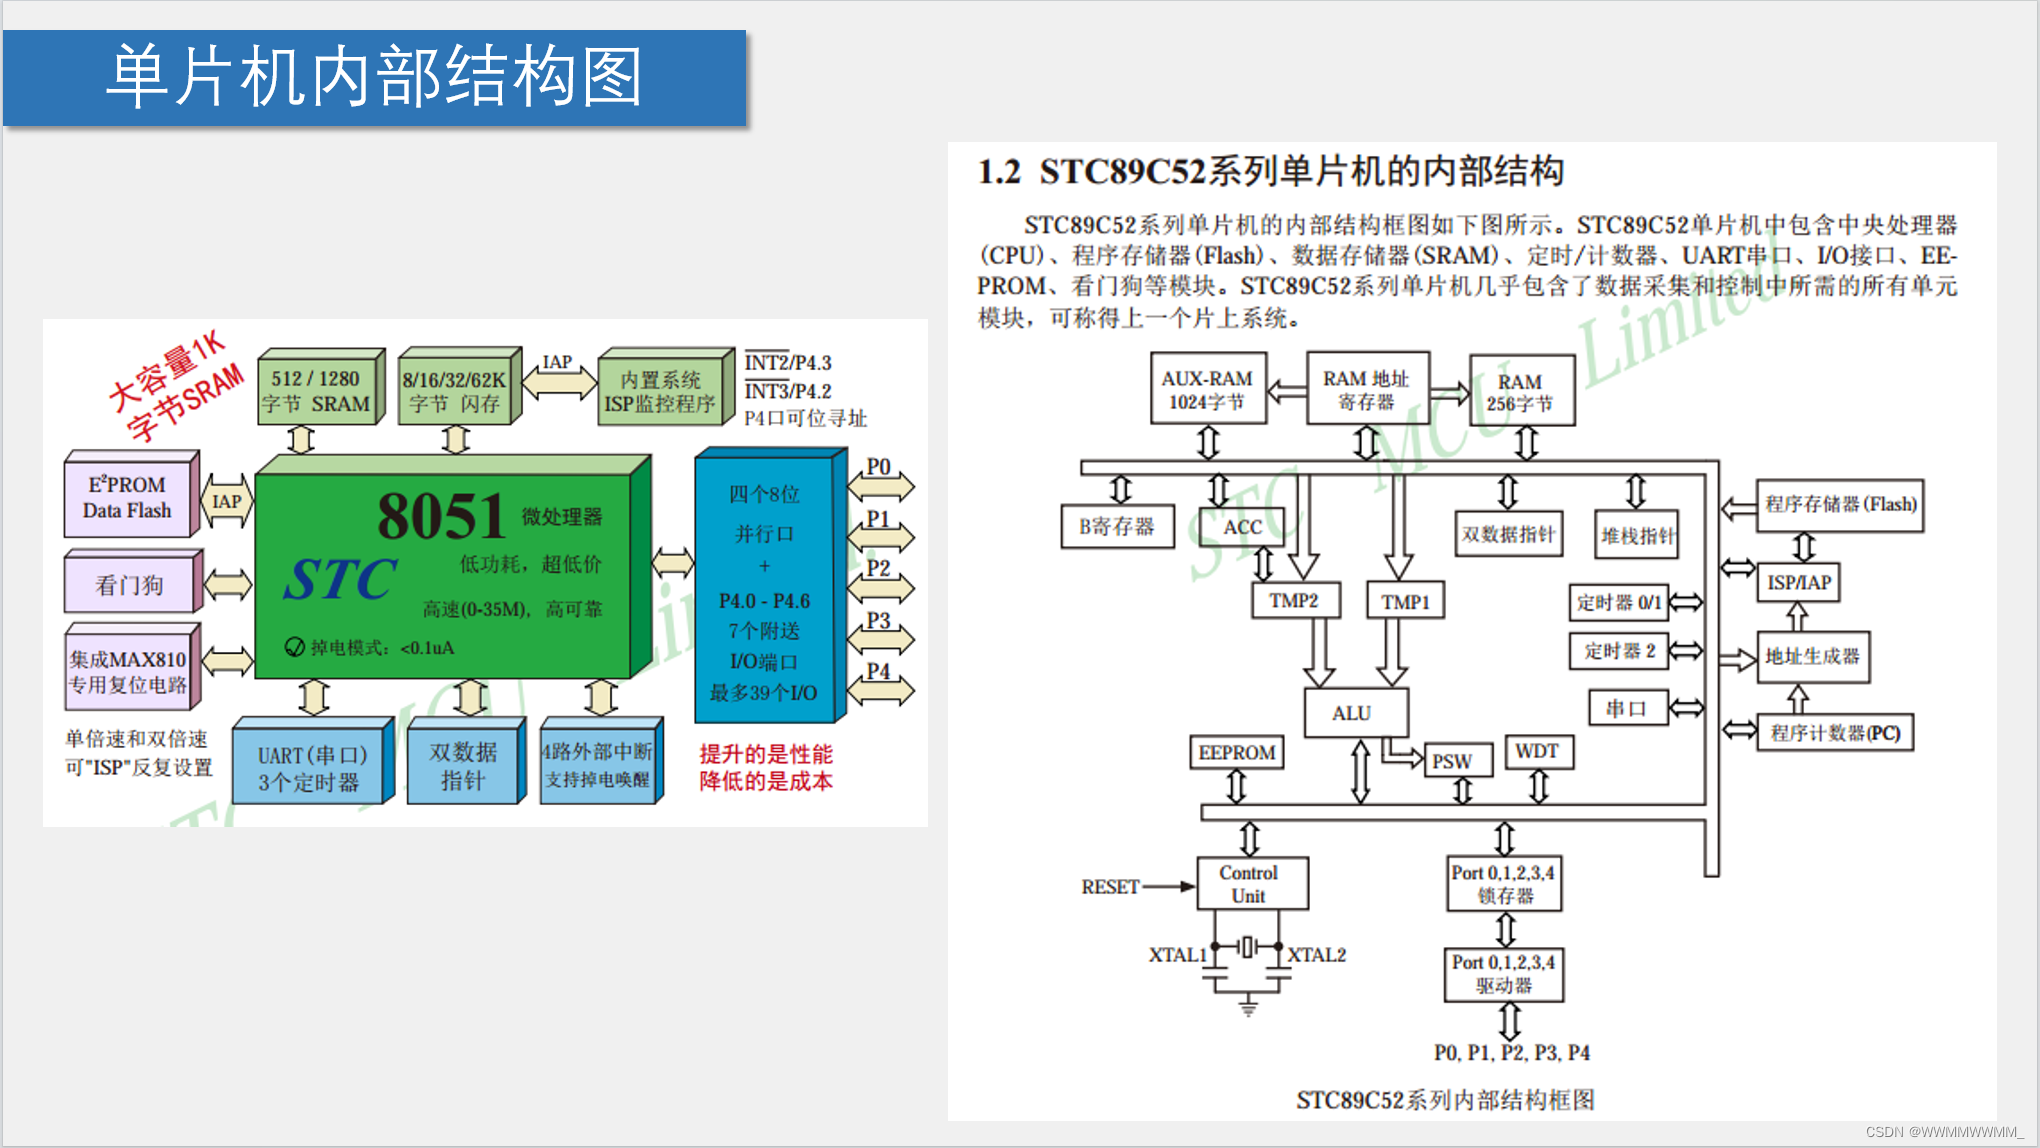
3.单片机内部结构
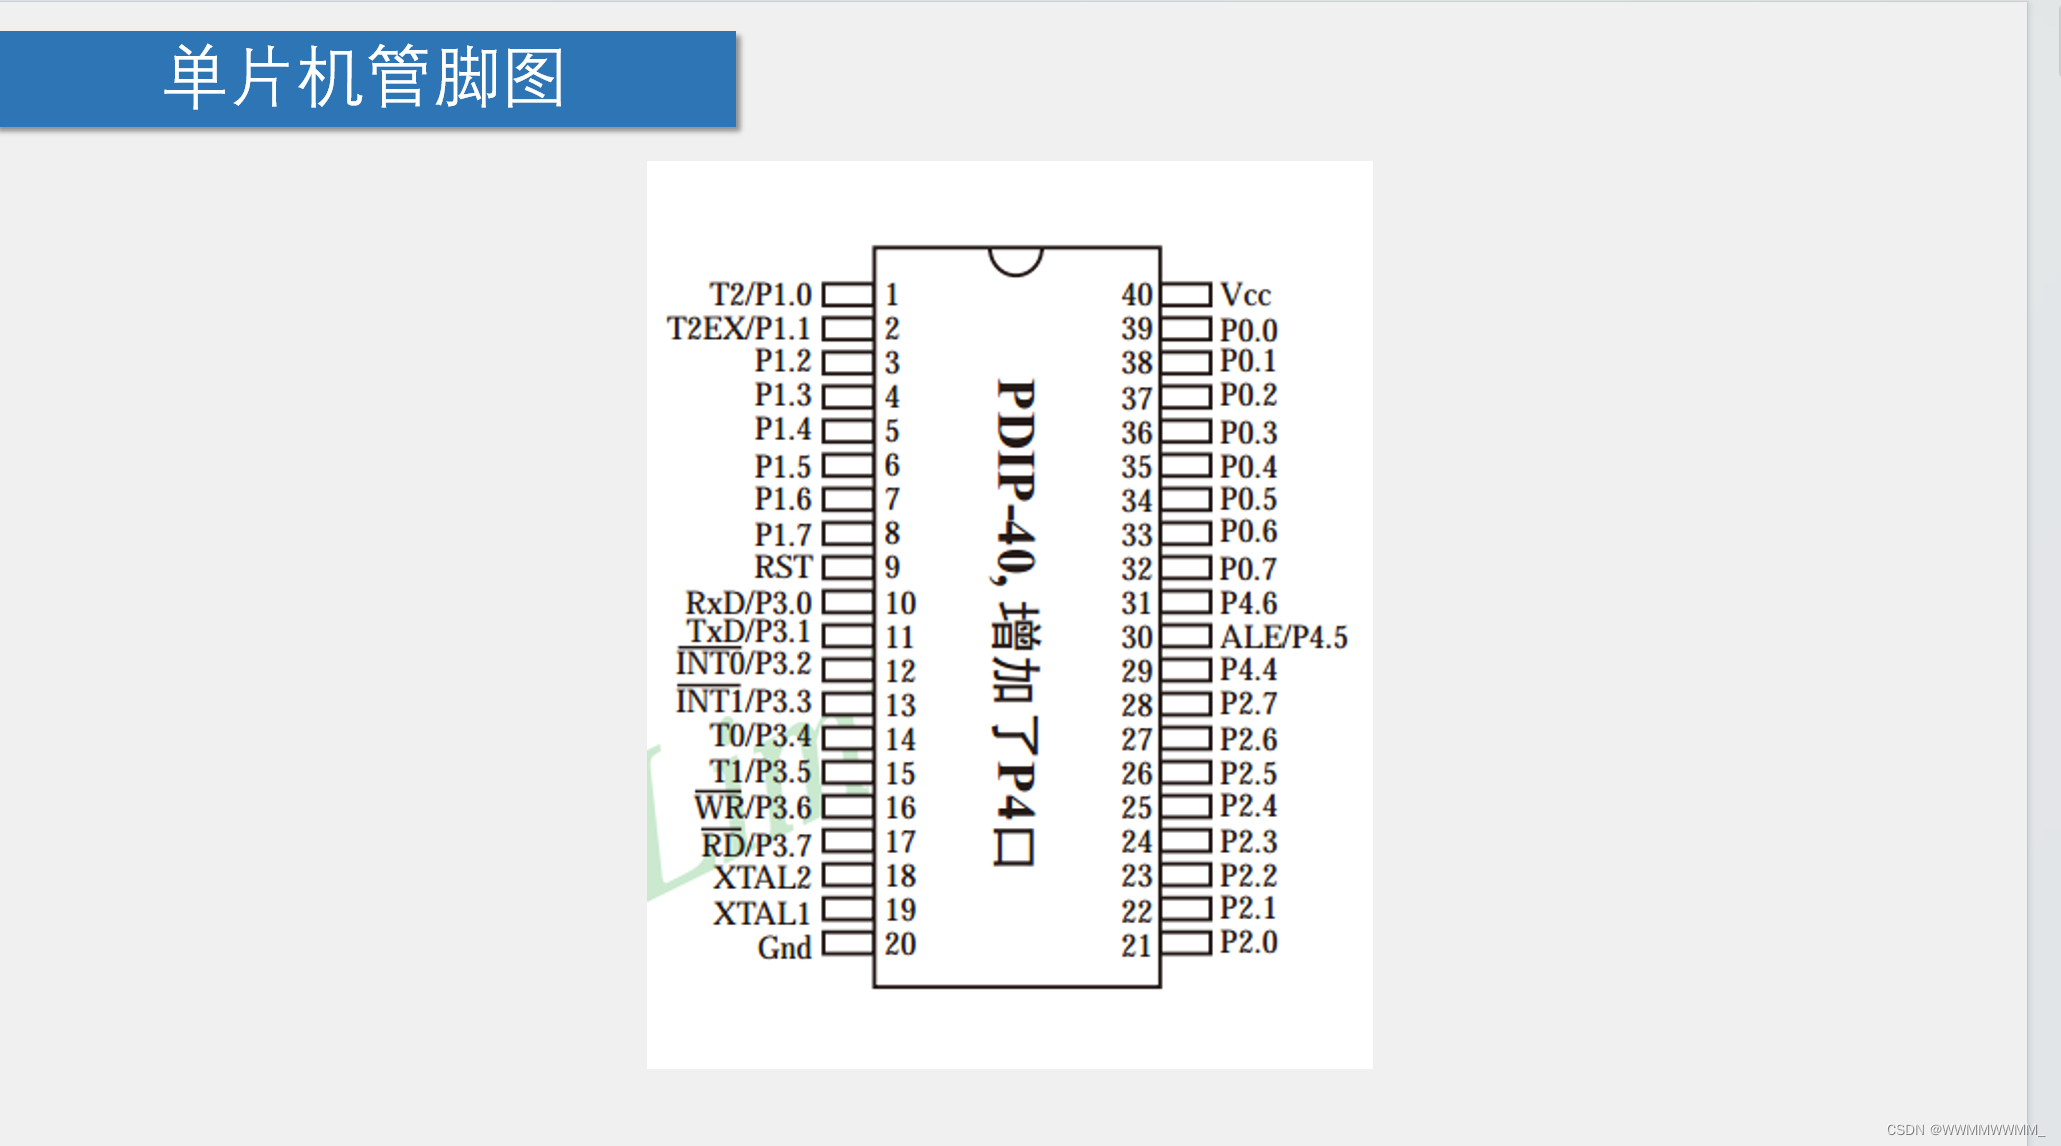
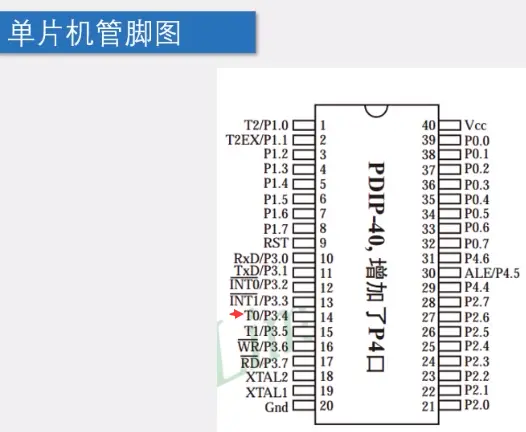
重点需记:单片机管脚
1.电源:Vcc:正极 Gnd:负极 2.XTAL:单片机时钟引脚,外接晶振
3.RST:复位
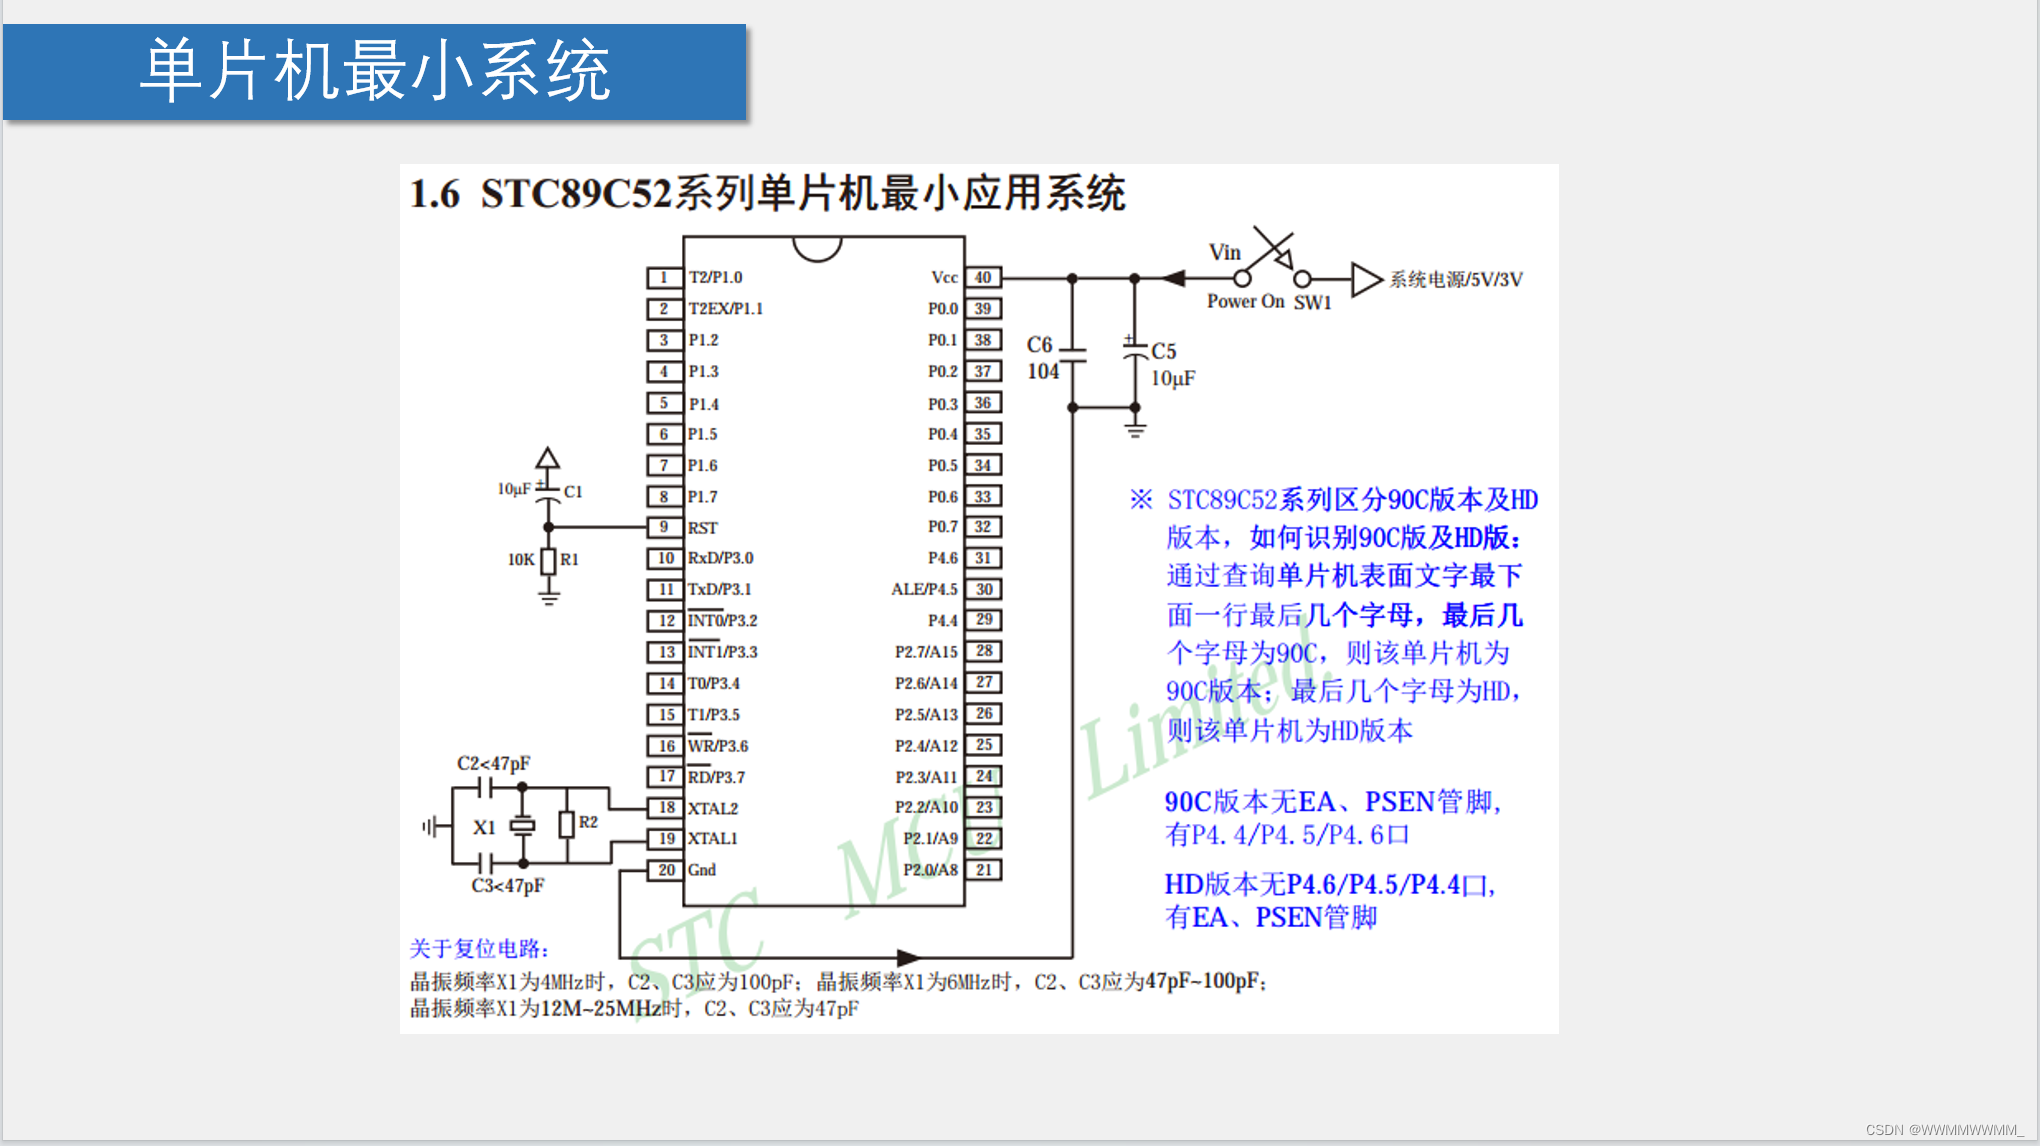
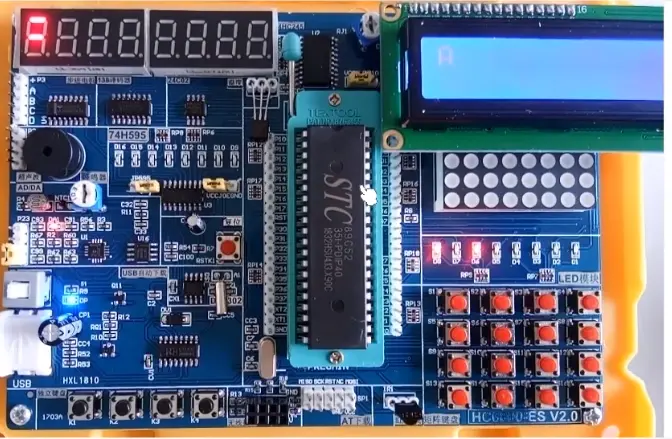
4.开发板介绍

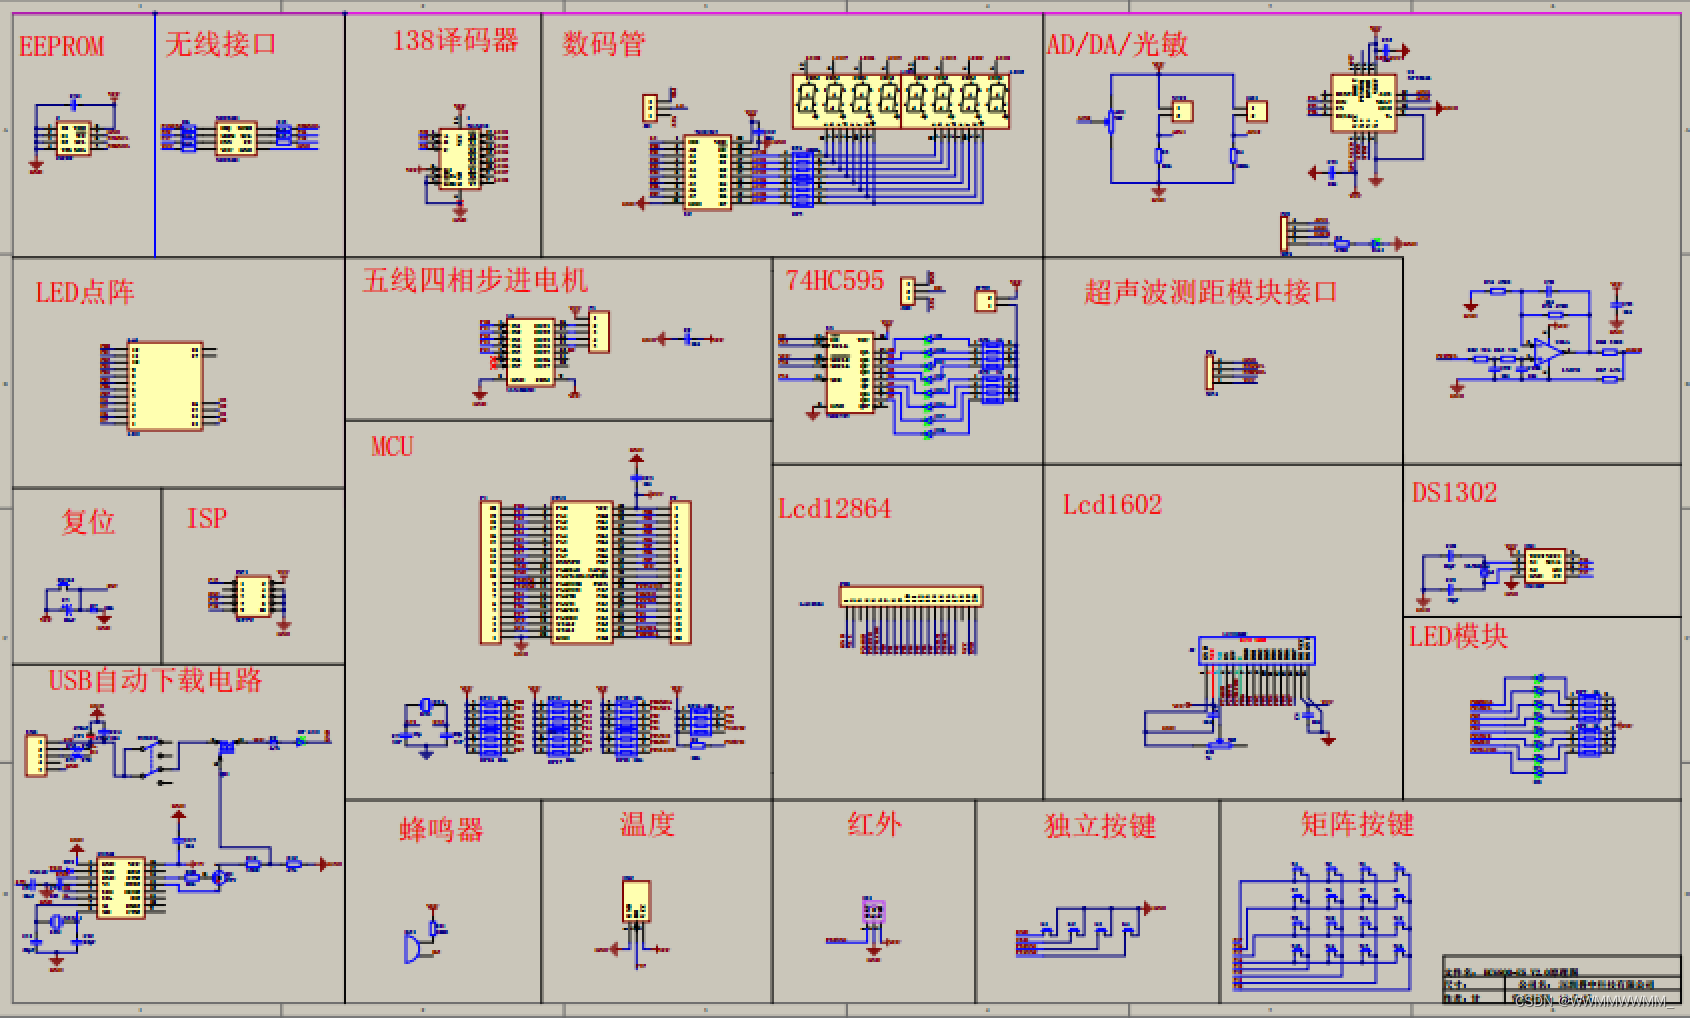
开发板原理图
二、单片机的一些基础项目
2-1、点亮一个led灯
#include void main() { P2=0x7f;//1111 1110 d1 16 15 //0111 1111 d8 7 16 //1011 1111 d7 11 16 } 通过高低电平控制led亮否
2-2、led闪烁
#include #include //延时函数 void Delay500ms() //@11.0592MHz { unsigned char i, j, k; _nop_(); i = 4; j = 129; k = 119; do { do { while (--k); } while (--j); } while (--i); } void main() { while(1){ P2=0xfe;//亮 Delay500ms();//延时500ms P2=0xff;//灭 Delay500ms();//延时500ms } } 通过延时函数使led闪烁
2-3、流水灯
#include #include void Delay500ms() //@11.0592MHz { unsigned char i, j, k; _nop_(); i = 4; j = 129; k = 119; do { do { while (--k); } while (--j); } while (--i); } void main() { while(1){ P2=0xfe;//1111 1110 Delay500ms(); P2=0xfd;//1111 1101 Delay500ms(); P2=0xfb;//1111 1011 Delay500ms(); P2=0xf7;//1111 0111 Delay500ms(); P2=0xef;//1110 1111 Delay500ms(); P2=0xdf;//1101 1111 Delay500ms(); P2=0xbf;//1011 1111 Delay500ms(); P2=0x7f;//0111 1111 Delay500ms(); } } 位运算做法:
2-4、流水灯plus
#include #include //任意延时函数——1ms的延时函数执行x次循环 void Delay1ms(unsigned int xms) //@11.0592MHz { unsigned char i, j; while(xms) { _nop_(); i = 2; j = 199; do { while (--j); } while (--i); xms--;} } void main() { while(1){ P2=0xfe;//1111 1110 Delay1ms(100); P2=0xfd;//1111 1101 Delay1ms(100); P2=0xfb;//1111 1011 Delay1ms(100); P2=0xf7;//1111 0111 Delay1ms(100); P2=0xef;//1110 1111 Delay1ms(100); P2=0xdf;//1101 1111 Delay1ms(100); P2=0xbf;//1011 1111 Delay1ms(100); P2=0x7f;//0111 1111 Delay1ms(100); } } 通过任意延时函数去简化步骤
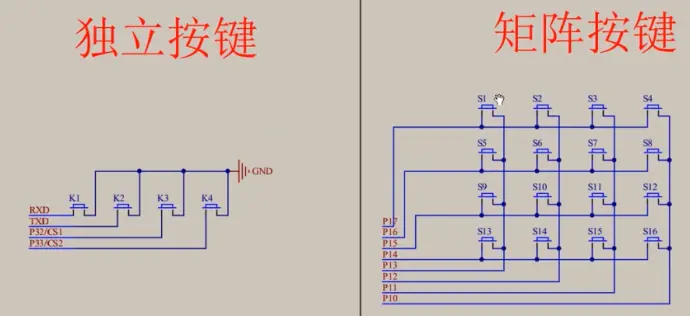
3-1、通过独立按键控制led闪烁
#include void main() { while(1) { if(P3_1==0)//低电平 按下按键接地为0 { P2_0=0;//d1亮 } else { P2_0=1; } } } 3-2、通过独立按键控制led状态
#include #include void Delay(unsigned int xms) //@11.0592MHz { unsigned char i, j; while(xms){ _nop_(); i = 2; j = 199; do { while (--j); } while (--i); xms--; } } void main() { while(1) { if(P3_1==0) { Delay(20);//取消前摇 while(P3_1==0);//判断何时松手 Delay(20);//取消后摇 P2_0=~P2_0;//按位取反 } } } 取消按键时的抖动,使单片机稳定判断状态。按一次亮,按一次灭。
3-3、通过独立按键控制led完成二进制
#include #include void Delay(unsigned int xms) //@11.0592MHz { unsigned char i, j; while(xms){ _nop_(); i = 2; j = 199; do { while (--j); } while (--i); xms--; } } void main() { unsigned int lednum=0; while(1) { if(P3_1==0) { Delay(20); while(P3_1==0); Delay(20); lednum++; P2=~lednum; } } } 也可以直接用P2--;代替最后两句,完成二进制运算。
3-4、用独立按键控制led灯移位
#include #include void Delay(unsigned int xms) //@11.0592MHz { unsigned char i, j; while(xms){ _nop_(); i = 2; j = 199; do { while (--j); } while (--i); xms--; } } void main() { unsigned int lednum=0; P2=~0x01; while(1) { if(P3_1==0)//k1 { Delay(20); while(P3_1==0); Delay(20); lednum++; if(lednum>=8) lednum=0; P2=~(0x01< 4-1 静态数码管
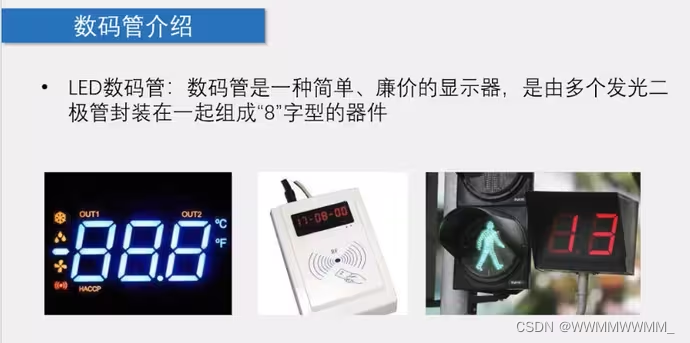
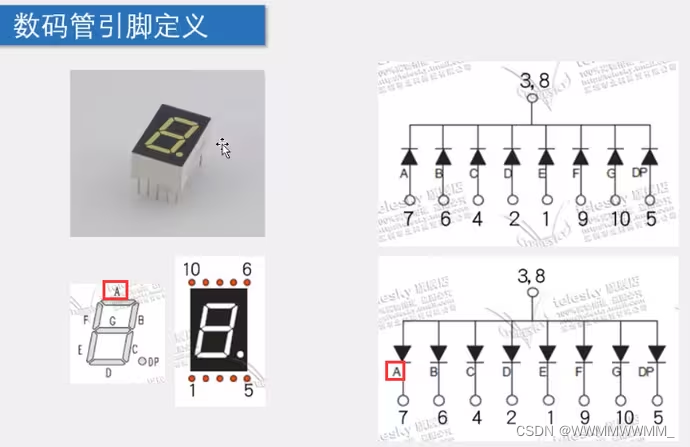
1.常见数码管
2.控制数码管显示的原理图
3.管脚定义(对应字母控制对应位置亮):上面的为共阴极、下面的为共阳极(可以理解为3,8管脚处为供电,三角形尖尖有一横的是负极,所有共阴极),两个图中的数字为引脚:
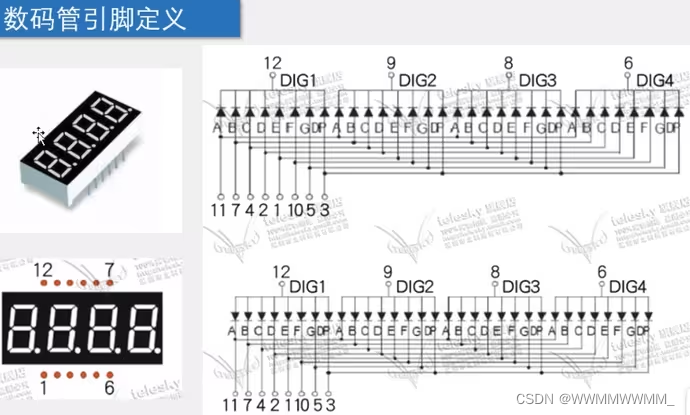
4.下面为多个数码管,PCB板的4个为一体,同样上面为共阴极、下面为共阳极的原理图:
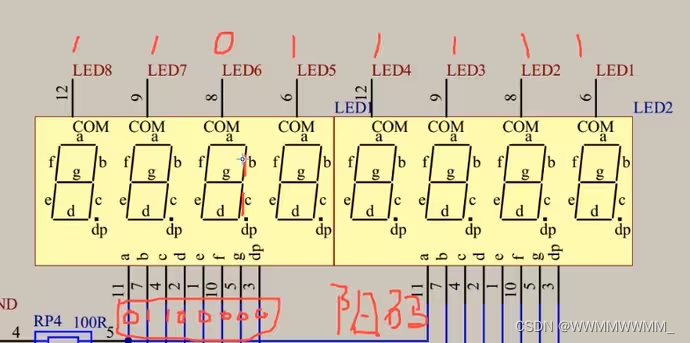
5.STC89C52实现数字显示
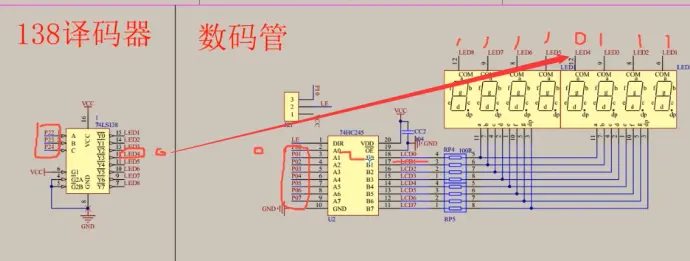
①原理图是共阴极(上面给0、下给1亮)
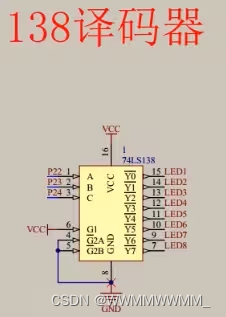
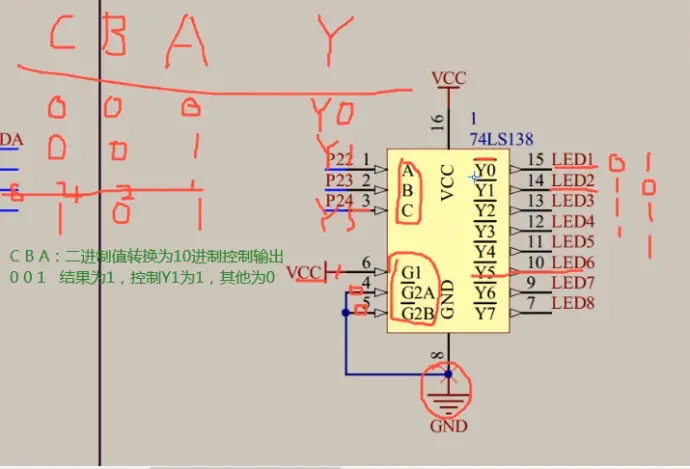
②138译码器:输入3(ABC,读的时候是从下读 C B A )个口,控制输出8个口,输出口连接共阴极的,是0还是1,在这里控制:使能端连接(按下图给1和0就可以用了)
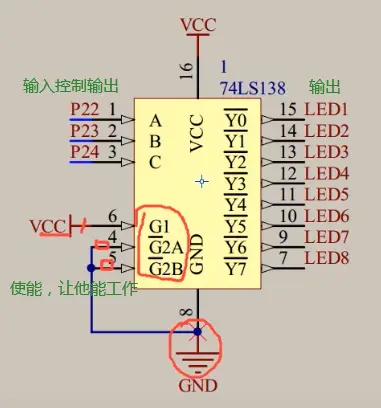
通过CBA给数字0和1二进制转换10进制(得到数字几)就控制Y几,Y0头上“—”是表示低电平有效(即给0):
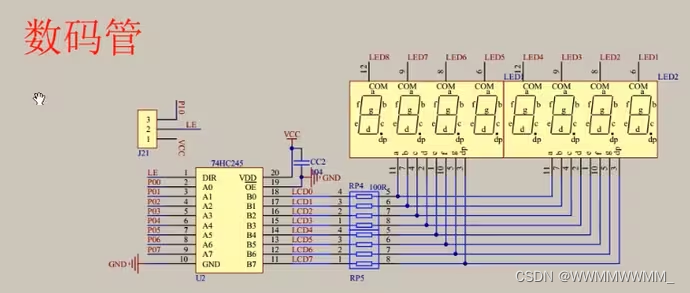
③双向缓冲,高电平往低电平送数据
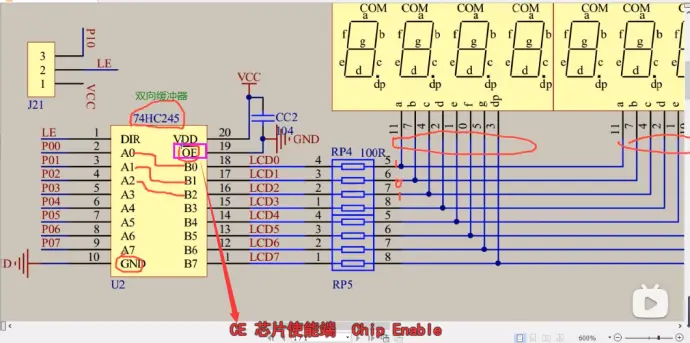
CC2电容作用:滤波电容,稳定电源,确定电路稳定性,提高电路工作性能可靠运行;
RP4:排阻,限流,防止电流过大
④这里的P01......P07,就是用P0口,后面代码就是通过P0口控制灯的
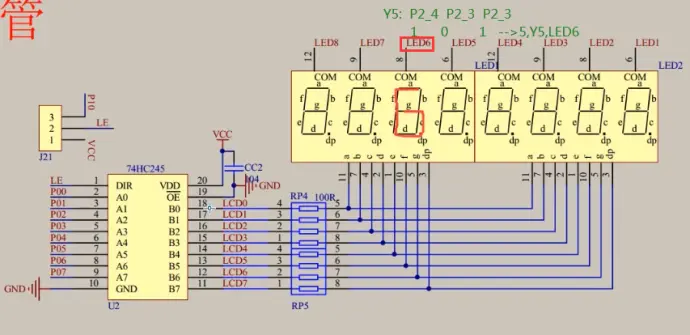
只有Y5为0,其他Y0...Y7都为1;
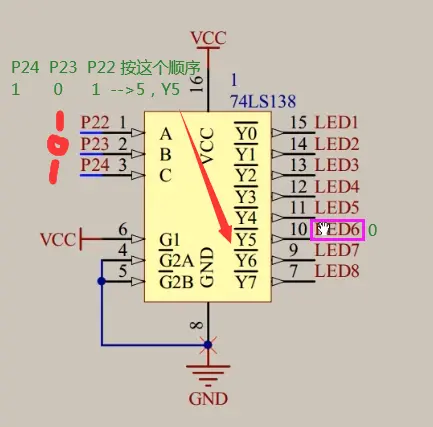
读取顺序都是从下到上
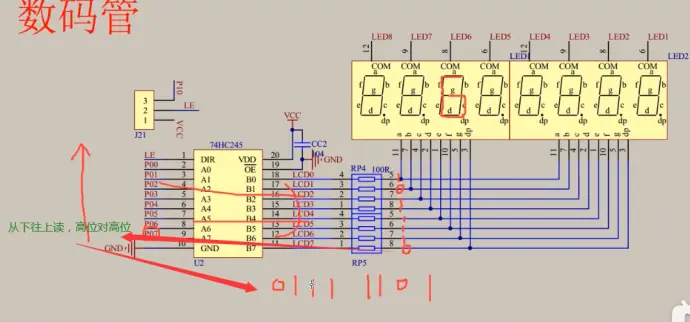
⑤代码控制公共端,从下往上写:
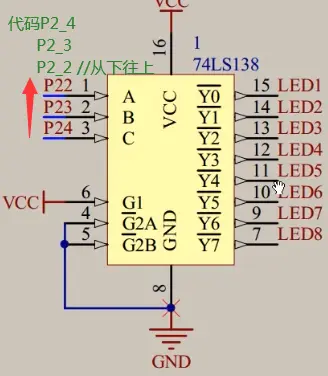
二进制101转换为1十进制为5,控制Y5,即公共端的LED6;
要显示下图的数字6
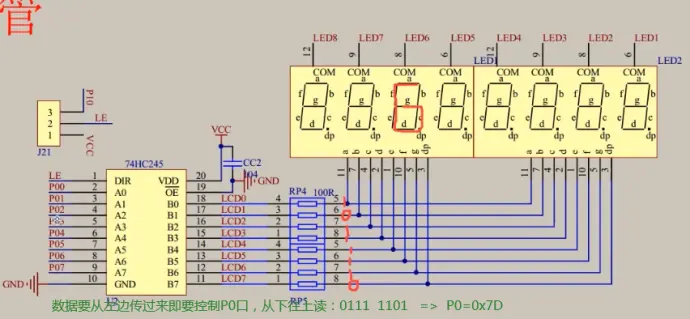
代码实现如下(P2控制共阴极,P0控制显示数字)及结果;
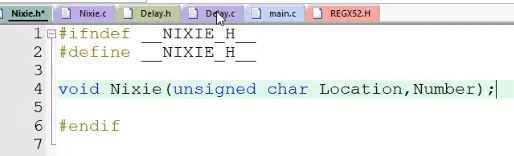
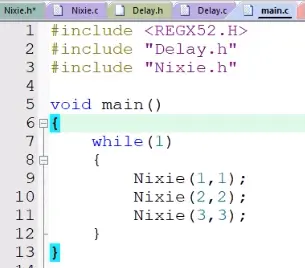
⑥优化操作代码:通过数组,子函数来优化代码
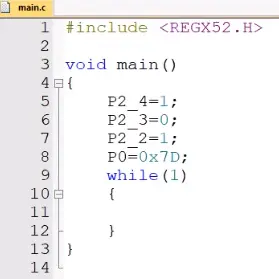
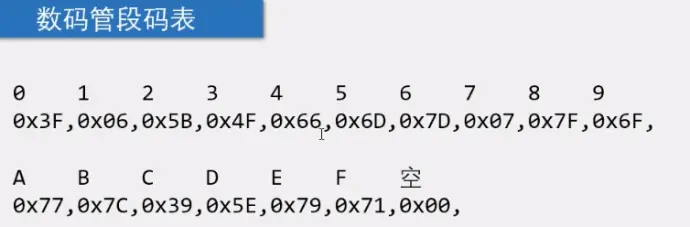
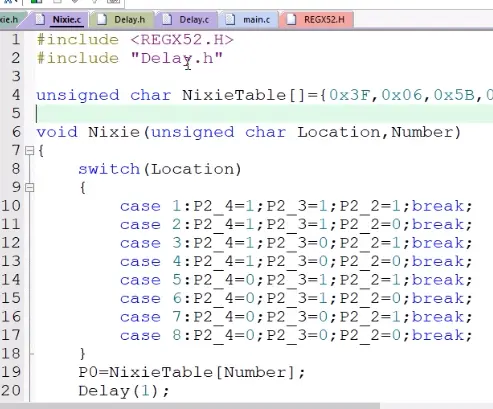
#include #include unsigned char NixieTable[]={0x3f,0x06,0x5b,0x4f,0x66,0x6d,0x7d,0x07,0x7f,0x6f,0x77,0x7c,0x39,0x5e,0x79,0x71,0x00}; void Nixie(unsigned char Location,Number) { switch(Location) { case 1:P2_4=1;P2_3=1;P2_2=1;break; case 2:P2_4=1;P2_3=1;P2_2=0;break; case 3:P2_4=1;P2_3=0;P2_2=1;break; case 4:P2_4=1;P2_3=0;P2_2=0;break; case 5:P2_4=0;P2_3=1;P2_2=1;break; case 6:P2_4=0;P2_3=1;P2_2=0;break; case 7:P2_4=0;P2_3=0;P2_2=1;break; case 8:P2_4=0;P2_3=0;P2_2=0;break; } P0=NixieTable[Number]; } void main() { Nixie(7,10); while(1); } 要显示的数字对应的值
4-2、动态数码管
#include #include unsigned char NixieTable[]={0x3f,0x06,0x5b,0x4f,0x66,0x6d,0x7d,0x07,0x7f,0x6f,0x77,0x7c,0x39,0x5e,0x79,0x71,0x00}; void Delay (unsigned int xms) //@11.0592MHz { unsigned char i, j; while(xms--){ _nop_(); i = 2; j = 199; do { while (--j); } while (--i); } } void Nixie(unsigned char Location,Number) { switch(Location) { case 1:P2_4=1;P2_3=1;P2_2=1;break; case 2:P2_4=1;P2_3=1;P2_2=0;break; case 3:P2_4=1;P2_3=0;P2_2=1;break; case 4:P2_4=1;P2_3=0;P2_2=0;break; case 5:P2_4=0;P2_3=1;P2_2=1;break; case 6:P2_4=0;P2_3=1;P2_2=0;break; case 7:P2_4=0;P2_3=0;P2_2=1;break; case 8:P2_4=0;P2_3=0;P2_2=0;break; } P0=NixieTable[Number]; Delay(1);//保证亮度 P0=0x00;//清零 } void main() { while(1){ Nixie(2,1); // Delay(20); Nixie(3,2); // Delay(20); Nixie(4,3); // Delay(20); } } 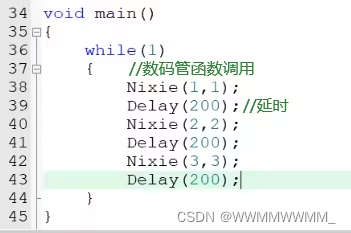
注释掉上面的延时调用,旁边的管会有些影响,需要消影,段选、位选影响造成串位,如下代码消除;

5)了解
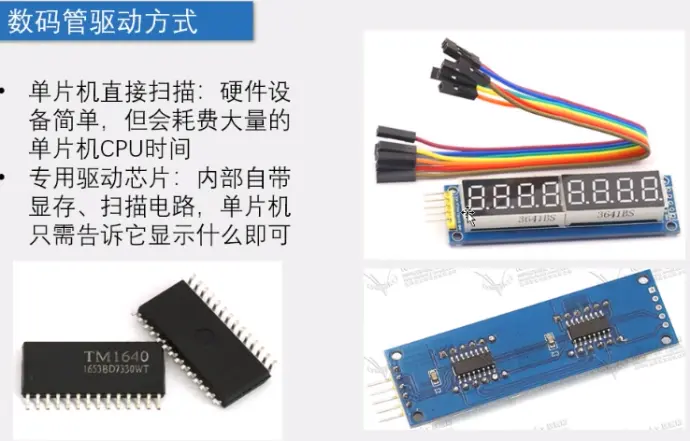
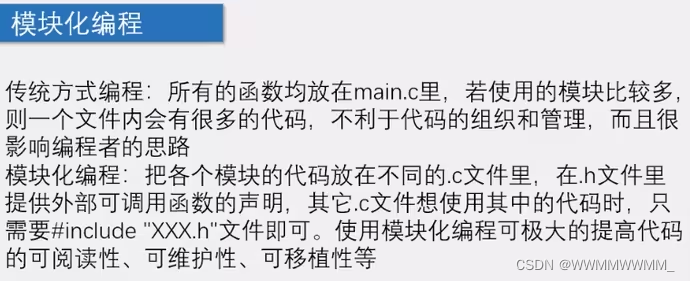
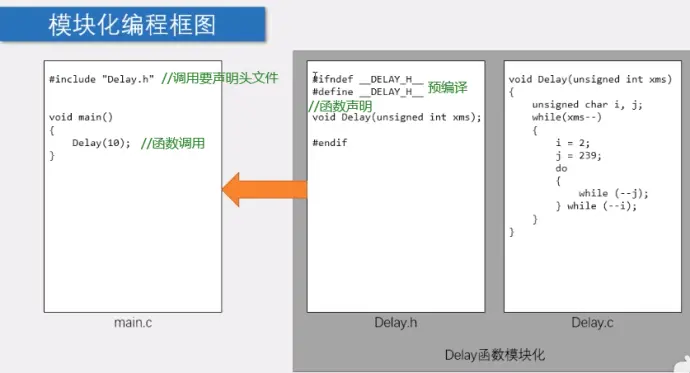
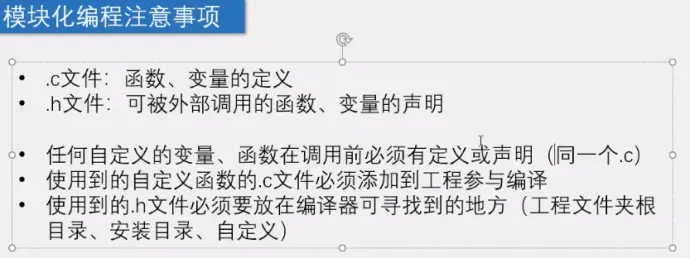
5-1、模块化编程
1)驱动,先会用,后续有详细内容:
2)模块化,功能函数用点C文件写,点H文件声明函数,在main函数文件引入头文件直接调用:
3)注意事项
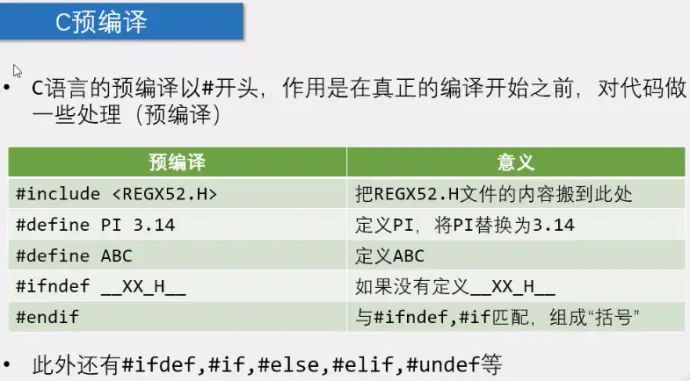
4)预编译
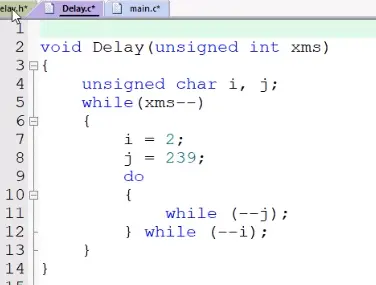
5)延时函数文件
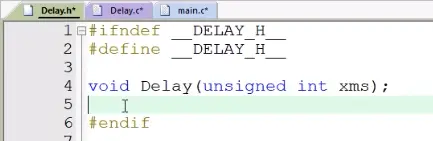
6)头文件延迟
7)主函数文件程序入口:

8)数码管模块,用到的头文件要引用:
9)数码管模块头文件
10)函数调用
11)显示
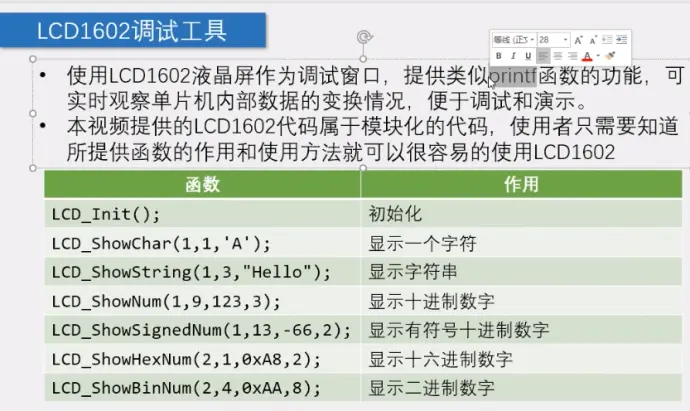
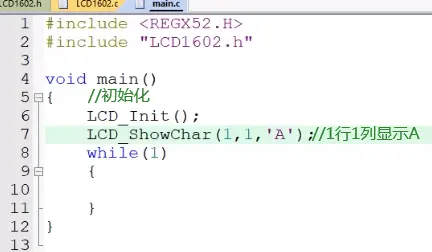
5-2 、LCD1602调试工具-------
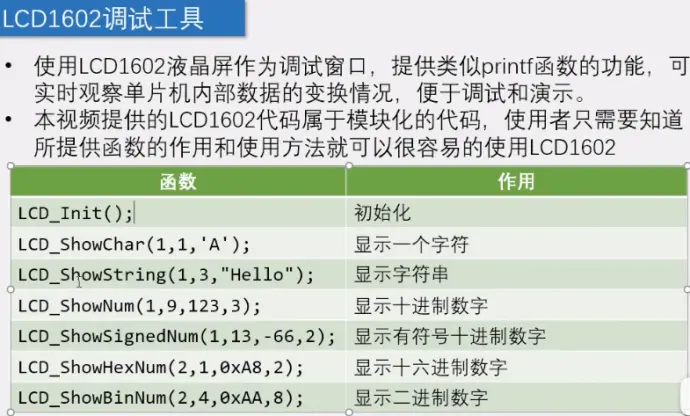
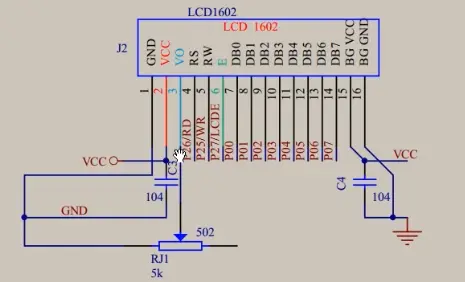
1)调试工具原理图
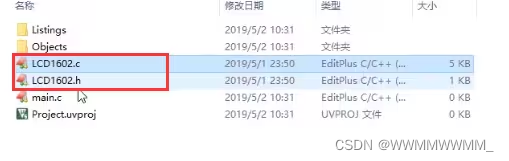
2)模块化代码,下完放到自己工程目录下:
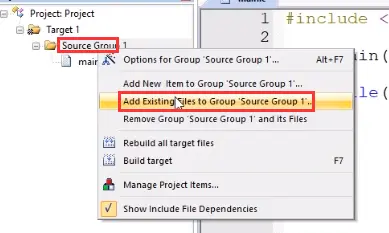
3)将下好的两个文件添加到工程:
4)文件主要内容如下:
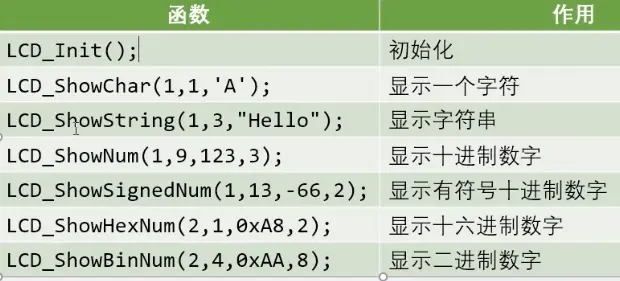
5)main函数调用:
6)显示其他管脚冲突,所有会一起显示:
7)其他函数的调用及功能,可以设置显示位置和范围:
8)需要用到延迟函数:可以直接将前面模块化文件复制到工程目录下,添加进来引用即可;
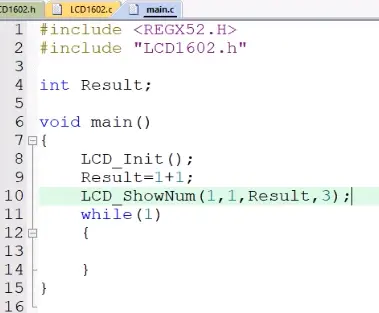
9)娱乐:小计时器
#include #include "LCD1602.h" #include "Delay.h" int Result=0; void main() { LCD_Init();//初始化 while(1) { Result++; Delay(1000); LCD_ShowNum(1,1,Result,3); }//计时器
6-1.矩阵键盘
1)基础介绍:
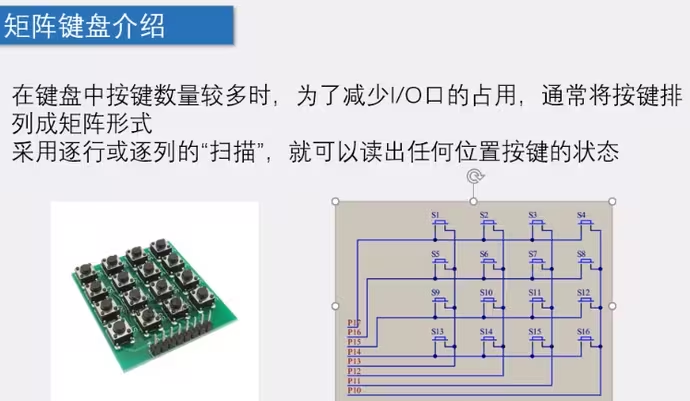
P14-P17给0就代表扫描,其他给1(没选中),一次只能扫描一行;P10-P13给0表示按下,给1表示没按下;(逐列扫描)
2.代码实现:
①:创建工程并把“Delay”与“LCD1602”的模块加入此工程中。
②:编写MatrixKey(矩阵)代码
#include #include "Delay.h" unsigned char MatrixKey() { unsigned char KeyNumber=0; P1=0xff; //按列扫描 P1_3=0; //控制扫描的列 if(P1_7==0){Delay(20);while(P1_7==0);Delay(20);KeyNumber=1;} //while判断何时松手 if(P1_6==0){Delay(20);while(P1_6==0);Delay(20);KeyNumber=5;} if(P1_5==0){Delay(20);while(P1_5==0);Delay(20);KeyNumber=9;} if(P1_4==0){Delay(20);while(P1_4==0);Delay(20);KeyNumber=13;} P1=0xff; P1_2=0; if(P1_7==0){Delay(20);while(P1_7==0);Delay(20);KeyNumber=2;} if(P1_6==0){Delay(20);while(P1_6==0);Delay(20);KeyNumber=6;} if(P1_5==0){Delay(20);while(P1_5==0);Delay(20);KeyNumber=10;} if(P1_4==0){Delay(20);while(P1_4==0);Delay(20);KeyNumber=14;} P1=0xff; P1_1=0; if(P1_7==0){Delay(20);while(P1_7==0);Delay(20);KeyNumber=3;} if(P1_6==0){Delay(20);while(P1_6==0);Delay(20);KeyNumber=7;} if(P1_5==0){Delay(20);while(P1_5==0);Delay(20);KeyNumber=11;} if(P1_4==0){Delay(20);while(P1_4==0);Delay(20);KeyNumber=15;} P1=0xff; P1_0=0; if(P1_7==0){Delay(20);while(P1_7==0);Delay(20);KeyNumber=4;} if(P1_6==0){Delay(20);while(P1_6==0);Delay(20);KeyNumber=8;} if(P1_5==0){Delay(20);while(P1_5==0);Delay(20);KeyNumber=12;} if(P1_4==0){Delay(20);while(P1_4==0);Delay(20);KeyNumber=16;} return KeyNumber; } ③.编写主函数
#include #include "Delay.h" #include "LCD1602.h" #include "matrixKey.h" unsigned char KeyNum; void main() { LCD_Init(); //LCD上电初始化 LCD_ShowString(1,1,"Helloworld"); while(1) { KeyNum=MatrixKey(); if(KeyNum){ LCD_ShowNum(2,1,KeyNum,2); } } } ④.软件使用小技巧
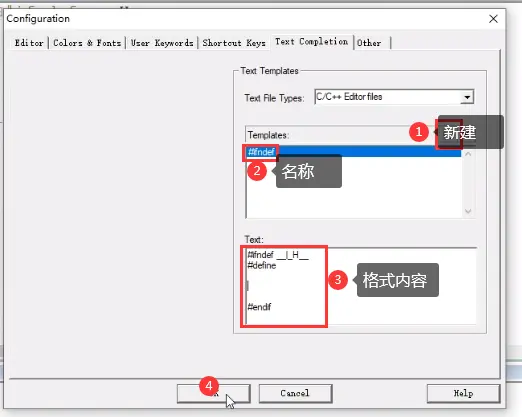
快速生成常用格式代码:
设置,完成后双击就可以生成了:
6-2.矩阵键盘密码锁
1):把6-1文件全部cv到6-2工程文件中
2):代码实现
#include #include "Delay.h" #include "LCD1602.h" #include "matrixKey.h" unsigned char KeyNum; unsigned int Password,count; void main() { LCD_Init(); LCD_ShowString(1,1,"Helloworld"); while(1) { KeyNum=MatrixKey(); if(KeyNum){ if(KeyNum<=10){ //s1~s10按下密码 if(count<4){ Password*=10; Password+=KeyNum%10; //这两句是用来实现四位密码的显示 count++; //计数 防止按下的密码数超过四位 } LCD_ShowNum(2,1,Password,4);//更新显示 } if(KeyNum==11){ //s11设置为确认键 if(Password==2345){ LCD_ShowString(1,14,"OK "); Password=0; //密码清零 count=0; //计数清零 LCD_ShowNum(2,1,Password,4);//更新显示 } else {LCD_ShowString(1,14,"ERR"); Password=0; //密码清零 count=0; //计数清零 LCD_ShowNum(2,1,Password,4);//更新显示 } } if(KeyNum==12){ //定义S12为取消键 Password=0; count=0; LCD_ShowNum(2,1,Password,4); } } } } 7.定时器介绍
1)介绍,Delay前面CPU是一直在等的,用定时器在Delay时可以去检测按键,提高CPU利用率:
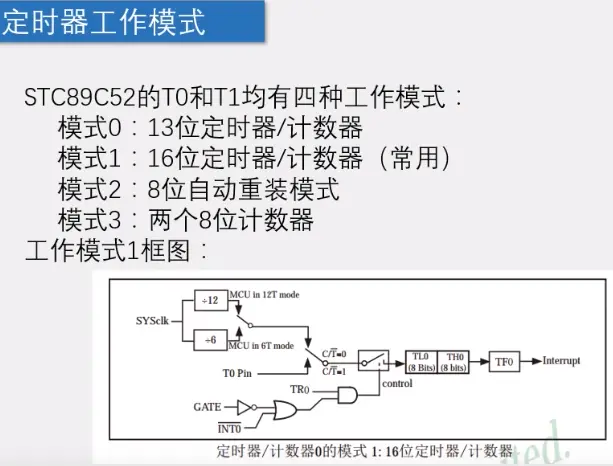
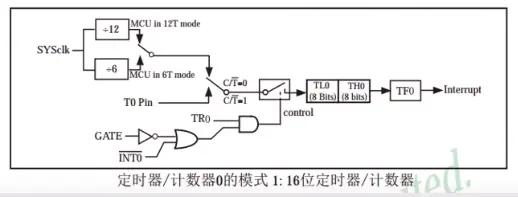
2)模式1最常用:
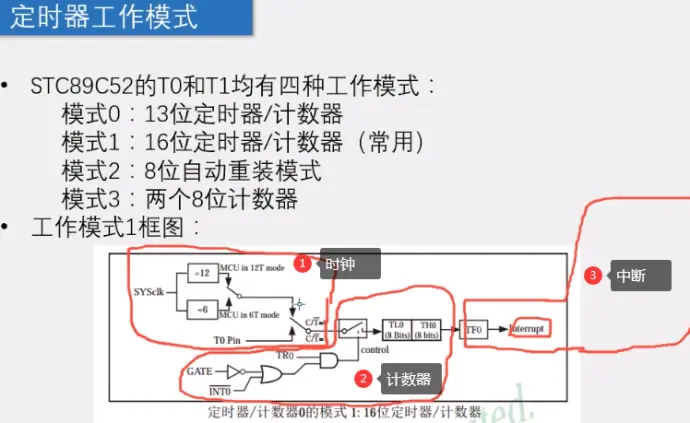
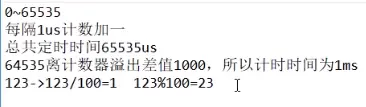
3)模式:时钟--计数最大65535(计数系统TL0\TH0:每来一个脉冲+1方法计数)-TF0(标志位,到最大了回到0)-中断:
4)非门与门图形为控制部分(TR0是否启动暂定)
5)定时器部分:
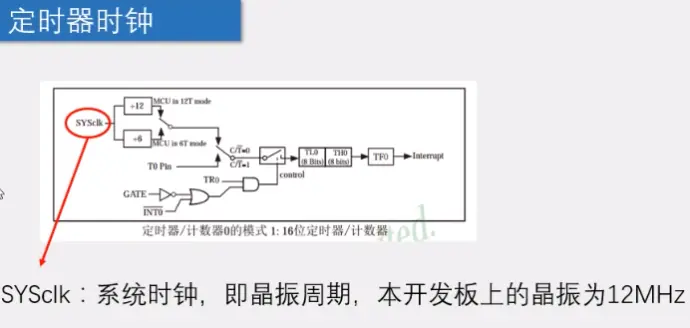
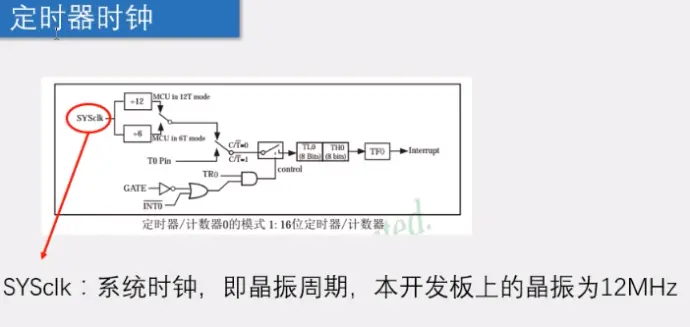
6)时钟可以由系统提供(上图,晶振),也可以由外部T0P提供(如下图引脚)
7)C/T,给1连上面为控制器,给0连接下面为定时器(如下图):
![]()
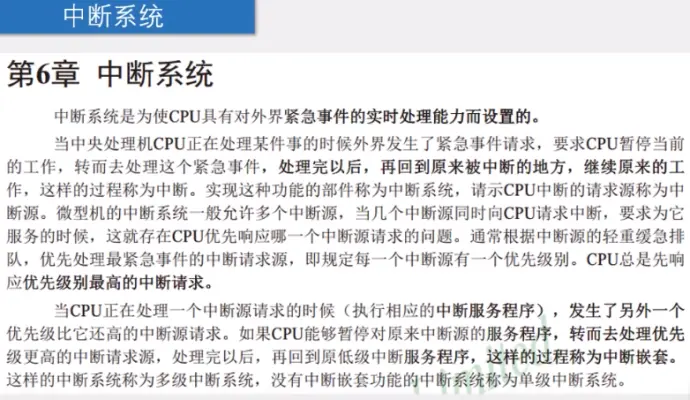
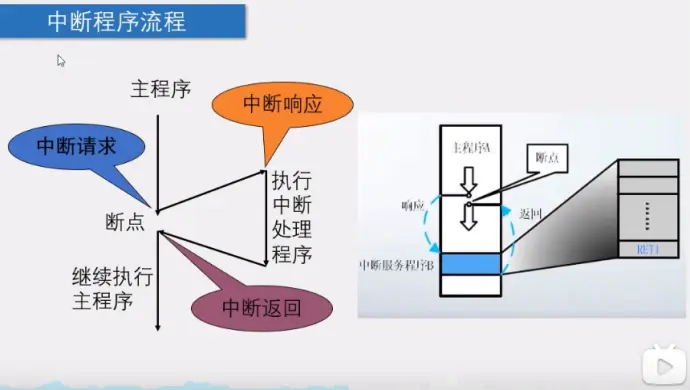
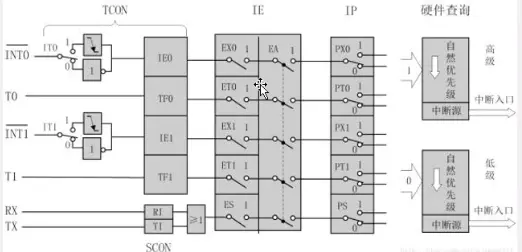
8)中断系统:
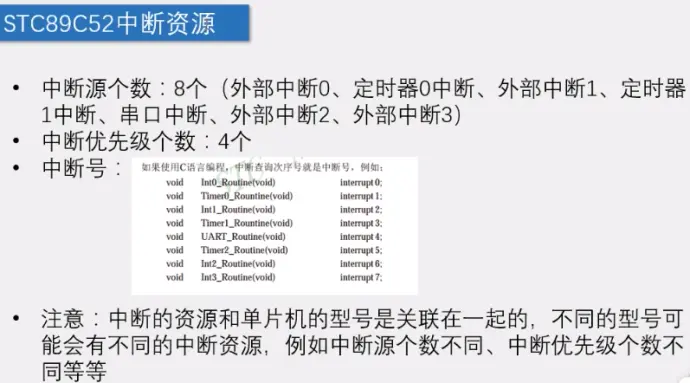
9)中断资源
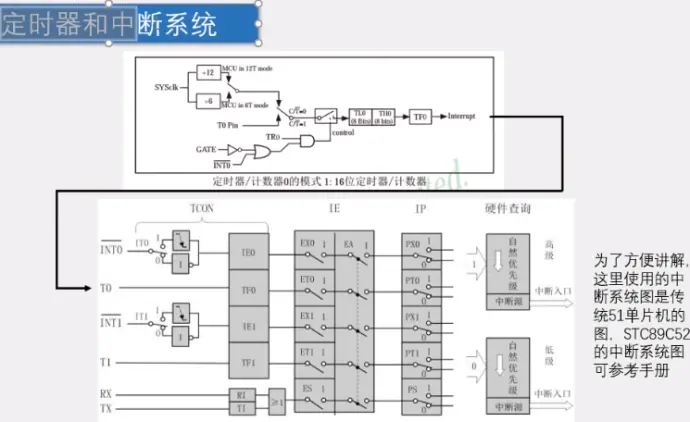
10)定时器和中断系统
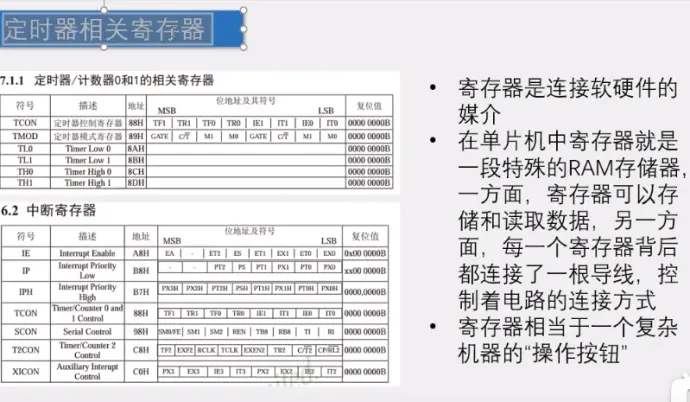
11)定时器相关寄存器
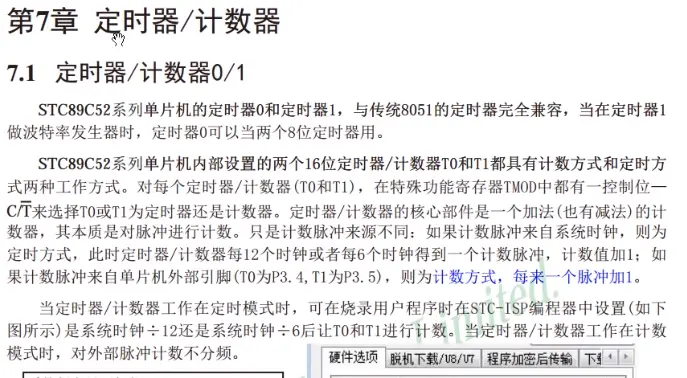
7-1.独立按键控制流水灯的模式
1.TMOD寄存器工作模式,定时器0配置使用(不可位寻址,只能整体赋值)
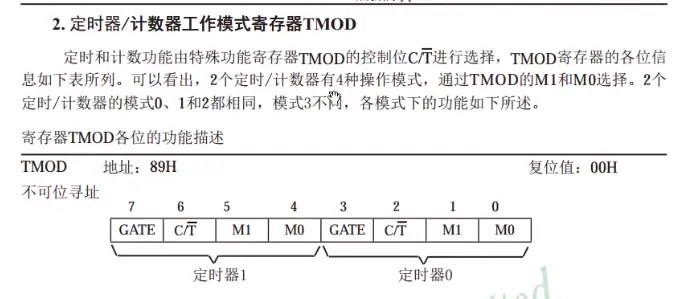
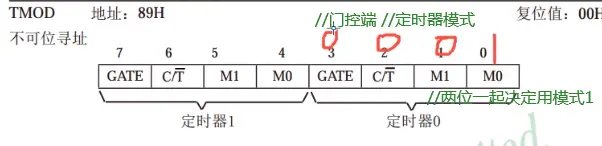
2.定时器模式1:门控端给0,就是tr0单独控制:C/T,T这里有一横表示低电平有效,就给0是用T(定时器模式),给1用C(控制器模式),M1,M0工作模式选择
3.TCON控制寄存器(可位寻址,可以单独每一位赋值)
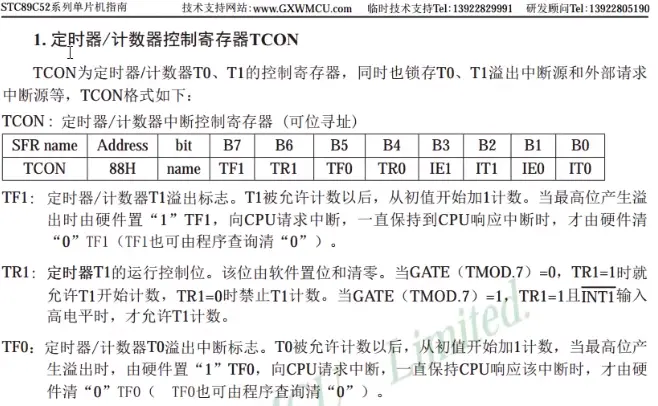
中断溢出标志位:
TF=0(等于1产生中断);
TR0=1(定时器是否开启,给1开始,电机开始工作);
IE0、IT0:控制外部中断引脚,可以不配置
4.定时器配置 TH0\TL0
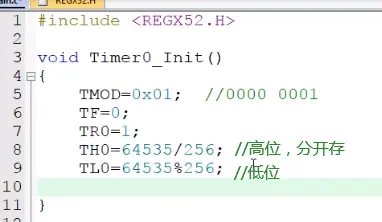
TH0\TL0 分开储存
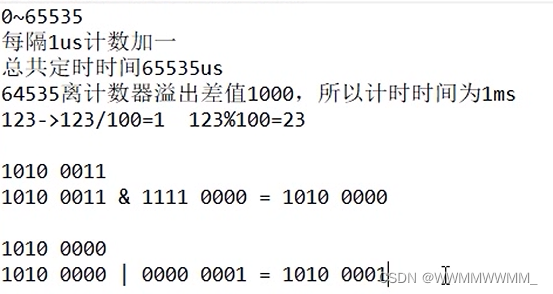
代码优化,TMOD问题(不可位寻址)配置两个的时候,后面的会把前面的覆盖;
因此,可采用“与或”法设定TMOD

5.中断配置T0-->ET0=1--EA=1,PT0=0
6.定时器配置完成,模块化编程
#include void Timer0_Init(void) //1ms@11.0592MHz { TMOD &= 0xF0; //设置定时器模式 TMOD |= 0x01; //设置定时器模式 TL0 = 0x66; //设置定时器初值 TH0 = 0xFC; //设置定时器初值 TF0 = 0; //清除TF0标志 TR0 = 1; //定时器0开始计时 ET0=1; //下面三行为中断的配置 EA=1; PT0=0; }
7.定时器中断函数模板
void Timer0_Routine() interrupt 1 //中断函数 { static unsigned int T0Count; TL0 = 0x66; //设置定时器初值 TH0 = 0xFC; //设置定时器初值 T0Count++; if(T0Count>=1000) //每隔1s { T0Count=0; } }8.独立按键模块
#include #include "Delay.h" unsigned char Key() { unsigned char KeyNumber=0; if(P3_1==0){Delay(20);while(P3_1==0);Delay(20);KeyNumber=1;} if(P3_0==0){Delay(20);while(P3_0==0);Delay(20);KeyNumber=2;} if(P3_2==0){Delay(20);while(P3_2==0);Delay(20);KeyNumber=3;} if(P3_3==0){Delay(20);while(P3_3==0);Delay(20);KeyNumber=4;} return KeyNumber; } 9.主函数
#include #include "Timer0.h" #include "key.h" #include unsigned char KeyNumber,LEDmode; void main() { P2=0xfe; //与INTRINS.H中的循环左右移函数共同实现流水灯 Timer0_Init(); //上电初始化 while(1) { KeyNumber=Key(); if(KeyNumber) { if(KeyNumber==1) { LEDmode++; if(LEDmode>=2) LEDmode=0; } } } } void Timer0_Routine() interrupt 1 //中断函数 { static unsigned int T0Count; TH0=64535/256; TL0=64535%256; T0Count++; if(T0Count>=1000) //每隔1s { T0Count=0; if(LEDmode==0) P2=_crol_(P2,1); if(LEDmode==1) P2=_cror_(P2,1); } } 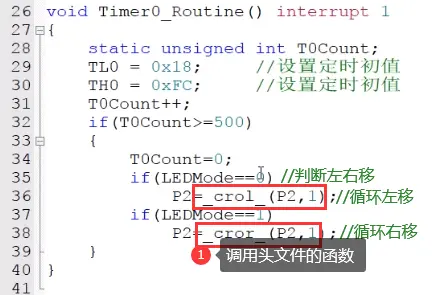
7-2.时钟
1.把LCD1602液晶显示、延迟、定时器、的代码复制到工程目录下,导入;
2.主函数包含其他模块头文件并初始化;

3.复制定时器中断函数到main函数下:
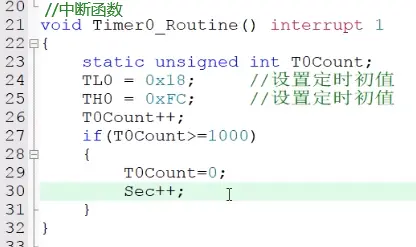
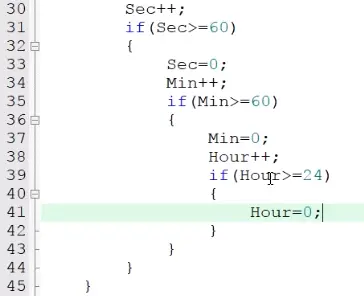
4.定义变量,秒计数、分、小时并显示:

5.代码综合
#include #include "Delay.h" #include "LCD1602.h" #include "Timer0.h" unsigned char Sec,Min,Hour; void main() { LCD_Init();//³õʼ»¯ Timer0_Init(); LCD_ShowString(1,1,"CLOCK:"); LCD_ShowString(2,1," : :"); while(1) { LCD_ShowNum(2,1,Hour,2); LCD_ShowNum(2,4,Min,2); LCD_ShowNum(2,7,Sec,2); } } void Timer0_Routine() interrupt 1 { static unsigned int T0Count; TL0 = 0x66; TH0 = 0xFC; T0Count++; if(T0Count>=1000) { T0Count=0; Sec++; if(Sec>=60) { Sec=0; Min++; if(Min>=60) { Min=0; Hour++; if(Hour>=24) { Hour=0;} } } } }