podman 替代 docker ? centos Stream 10 已经弃用docker,开始用podman了!
👨🎓博主简介
🏅CSDN博客专家
🏅云计算领域优质创作者
🏅华为云开发者社区专家博主
🏅阿里云开发者社区专家博主
💊交流社区:运维交流社区 欢迎大家的加入!
🐋 希望大家多多支持,我们一起进步!😄
🎉如果文章对你有帮助的话,欢迎 点赞 👍🏻 评论 💬 收藏 ⭐️ 加关注+💗
文章目录
- 一、什么是 podman?
- 二、部署 podman
- 三、podman 参数
- 1、podman 镜像管理
- 2、podman容器管理
- 3、podman运行容器命令
- 四、附加:修改podman 存储路径
- 1、podman 中没有数据修改存储路径
- 2、podman 中有数据迁移修改存储路径
- 五、参考文章
一、什么是 podman?

Podman 是一个开源项目,可在大多数 Linux 平台上使用,并位于GitHub 上。Podman 是一个无守护进程的容器引擎,用于在 Linux 系统上开发、管理和运行 Open Container Initiative (OCI) 容器和容器映像。Podman 提供了一个与 Docker 兼容的命令行前端,它可以简单地为 Docker cli ,alias docker=podman。Podman 还提供了一个套接字激活的 REST API 服务,以允许远程应用程序启动按需容器。此 REST API 还支持 Docker API,允许 docker-py 和 docker-compose 的用户与 Podman 作为服务进行交互。
Podman 控制下的容器可以由 root 或非特权用户运行。Podman 使用libpod库管理整个容器生态系统,包括 pod、容器、容器映像和容器卷。Podman 专注于帮助您维护和修改 OCI 容器镜像的所有命令和功能,例如拉取和标记。它允许您在生产环境中创建、运行和维护从这些映像创建的容器。
Podman 服务仅在 Linux 平台上运行,但 podman 远程 REST API 客户端存在于 Mac 和 Windows 平台上,并且可以通过 ssh 与运行在 Linux 机器或 VM 上的 Podman 服务进行通信。Mac 客户端。
二、部署 podman
正常 centos Stream 10里面是自带的有podman服务的;目前只知道 centos Stream8-10 系统会自带podman服务,其他系统没安装过,可自行查看
podman --version。
离线安装:podman 离线安装包
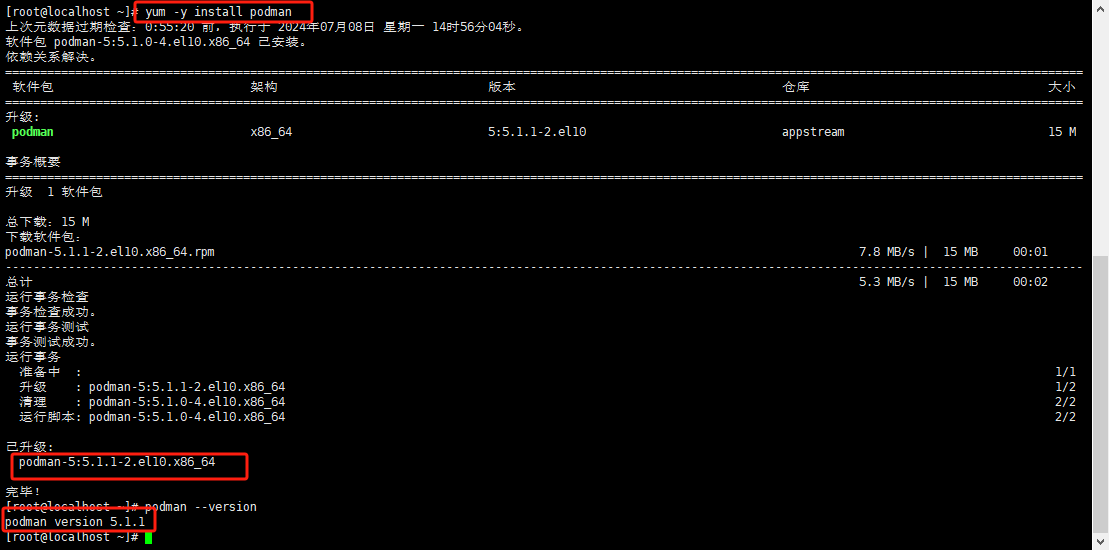
Podman 在 CentOS 8 和 Stream 的 AppStream 存储库中可用,可直接进行yum安装。
# 安装podman yum -y install podman # 查看podman版本号 podman --version 
这样就安装成功了;
- 启动服务并配置开机自启
# 设置开机自启 systemctl enable podman # 启动podman服务 systemctl start podman # 重启podman服务 systemctl restart podman # 停止podman服务 systemctl stop podman # 查看podman服务状态() systemctl status podman 三、podman 参数
podman常用参数和docker常用参数都是一样的;这里举例几个就行,具体的可以查看docker的命令参数:linux(centos)中部署docker(步骤超全,含带一些发展史和一些概念),查看后面的docker镜像管理、docker容器管理、docker运行容器命令。
1、podman 镜像管理
#列出所有的镜像 [root@podman ~]# podman images REPOSITORY TAG IMAGE ID CREATED SIZE REPOSITORY:表示镜像的仓库源 TAG:镜像的标签 IMAGE ID:镜像ID CREATED:镜像创建时间 SIZE:镜像大小 | 命令 | 作用 | 举例 | 选项 |
|---|---|---|---|
| podman search | 搜索镜像 | podman search busybox | -f 按条件过滤 |
| podman pull | 拉取镜像 | podman pull busybox:latest | |
| podman push | 推送镜像到仓库 | podman push busybox:latest | |
| podman tag | 为镜像修改或制作标签 | podman tag busybox:latest busybox:v1 | |
| podman rmi | 删除镜像 | podman rmi busybox:v1 | |
| podman save | 将镜像保存为tar包 | podman save -o centos7.tar centos:7 | -o 指定生成tar包名称 |
| podman load | 将tar包保存的镜像导入 | podman load -i centos.tar | -i 指定读取的tar包名称 |
| podman import | 通过一个tar包创建镜像 | podman import centos-7.tar.gz centos7:v1 | |
| podman histroy | 查看镜像创建的历史 | podman history centos:7 |
podman中还提供了专门管理镜像的子命令podman image,用法与podman命令类似。
| podman image 命令 | 说明 |
|---|---|
| podman images | 列出所有镜像 |
| podman image ls | 列出所有镜像 |
| podman image pull | 拉取镜像 |
| podman image load | 导入镜像 |
| podman image rm | 删除镜像 |
| podman image inspect | 查看镜像的详细信息 |
| podman image histroy | 查看镜像的创建记录 |
| podman image push | 拉取镜像 |
| podman image save | 导出镜像 |
| podman image tag | 设置标签(修改版本) |
| podman image prune | 删除未使用的镜像 |
| podman image build | podmanfile构建镜像 |
2、podman容器管理
| podman container命令 | 说明 | 举例 | 选项 |
|---|---|---|---|
| podman ps -a | 查看所有的容器 | ||
| docekr ps | 查看所有的正在运行的容器 | ||
| podman container ls | 查看运行的容器 | podman container ls | -a/-q |
| podman container create | 创建容器但不运行 | podman container create nginx | |
| podman container start | 启动容器 | podman start nginx | |
| podman container stop | 关闭容器 | podman stop nginx | |
| podman container restart | 重启容器 | podman restart nginx | |
| podman container inspect | 查看容器的信息 | podman inspect nginx | |
| podman container rm | 删除容器 | podman rm -f nginx | -f强制删除 |
| podman container rename | 给容器重命名 | podman rename nginx nginx2 | |
| podman container prune | 删除没有运行的容器 | ||
| podman container pause | 暂停容器运行(挂起) | ||
| podman container unpause | 继续运行容器 | ||
| podman container port | 列出端口映射 | podman port nginx2 | |
| podman container logs | 获取容器日志信息 | podman logs nginx2 | |
| podman container kill | 杀死正在运行的容器 | podman kill nginx2 | |
| podman container stats | 查看容器资源使用情况 | podman stats nginx2 | |
| podman container top | 查看容器的进程 | podman top nginx2 | |
| podman container diff | 对比容器文件变化 podman diff nginx nginx2 | ||
| podman container cp | 容器与主机间文件复制 | podman cp a.txt nginx:/home/ | |
| podman container exec | 创建容器 | podman exec -itd–name nginx nginx:v1创建容器并运行 | |
| podman container export | 容器文件导出为tar | podman export nginx.tar nginx | |
| podman container commit | 提交容器变化为新镜像 | podman commit nginx | |
| podman container update | 更新容器配置 | podman update --restart=always nginx | |
| podman container wait | 阻塞容器 | ||
| podman container run | 运行一个podman容器 | podman run -itd --name nginx nginx:v1 |
3、podman运行容器命令
podman container run命令是根据指定镜像创建一个容器并启动运行。如果本地没有该镜像,则从podman仓库中拉去镜像。所以
podman container run = podman image pull + podman container create + podman container start
命令格式:podman container run [选项] 镜像名称|镜像ID [command]
常用选项:
| 参数 | 解析 |
|---|---|
| -d | 后台运行容器,返回容器ID,运行守护进程式容器 |
| -i | 以交互模式运行容器,通常与 -t 同时使用; |
| -t | 为容器重新分配一个伪输入终端,通常与 -i 同时使用; |
| -P | 随机映射端口,容器内部端口随机映射为主机端口 |
| -p | 指定端口映射, -p 主机端口:容器端口 |
| - -expose | 指定暴露端口或端口范围 |
| - -name | 指定生成容器的名称 |
| -h | 指定容器的主机名称 |
| -v | 映射容器外与容器内的目录 |
| - -net | 指定podman网络模式(bridge/host/none/container) |
| - -restart | 指定是否开机自启 |
| - -privileged | 使用该参数,container内的root拥有真正的root权限。 |
| - -dns | 指定DNS服务器地址,默认与主机一致 |
| -e | 设置环境变量 |
| - -env-file | 从指定文件读取环境变量 |
1.运行交互式容器 [root@podman ~]# podman container run -it --name='centos-1' centos:7 /bin/bash [root@3ad7e1a5e55f /]# 直接退出,运行exit,容器会结束运行 [root@podman ~]# podman container ls -a CONTAINER ID IMAGE COMMAND CREATED STATUS PORTS NAMES 3ad7e1a5e55f centos:7 "/bin/bash" 39 seconds ago Exited (0) 6 seconds ago centos-1 可以使用podman container start命令启动容器 [root@podman ~]# podman container start centos-1 centos-1 [root@podman ~]# podman container ls -a CONTAINER ID IMAGE COMMAND CREATED STATUS PORTS NAMES 3ad7e1a5e55f centos:7 "/bin/bash" About a minute ago Up 2 seconds centos-1 运行容器,不结束容器退出 [root@podman ~]# podman container run -it --name='centos-2' centos:7 /bin/bash [root@764b82cb892f /]#(ctrl+pq) 2.启动守护进程式容器 [root@podman ~]# podman container run -d nginx:latest cef133be2d53c0d4921ceba34855e7dc250984191d10d3dfedf82195e9d85d3c [root@podman ~]# podman ps -a CONTAINER ID IMAGE COMMAND CREATED STATUS PORTS NAMES cef133be2d53 nginx:latest "/podman-entrypoint.…" 6 seconds ago Up 5 seconds 80/tcp relaxed_lichterman 764b82cb892f centos:7 "/bin/bash" 3 minutes ago Up 3 minutes centos-2 3ad7e1a5e55f centos:7 "/bin/bash" 5 minutes ago Up 4 minutes centos-1 四、附加:修改podman 存储路径
podman和docker一样,默认都是存在与/var/lib/下的,一般镜像和容器都很大,可能会导致根磁盘空间占用过大,如果/根目录下空间满了,我们就要考虑给容器和镜像换位置;一般来说/根目录起初不会设置的很大,后续都会再加硬盘来扩容空间,所以这时候我们挂了一个磁盘,要把podman数据存储到比如/data/podman下,那么就如下操作就可以了;
1、podman 中没有数据修改存储路径
- 打开 Podman 配置文件
没有就创建一个
sudo vim /etc/containers/storage.conf - 编辑存储配置:
[storage] driver = "overlay" runroot = "/data/podman/containers/run" graphroot = "/data/podman/containers/storage" - 重新加载并启动podman服务
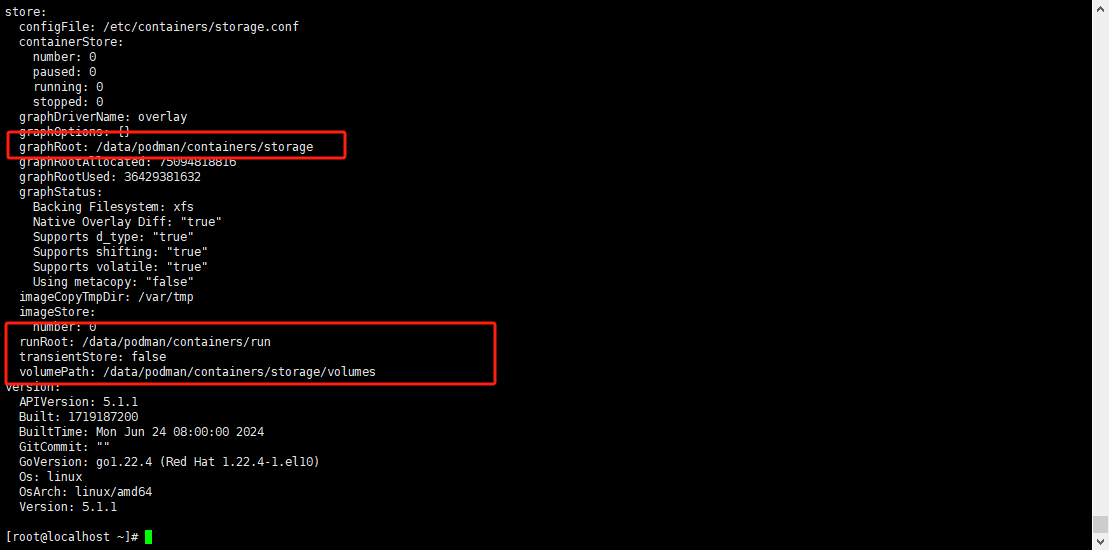
sudo systemctl daemon-reload sudo systemctl restart podman - podman info 查看docker配置路径
sudo podman info 
这样就修改成功了,如果不放心可以ls /data/podman/containers/storage/看看;
- 查看 podman 服务运行状态
systemctl status podman 
运行状态,那么就没问题了,接下来可以试试拉取镜像或者导入镜像;
2、podman 中有数据迁移修改存储路径
注意:如果podman中已经存在了数据,那么就需要吧
/var/lib/containers下的和podman相关的都挪到新的存储目录下然后在修改boltdb数据库里配置并重启数据库和podman服务方可生效;
切记:先移动或复制 --》 在修改配置文件 --》 在修改boltdb数据库 --》 在重启服务。
podman在数据库中可能会存储有运行配置,默认是在/var/lib/containers/storage/libpod/bolt_state.db中的,所以如果该数据库中存储了运行配置,则只修改了/etc/containers/storage.conf中的配置是不起作用的,podman会优先使用数据库中存储的配置,这点很坑。我们在修改了/etc/containers/storage.conf中的配置后,将在/var/lib/containers/复制到修改的路径下,重启之后,可以使用如下的命令来查看详细信息:
# 创建一个storage.conf文件 sudo vim /etc/containers/storage.conf # 编辑配置文件 [storage] driver = "overlay" runroot = "/data/podman/containers/run" graphroot = "/data/podman/containers/storage" # 重启podman服务 sudo systemctl daemon-reload sudo systemctl restart podman # 查看podman服务状态 systemctl status podman 
没有启动起来,报错了;
# 查看podman报错详细信息 sudo podman info --log-level=debug 
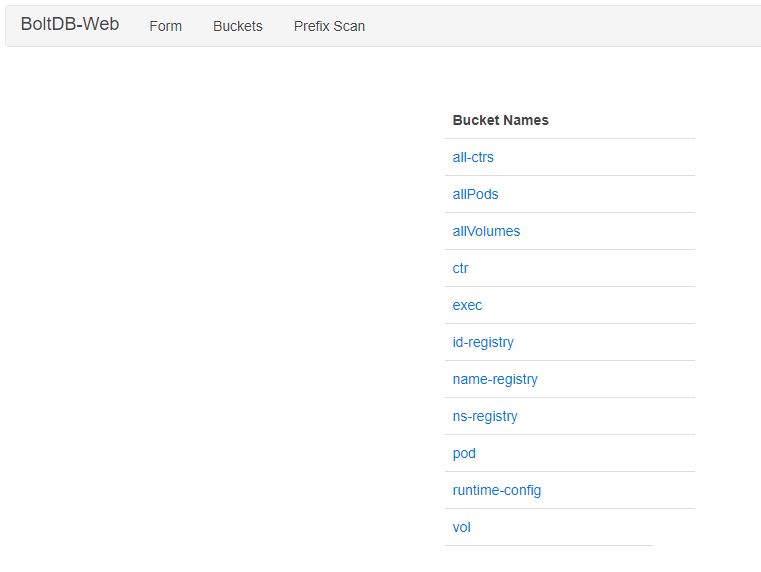
所以如果bolt数据库存储了相关配置,那么无论怎么修改/etc/containers/storage.conf中的配置都会被重载而不起作用。bolt_state.db又是一种小众的数据库,格式为bolt,目前BoltDB不支持直接修改和查看数据库内容,需要使用专门的bolt数据库工具才能查看和修改。
https://github.com/etcd-io/bbolt 页面罗列了不少bolt工具,笔者选用了boltdbweb这款Go写的Web工具来查看和修改。

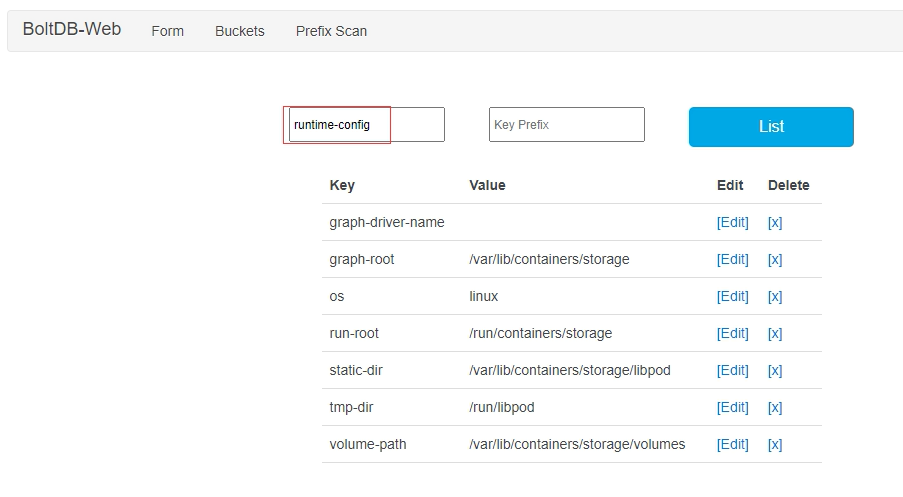
打开runtime-config可以看到里面有graph-root就是podman的存储路径;

这里可以修改graph root、static dir和volume path配置,也可以直接删除掉,让podman直接使用/etc/containers/storage.conf中的配置。
注意,bolt_state.db文件非常重要,如果之前已经有很多容器,则里面存储了很多非常重要的信息,如果丢失,则之前的容器就废了,所以在操作前一定要备份。
修改数据库这边我没有弄,参考的: 改变podman的存储路径 - witton,总之,如果数据多的话先备份,而且并不建议更换。
五、参考文章
| 文件名 | 文件连接 |
|---|---|
| 改变podman的存储路径 - witton | https://blog.csdn.net/witton/article/details/128497746 |
