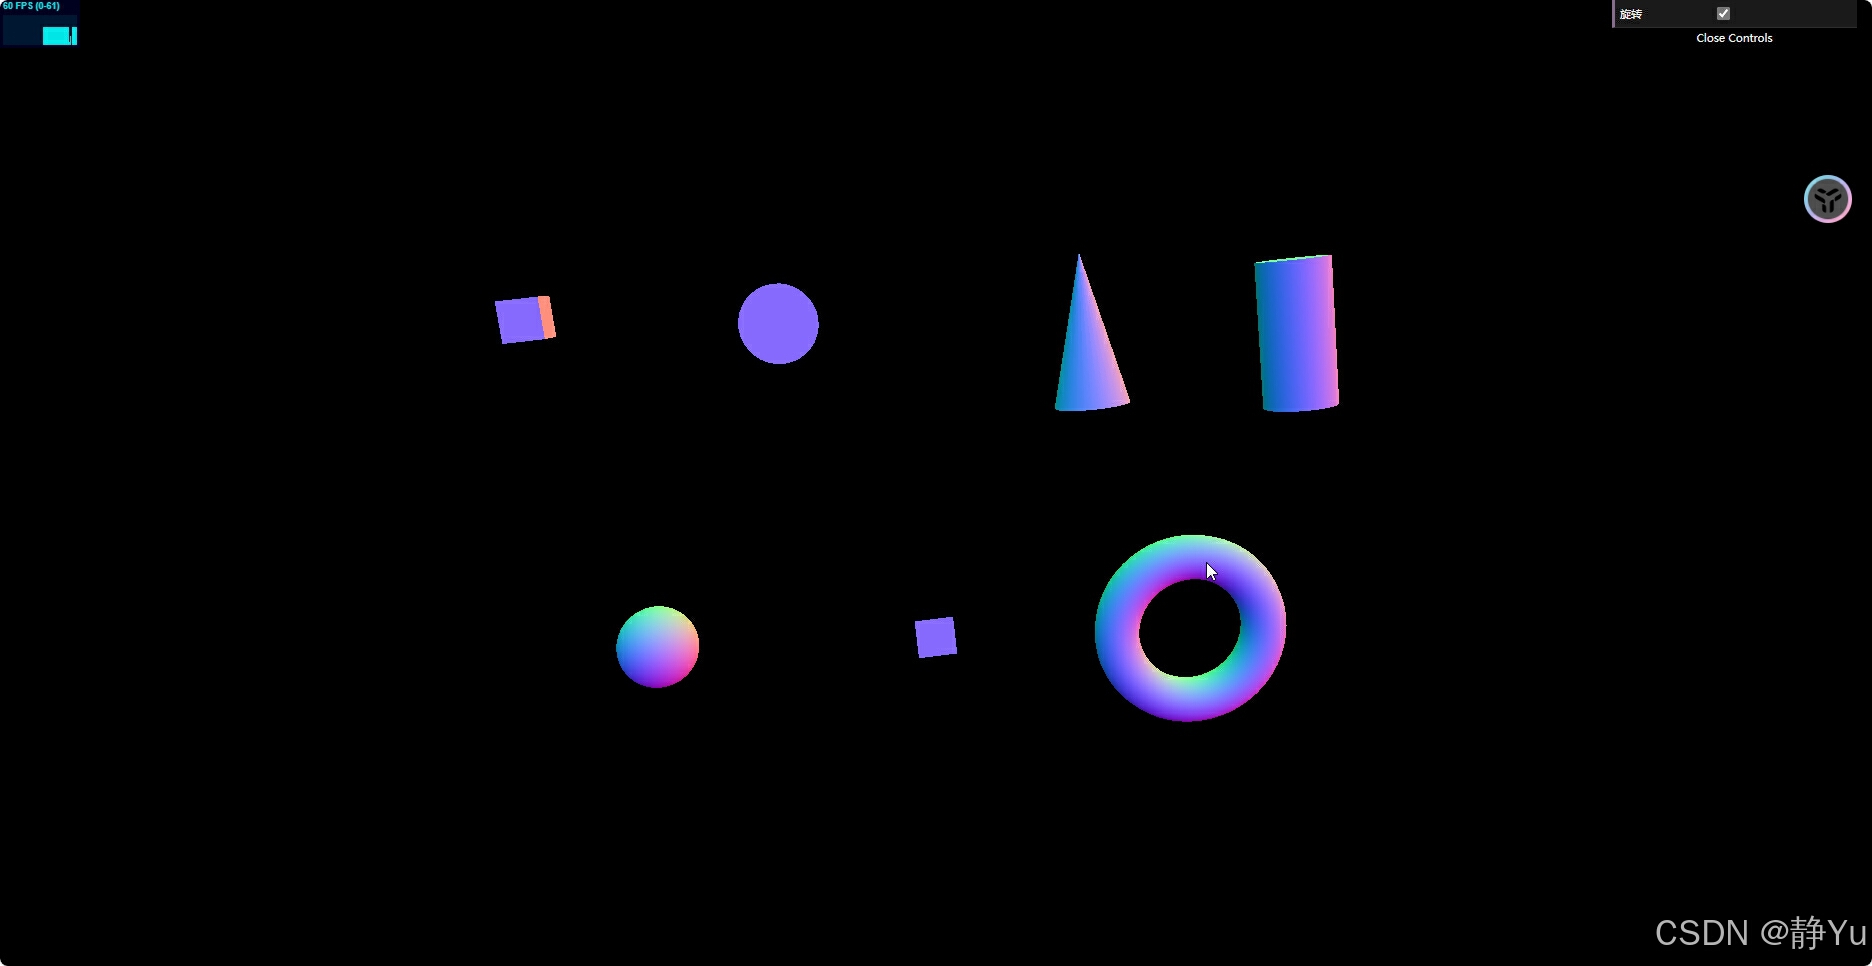
three.js创建基础模型
场景是一个三维空间,是所有物品的容器。可以将其想象成一个空房间,里面可以放置要呈现的物体、相机、光源等。
通过new THREE.Scene()来创建一个新的场景。
/* *1. 创建场景 -- 放置物体对象的环境 */ const scene = new THREE.Scene(); 场景只是一个三维的空间,或者说是一个容器,你还需要往里面填充一些3D物体。就好比是一个新的房子,场景就是一个空的房子,只是一个空间,你还需要添置一些家居和生活用品。
渲染器
创建渲染器 使用THREE.WebGLRenderer()构造函数创建一个WebGL渲染器对象。
设置渲染器参数 可以设置渲染器的一些参数,比如是否启用alpha通道、抗锯齿等。
设置渲染器大小 使用setSize方法设置渲染器输出的宽度和高度,通常与浏览器窗口的尺寸相匹配。
将渲染器添加到DOM 将渲染器生成的元素添加到HTML文档中,通常是添加到body或某个指定的容器元素内。
//初始化渲染器 function initRenderer() { renderer = new THREE.WebGLRenderer(); //实例化渲染器 renderer.setSize(window.innerWidth, window.innerHeight); //设置宽和高 document.body.appendChild(renderer.domElement); //添加到dom } 相机
在Three.js中初始化一个相机是创建3D场景的重要步骤之一。相机的作用是从特定的角度和位置观察3D场景,类似于现实世界中的摄影机。
最常用的相机类型是THREE.PerspectiveCamera,它模拟了人眼的透视效果。
function initCamera() { camera = new THREE.PerspectiveCamera(45, window.innerWidth / window.innerHeight, 0.1, 200); //实例化相机 camera.position.set(0, 0, 150); } 该函数用于初始化相机,使用THREE.PerspectiveCamera创建一个透视相机,通过设置相机的视野角度、宽高比、近平面和远平面来调整相机的属性。然后使用camera.position.set方法设置相机的位置为(0, 0, 150)。
创建模型
创建了一个新的Three.js材质对象,类型为MeshNormalMaterial。这个对象将用于在WebGL中渲染3D模型,其颜色会根据模型的法线方向来计算,呈现出一种正常的材质效果。
var material = new THREE.MeshNormalMaterial(); 创建立方体
BoxGeometry 是四边形的原始几何类,它通常使用构造函数所提供的 “width”、“height”、“depth” 参数来创建立方体或者不规则四边形。
//创建立方体 box = new THREE.Mesh(new THREE.BoxGeometry(5, 5, 5), material); box.position.set(-50, 20, 0); scene.add(box); BoxGeometry(width : Float, height : Float, depth : Float, widthSegments : Integer, heightSegments : Integer, depthSegments : Integer)
width — X 轴上面的宽度,默认值为 1。
height — Y 轴上面的高度,默认值为 1。
depth — Z 轴上面的深度,默认值为 1。
widthSegments — (可选)宽度的分段数,默认值是 1。
heightSegments — (可选)高度的分段数,默认值是 1。
depthSegments — (可选)深度的分段数,默认值是 1。
创建圆
CircleGeometry是欧式几何的一个简单形状,它由围绕着一个中心点的三角分段的数量所构造,由给定的半径来延展。 同时它也可以用于创建规则多边形,其分段数量取决于该规则多边形的边数。
//创建圆 circle = new THREE.Mesh(new THREE.CircleGeometry(5, 32), material); circle.position.set(-20, 20, 0); scene.add(circle); CircleGeometry(radius : Float, segments : Integer, thetaStart : Float, thetaLength : Float)
radius — 圆形的半径,默认值为1
segments — 分段(三角面)的数量,最小值为3,默认值为32。
thetaStart — 第一个分段的起始角度,默认为0。(three o’clock position)
thetaLength — 圆形扇区的中心角,通常被称为“θ”(西塔)。默认值是2*Pi,这使其成为一个完整的圆。
创建圆锥
ConeGeometry一个用于生成圆锥几何体的类。
cone = new THREE.Mesh(new THREE.ConeGeometry(5, 20, 32), material); cone.position.set(20, 20, 0); scene.add(cone); ConeGeometry(radius : Float, height : Float, radialSegments : Integer, heightSegments : Integer, openEnded : Boolean, thetaStart : Float, thetaLength : Float)
radius — 圆锥底部的半径,默认值为1。
height — 圆锥的高度,默认值为1。
radialSegments — 圆锥侧面周围的分段数,默认为32。
heightSegments — 圆锥侧面沿着其高度的分段数,默认值为1。
openEnded — 一个Boolean值,指明该圆锥的底面是开放的还是封顶的。默认值为false,即其底面默认是封顶的。
thetaStart — 第一个分段的起始角度,默认为0。(three o’clock position)
thetaLength — 圆锥底面圆扇区的中心角,通常被称为“θ”(西塔)。默认值是2*Pi,这使其成为一个完整的圆锥。
创建圆柱
CylinderGeometry一个用于生成圆柱几何体的类。
cylinder = new THREE.Mesh(new THREE.CylinderGeometry(5, 5, 20, 32), material); cylinder.position.set(50, 20, 0); scene.add(cylinder); CylinderGeometry(radiusTop : Float, radiusBottom : Float, height : Float, radialSegments : Integer, heightSegments : Integer, openEnded : Boolean, thetaStart : Float, thetaLength : Float)
radiusTop — 圆柱的顶部半径,默认值是1。
radiusBottom — 圆柱的底部半径,默认值是1。
height — 圆柱的高度,默认值是1。
radialSegments — 圆柱侧面周围的分段数,默认为32。
heightSegments — 圆柱侧面沿着其高度的分段数,默认值为1。
openEnded — 一个Boolean值,指明该圆锥的底面是开放的还是封顶的。默认值为false,即其底面默认是封顶的。
thetaStart — 第一个分段的起始角度,默认为0。(three o’clock position)
thetaLength — 圆柱底面圆扇区的中心角,通常被称为“θ”(西塔)。默认值是2*Pi,这使其成为一个完整的圆柱。
创建球
SphereGeometry一个用于生成球体的类。
sphere = new THREE.Mesh(new THREE.SphereGeometry(5, 32, 32), material); sphere.position.set(-35, -20, 0); scene.add(sphere); SphereGeometry(radius : Float, widthSegments : Integer, heightSegments : Integer, phiStart : Float, phiLength : Float, thetaStart : Float, thetaLength : Float)
radius — 球体半径,默认为1。
widthSegments — 水平分段数(沿着经线分段),最小值为3,默认值为32。
heightSegments — 垂直分段数(沿着纬线分段),最小值为2,默认值为16。
phiStart — 指定水平(经线)起始角度,默认值为0。。
phiLength — 指定水平(经线)扫描角度的大小,默认值为 Math.PI * 2。
thetaStart — 指定垂直(纬线)起始角度,默认值为0。
thetaLength — 指定垂直(纬线)扫描角度大小,默认值为 Math.PI。
该几何体是通过扫描并计算围绕着Y轴(水平扫描)和X轴(垂直扫描)的顶点来创建的。 因此,不完整的球体(类似球形切片)可以通过为phiStart,phiLength,thetaStart和thetaLength设置不同的值来创建, 以定义我们开始(或结束)计算这些顶点的起点(或终点)。
创建平面
PlaneGeometry一个用于生成平面几何体的类。
plane = new THREE.Mesh(new THREE.PlaneGeometry(5, 5), material); plane.position.set(0, -20, 0); scene.add(plane); PlaneGeometry(width : Float, height : Float, widthSegments : Integer, heightSegments : Integer)
width — 平面沿着 X 轴的宽度。默认值是 1。
height — 平面沿着 Y 轴的高度。默认值是 1。
widthSegments — (可选)平面的宽度分段数,默认值是 1。
heightSegments — (可选)平面的高度分段数,默认值是 1。
创建圆环
TorusGeometry一个用于生成圆环几何体的类。
torus = new THREE.Mesh(new THREE.TorusGeometry(10, 3, 16, 100), material); torus.position.set(35, -20, 0); scene.add(torus); TorusGeometry(radius : Float, tube : Float, radialSegments : Integer, tubularSegments : Integer, arc : Float)
radius - 环面的半径,从环面的中心到管道横截面的中心。默认值是1。
tube — 管道的半径,默认值为0.4。
radialSegments — 管道横截面的分段数,默认值为12。
tubularSegments — 管道的分段数,默认值为48。
arc — 圆环的圆心角(单位是弧度),默认值为Math.PI * 2。
运行动画
requestAnimationFrame(animate)循环调用自身,实现动画的连续渲染。
在每次函数调用中,首先判断变量rotate是否为真,如果为真,则将step变量的值增加0.02。然后,根据step的值设置每个模型的转向,包括box、circle、cone、cylinder、sphere、plane和torus。这些模型的转向通过rotation.set(step, step, step)方法实现。
接下来,函数调用stats.update()来更新性能检测框,用于显示动画的帧率等性能信息。
最后,函数通过调用renderer.render(scene, camera)方法来渲染动画界面,其中scene表示场景,camera表示摄像机。
整个函数通过不断循环调用自身,更新模型的转向,渲染动画界面,并更新性能信息,从而实现动画的播放效果。
var step = 0; //记录旋转的角度 function animate() { requestAnimationFrame(animate); //循环调用函数 //判断是否可以旋转 if (rotate) { step += 0.02; //设置每一个模型的转向 box.rotation.set(step, step, step); circle.rotation.set(step, step, step); cone.rotation.set(step, step, step); cylinder.rotation.set(step, step, step); sphere.rotation.set(step, step, step); plane.rotation.set(step, step, step); torus.rotation.set(step, step, step); } stats.update(); //更新性能检测框 renderer.render(scene, camera); //渲染界面 } 性能检测和调试框
initStats()函数用于创建一个Stats对象,该对象用于显示性能统计信息,如帧率等。然后将创建的Stats对象的DOM元素添加到HTML文档的body中,以便在页面上显示性能统计信息。
initGui()函数用于创建一个图形用户界面(GUI),该界面可以用于控制某些参数。在函数中,首先定义了一个名为controls的对象,该对象包含一个属性rotate,用于控制是否启用旋转。然后创建了一个dat.GUI对象,并通过gui.add方法将controls对象的rotate属性添加到GUI界面中,并设置了该属性的名称为"旋转"。最后,通过回调函数onChange来更新rotate变量的值,以便在参数改变时能够相应地更新场景。
//性能检测框 function initStats() { stats = new Stats(); document.body.appendChild(stats.dom); } //创建调试框 function initGui() { controls = { rotate: true }; gui = new dat.GUI(); gui.add(controls, "rotate").name("旋转").onChange(function (e) { rotate = e; }); } 