QT初体验:手把手带你写一个自己的串口助手
前言
本文记录一下用QT Creator 写一个基本功能齐全的串口助手的过程,整个工程只有几百行代码,跟着做下来对新手来说可以更快了解整个QT项目的开发过程和一些常用控件的使用方法。对新手学习QT能增强信心,话不多说,正文开始
先看成品: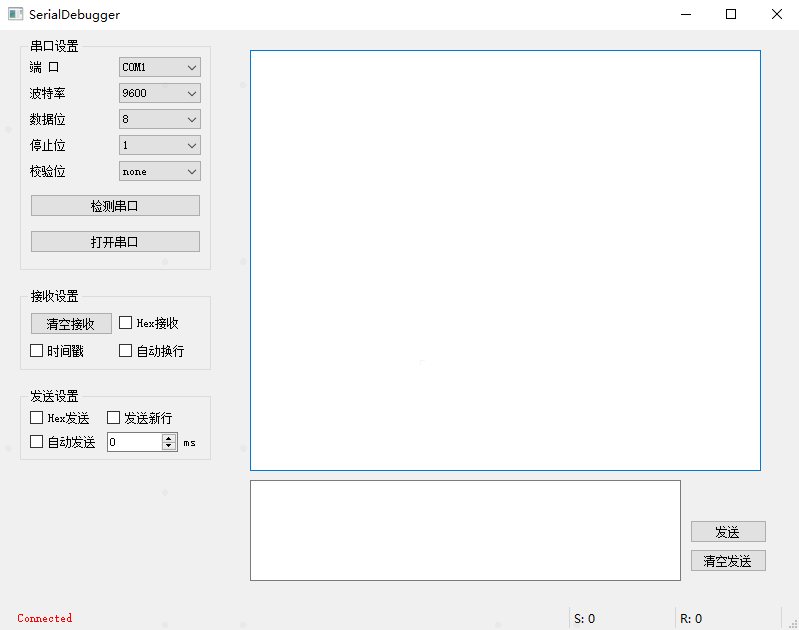
制作过程
1. 布局UI界面
(1) 创建QMainWindow工程。这一步就不赘述了,参考:QT C++入门学习(1) QT Creator安装和使用
创建项目时项目名称可以设为Serial,基类可以选择QMainWindow也可以选择Qwiget。
注意默认勾选“Generate form”,生成 ui 窗体文件 mainwindow.ui 后面要用到。
完成后项目文件展示: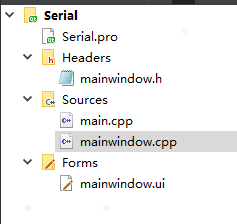
(2)双击mainwindow.ui打开UI布局界面,从左侧控件选择区找到需要的控件拖动到界面设计区的对应位置
(请注意:以下提到的摆放位置只放大概位置即可,因为必须借用布局工具才能规正)
找到Label控件:
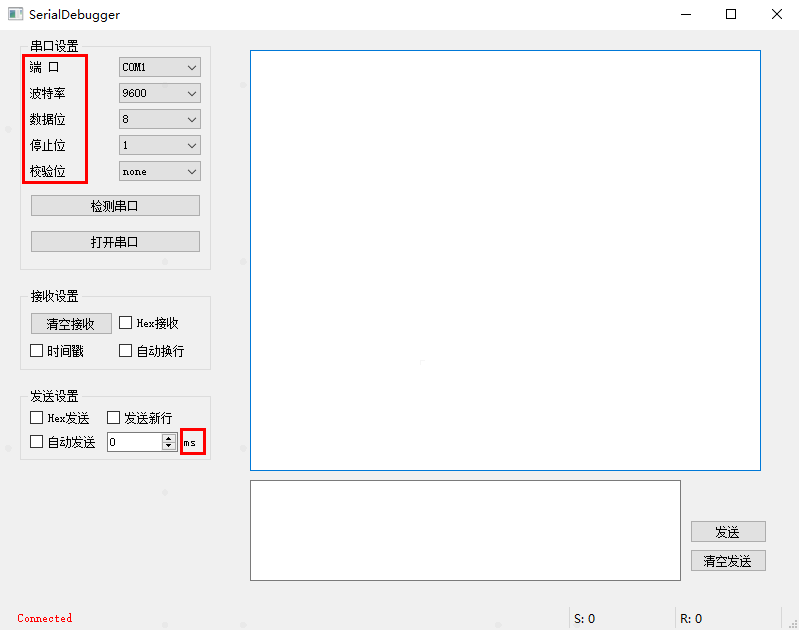
用6个Lable控件分别按下图所示红框位置摆放,并且双击改显示的文字,或单击选择对应Lable后在其右边属性设置界面里的text属性更改
找到Combo Box控件:
用5个Combo Box控件分别按下图绿色框所示位置摆放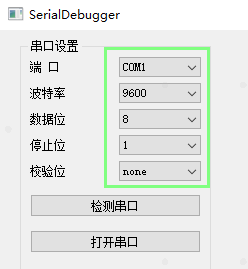
找到Push Button控件:
用5个Push Button控件分别按下图紫色框所示位置摆放,并且双击按钮改显示的文字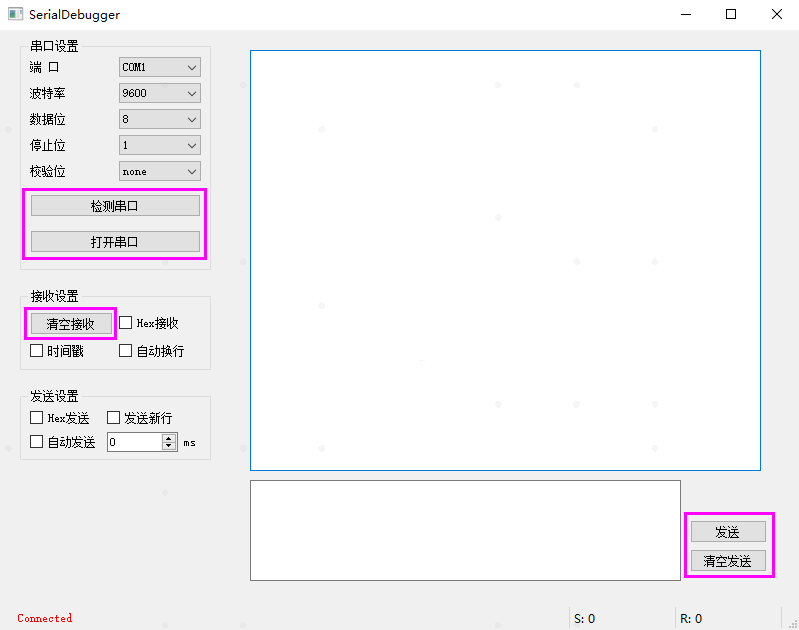
找到Check Box控件:
用6个Check Box控件分别按下图蓝色框所示位置摆放,并且双击更改显示的文字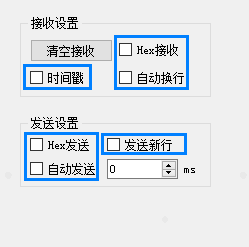
用1个Spin Box控件分别按下图棕色框所示位置摆放并调整大小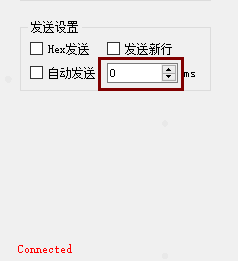
最后两个大的白色区域就是接收框和发送输入框,上面接收框用Plain Text Edit控件,下面输入框用Text Edit控件
接收框用的Plain Text Edit控件需要更改属性为只读
2. 添加下拉列表项
5个Combo Box控件分别双击添加列表项(端口对应的Combo Box不用改)
波特率:
(点击绿色加号即可添加)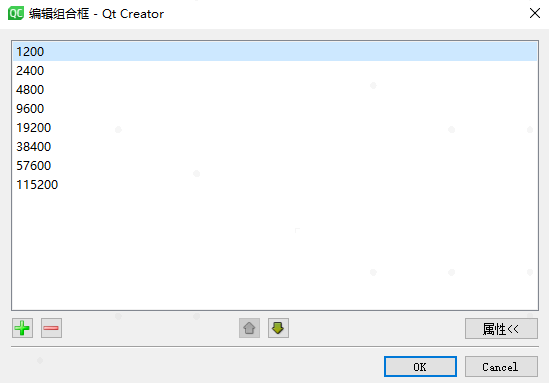
数据位:
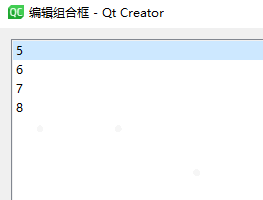
停止位:
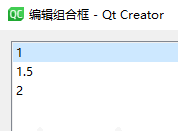
校验位:
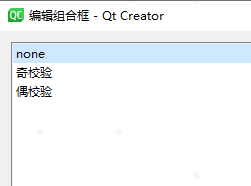
对于波特率和数据位的下拉列表控件还需要通过更改属性currentIndex属性,改变默认值。波特率默认9600,数据位默认8。

3. 修改控件名称
下面对控件进行改名,以便对应程序中的对象名,用默认名不直观。
如何改名?
点击控件,找到界面右边属性栏的objectName。
名称参考下图:
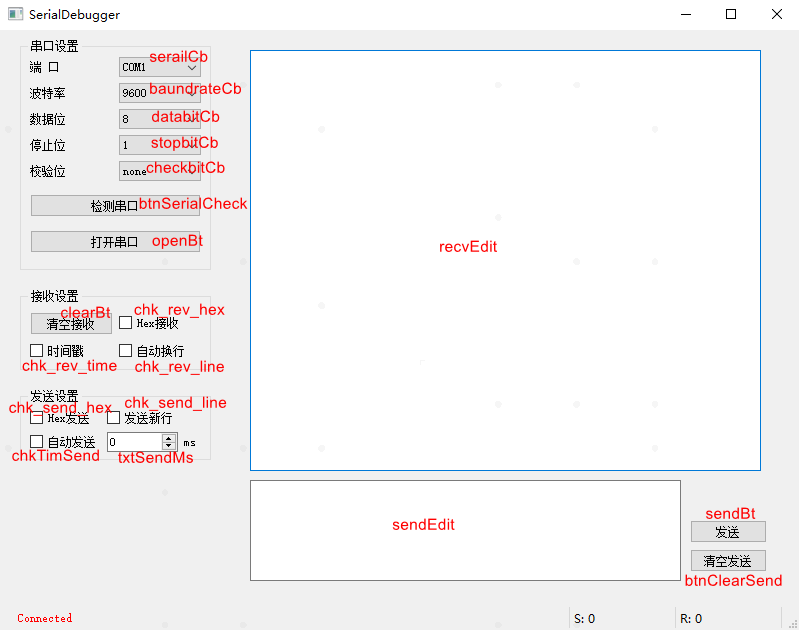
注意这一步一定要把对象名设置对,否则在编译程序时会有问题。
4. 利用布局工具
第一步放置控件的时候,想必就会发现根本很难通过鼠标拖动的方法完成对齐,这时还得用上方菜单栏的布局工具: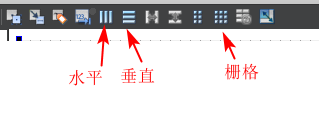
下图中的红框就是布局后才显示的: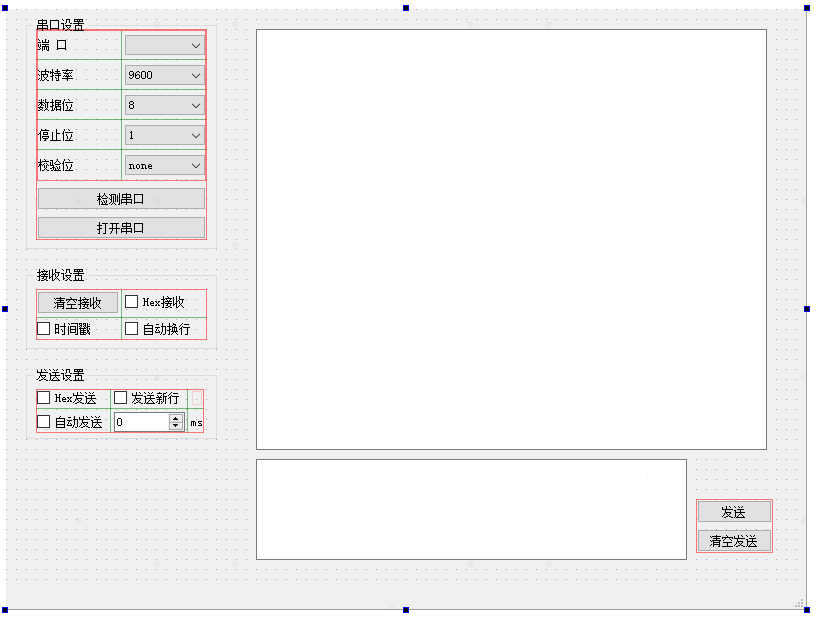
操作方法是先手动把控件摆放到大概位置,然后鼠标左键拉一个框选定几个控件,再点击上面的布局工具。
接收设置和发送设置就是用了栅格布局,发送和清空发送按钮是垂直布局,串口设置中是上面部分是栅格布局,然后整体再用垂直布局。布局后的红框还可以调整大小
最后这3个框是Group Box控件,双击就可以改文字。为啥把这步放最后了是因为发现Group Box控件放上去后直接选不了里面的控件了,暂时不知道怎么操作。这里跟VS里不一样,VS就比较方便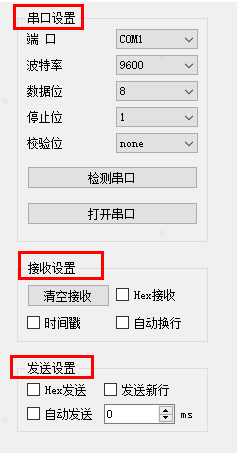
5. 编辑代码
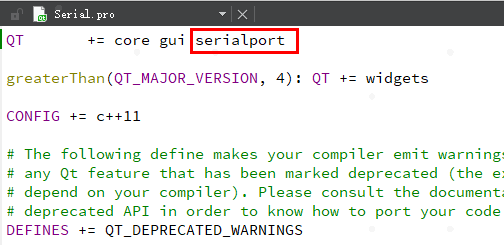
双击打开.pro文件
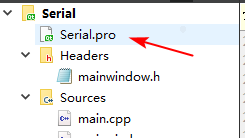
core gui后面添加serialport,即 QT += core gui serialport
mainwindow.h文件源码:
#ifndef MAINWINDOW_H #define MAINWINDOW_H #include #include #include #include #include #include #include QT_BEGIN_NAMESPACE namespace Ui { class MainWindow; } QT_END_NAMESPACE class MainWindow : public QMainWindow { Q_OBJECT public: MainWindow(QWidget *parent = nullptr); ~MainWindow(); QSerialPort *serialPort;//定义串口指针 private slots: /*手动连接槽函数*/ void manual_serialPortReadyRead(); /*以下为mainwindow.ui文件中点击“转到槽”自动生成的函数*/ void on_openBt_clicked(); void on_sendBt_clicked(); void on_clearBt_clicked(); void on_btnClearSend_clicked(); void on_chkTimSend_stateChanged(int arg1); void on_btnSerialCheck_clicked(); private: Ui::MainWindow *ui; // 发送、接收字节计数 long sendNum, recvNum; QLabel *lblSendNum; QLabel *lblRecvNum; QLabel *lblPortState; void setNumOnLabel(QLabel *lbl, QString strS, long num); // 定时发送-定时器 QTimer *timSend; //QTimer *timCheckPort; }; #endif // MAINWINDOW_H mainwindow.cpp文件源码:
#include "mainwindow.h" #include "ui_mainwindow.h" #include "QSerialPortInfo" #include #include #include MainWindow::MainWindow(QWidget *parent) : QMainWindow(parent) , ui(new Ui::MainWindow) { ui->setupUi(this); QStringList serialNamePort; serialPort = new QSerialPort(this); connect(serialPort,SIGNAL(readyRead()),this,SLOT(manual_serialPortReadyRead()));/*手动连接槽函数*/ /*找出当前连接的串口并显示到serailCb*/ //foreach(const QSerialPortInfo &info,QSerialPortInfo::availablePorts()) //{ //serialNamePort<serailCb->addItems(serialNamePort);// 可用串口号,显示到串口选择下拉框中 ui->serailCb->clear(); //通过QSerialPortInfo查找可用串口 foreach(const QSerialPortInfo &info, QSerialPortInfo::availablePorts()) { ui->serailCb->addItem(info.portName()); } // 发送、接收计数清零 sendNum = 0; recvNum = 0; // 状态栏 QStatusBar *sBar = statusBar(); // 状态栏的收、发计数标签 lblSendNum = new QLabel(this); lblRecvNum = new QLabel(this); lblPortState = new QLabel(this); lblPortState->setText("Connected"); //设置串口状态标签为绿色 表示已连接状态 lblPortState->setStyleSheet("color:red"); // 设置标签最小大小 lblSendNum->setMinimumSize(100, 20); lblRecvNum->setMinimumSize(100, 20); lblPortState->setMinimumSize(550, 20); setNumOnLabel(lblSendNum, "S: ", sendNum); setNumOnLabel(lblRecvNum, "R: ", recvNum); // 从右往左依次添加 sBar->addPermanentWidget(lblPortState); sBar->addPermanentWidget(lblSendNum); sBar->addPermanentWidget(lblRecvNum); // 定时发送-定时器 timSend = new QTimer; timSend->setInterval(1000);// 设置默认定时时长1000ms connect(timSend, &QTimer::timeout, this, [=](){ on_sendBt_clicked(); }); } MainWindow::~MainWindow() { delete ui; } //检测通讯端口槽函数 void MainWindow::on_btnSerialCheck_clicked() { ui->serailCb->clear(); //通过QSerialPortInfo查找可用串口 foreach(const QSerialPortInfo &info, QSerialPortInfo::availablePorts()) { ui->serailCb->addItem(info.portName()); } } /*手动实现接收数据函数*/ void MainWindow::manual_serialPortReadyRead() { QByteArray recBuf = serialPort->readAll();; QString str_rev; // 接收字节计数 recvNum += recBuf.size(); // 状态栏显示计数值 setNumOnLabel(lblRecvNum, "R: ", recvNum); if(ui->chk_rev_hex->checkState() == false){ if(ui->chk_rev_time->checkState() == Qt::Checked){ QDateTime nowtime = QDateTime::currentDateTime(); str_rev = "[" + nowtime.toString("yyyy-MM-dd hh:mm:ss") + "] "; str_rev += QString(recBuf).append("\r\n"); } else{ // 在当前位置插入文本,不会发生换行。如果没有移动光标到文件结尾,会导致文件超出当前界面显示范围,界面也不会向下滚动。 //ui->recvEdit->appendPlainText(buf); if(ui->chk_rev_line->checkState() == Qt::Checked){ str_rev = QString(recBuf).append("\r\n"); } else { str_rev = QString(recBuf); } } }else{ // 16进制显示,并转换为大写 QString str1 = recBuf.toHex().toUpper();//.data(); // 添加空格 QString str2; for(int i = 0; i str2 += str1.mid (i,2); str2 += " "; } if(ui->chk_rev_time->checkState() == Qt::Checked) { QDateTime nowtime = QDateTime::currentDateTime(); str_rev = "[" + nowtime.toString("yyyy-MM-dd hh:mm:ss") + "] "; str_rev += str2.append("\r\n"); } else { if(ui->chk_rev_line->checkState() == Qt::Checked) str_rev += str2.append("\r\n"); else str_rev = str2; } } ui->recvEdit->insertPlainText(str_rev); ui->recvEdit->moveCursor(QTextCursor::End); } /*打开串口*/ void MainWindow::on_openBt_clicked() { /*串口初始化*/ QSerialPort::BaudRate baudRate; QSerialPort::DataBits dataBits; QSerialPort::StopBits stopBits; QSerialPort::Parity checkBits; // 获取串口波特率 // baudRate = ui->baundrateCb->currentText().toInt();直接字符串转换为 int 的方法 if(ui->baundrateCb->currentText()=="1200") baudRate=QSerialPort::Baud1200; else if(ui->baundrateCb->currentText()=="2400") baudRate=QSerialPort::Baud2400; else if(ui->baundrateCb->currentText()=="4800") baudRate=QSerialPort::Baud4800; else if(ui->baundrateCb->currentText()=="9600") baudRate=QSerialPort::Baud9600; else if(ui->baundrateCb->currentText()=="19200") baudRate=QSerialPort::Baud19200; else if(ui->baundrateCb->currentText()=="38400") baudRate=QSerialPort::Baud38400; else if(ui->baundrateCb->currentText()=="57600") baudRate=QSerialPort::Baud57600; else if(ui->baundrateCb->currentText()=="115200") baudRate=QSerialPort::Baud115200; // 获取串口数据位 if(ui->databitCb->currentText()=="5") dataBits=QSerialPort::Data5; else if(ui->databitCb->currentText()=="6") dataBits=QSerialPort::Data6; else if(ui->databitCb->currentText()=="7") dataBits=QSerialPort::Data7; else if(ui->databitCb->currentText()=="8") dataBits=QSerialPort::Data8; // 获取串口停止位 if(ui->stopbitCb->currentText()=="1") stopBits=QSerialPort::OneStop; else if(ui->stopbitCb->currentText()=="1.5") stopBits=QSerialPort::OneAndHalfStop; else if(ui->stopbitCb->currentText()=="2") stopBits=QSerialPort::TwoStop; // 获取串口奇偶校验位 if(ui->checkbitCb->currentText() == "none"){ checkBits = QSerialPort::NoParity; }else if(ui->checkbitCb->currentText() == "奇校验"){ checkBits = QSerialPort::OddParity; }else if(ui->checkbitCb->currentText() == "偶校验"){ checkBits = QSerialPort::EvenParity; }else{ } // 初始化串口属性,设置 端口号、波特率、数据位、停止位、奇偶校验位数 serialPort->setPortName(ui->serailCb->currentText()); serialPort->setBaudRate(baudRate); serialPort->setDataBits(dataBits); serialPort->setStopBits(stopBits); serialPort->setParity(checkBits); // 根据初始化好的串口属性,打开串口 // 如果打开成功,反转打开按钮显示和功能。打开失败,无变化,并且弹出错误对话框。 if(ui->openBt->text() == "打开串口"){ if(serialPort->open(QIODevice::ReadWrite) == true){ //QMessageBox:: ui->openBt->setText("关闭串口"); // 让端口号下拉框不可选,避免误操作(选择功能不可用,控件背景为灰色) ui->serailCb->setEnabled(false); }else{ QMessageBox::critical(this, "错误提示", "串口打开失败!!!\r\n该串口可能被占用\r\n请选择正确的串口"); } //statusBar 状态栏显示端口状态 QString sm = "%1 OPENED, %2, 8, NONE, 1"; QString status = sm.arg(serialPort->portName()).arg(serialPort->baudRate()); lblPortState->setText(status); lblPortState->setStyleSheet("color:green"); }else{ serialPort->close(); ui->openBt->setText("打开串口"); // 端口号下拉框恢复可选,避免误操作 ui->serailCb->setEnabled(true); //statusBar 状态栏显示端口状态 QString sm = "%1 CLOSED"; QString status = sm.arg(serialPort->portName()); lblPortState->setText(status); lblPortState->setStyleSheet("color:red"); } } /*发送数据*/ void MainWindow::on_sendBt_clicked() { QByteArray array; //Hex复选框 if(ui->chk_send_hex->checkState() == Qt::Checked){ //array = QString2Hex(data); //HEX 16进制 array = QByteArray::fromHex(ui->sendEdit->toPlainText().toUtf8()).data(); }else{ //array = data.toLatin1(); //ASCII array = ui->sendEdit->toPlainText().toLocal8Bit().data(); } if(ui->chk_send_line->checkState() == Qt::Checked){ array.append("\r\n"); } // 如发送成功,会返回发送的字节长度。失败,返回-1。 int a = serialPort->write(array); // 发送字节计数并显示 if(a > 0) { // 发送字节计数 sendNum += a; // 状态栏显示计数值 setNumOnLabel(lblSendNum, "S: ", sendNum); } } // 状态栏标签显示计数值 void MainWindow::setNumOnLabel(QLabel *lbl, QString strS, long num) { // 标签显示 QString strN; strN.sprintf("%ld", num); QString str = strS + strN; lbl->setText(str); } /*清空*/ void MainWindow::on_clearBt_clicked() { ui->recvEdit->clear(); // 清除发送、接收字节计数 sendNum = 0; recvNum = 0; // 状态栏显示计数值 setNumOnLabel(lblSendNum, "S: ", sendNum); setNumOnLabel(lblRecvNum, "R: ", recvNum); } void MainWindow::on_btnClearSend_clicked() { ui->sendEdit->clear(); // 清除发送字节计数 sendNum = 0; // 状态栏显示计数值 setNumOnLabel(lblSendNum, "S: ", sendNum); } // 定时发送开关 选择复选框 void MainWindow::on_chkTimSend_stateChanged(int arg1) { // 获取复选框状态,未选为0,选中为2 if(arg1 == 0){ timSend->stop(); // 时间输入框恢复可选 ui->txtSendMs->setEnabled(true); }else{ // 对输入的值做限幅,小于10ms会弹出对话框提示 if(ui->txtSendMs->text().toInt() >= 10){ timSend->start(ui->txtSendMs->text().toInt());// 设置定时时长,重新计数 // 让时间输入框不可选,避免误操作(输入功能不可用,控件背景为灰色) ui->txtSendMs->setEnabled(false); }else{ ui->chkTimSend->setCheckState(Qt::Unchecked); QMessageBox::critical(this, "错误提示", "定时发送的最小间隔为 10ms\r\n请确保输入的值 >=10"); } } } 如果一切顺利的话,点击左下角的三角符号进行编译运行就可以测试效果了。
打包可执行文件
当经过上面的步骤,编译后能成功运行。这时如果希望像我们平时用到的各种免安装的exe工具一样可以分享给其他小伙伴使用,就需要再打包一下才行。
传送门:QT如何打包生成独立可执行.exe文件
遗留问题:
本来想定义一个定时器,然后在定时器触发的槽函数中进行扫描端口以达到自动更新端口的效果,就不需要在新插入串口设备时要点击一次检测串口的按钮。但如果槽函数中每次都需要先清除之前检测到的端口,再重新扫描。实际运行时就会出现刚想点开端口下拉列表还没选就刷新成COM1了,会干扰选择端口的操作。尝试了一番不能解决只能作罢。
定时器的槽函数类似下面这样(这是一个结果有问题的示范):
void MainWindow::slot_timCheckPort() { if(ui->openBt->text() == "打开串口"){ ui->serailCb->clear(); //通过QSerialPortInfo查找可用串口 foreach(const QSerialPortInfo &info, QSerialPortInfo::availablePorts()) { ui->serailCb->addItem(info.portName()); } } } 相关好文推荐:
https://blog.csdn.net/hanhui22/article/details/111594742
https://blog.csdn.net/weixin_46183891/article/details/124368488
https://blog.csdn.net/qq_30255657/article/details/125247114
https://blog.csdn.net/zzssdd2/category_10730183.html
https://blog.csdn.net/Mark_md/article/details/108928314
