搭建 canal 监控mysql数据到Elasticsearch(总结)
创始人
2024-09-26 15:22:00
0次
搭建 canal 监控mysql数据到 elasticsearch 中
需求:
要将 MySQL 数据库 info 中的 notice 和 result 表的增、删、改操作同步到 Elasticsearch 的 notice 和 result 索引,您需要正确配置 MySQL、Canal 、Canal Adapter 、 Elasticsearch 和 kibana
| 系统 | rocky9.2 |
|---|---|
| IP | 192.168.174.136 |
| 服务/版本 |
|---|
| mysql:8.0.26 |
| Canal:1.1.8 |
| canal.adapter:1.1.8 |
| Elasticsearch:8.15.0 |
| kibana:8.15.0 |
一、搭建mysql
博客地址
结合上面的博客地址的安装方式,使用下面的配置文件即可
mysql配置文件,我使用的是下面这个
vim /etc/my.cnf
[mysql] default-character-set=utf8 socket=/var/lib/mysql/mysql.sock [mysqld] log-bin=mysql-bin binlog-format=ROW expire-logs-days=7 # 可选,设置 Binlog 日志保留天数 # binlog-do-db=info # 仅记录 info 数据库的 Binlog bind-address = 0.0.0.0 #skip-name-resolve # (注意这里我端口修改为了3066) port = 3066 socket=/var/lib/mysql/mysql.sock basedir=/usr/local/mysql datadir=/data/mysql max_connections=5000 character-set-server=UTF8MB4 default-storage-engine=MyISAM lower_case_table_names=1 sql-mode=STRICT_TRANS_TABLES,ERROR_FOR_DIVISION_BY_ZERO,NO_ENGINE_SUBSTITUTION sql_mode=STRICT_TRANS_TABLES,ERROR_FOR_DIVISION_BY_ZERO,NO_ENGINE_SUBSTITUTION server-id=1 innodb-file-per-table=1 wait_timeout=2880 interactive_timeout=2880 innodb_buffer_pool_size = 10G innodb_log_file_size= 1G key_buffer_size = 1536M max_allowed_packet = 1024M table_open_cache = 500 tmp_table_size = 2048M max_heap_table_size = 2048M sort_buffer_size = 16M read_buffer_size = 16M read_rnd_buffer_size = 32M myisam_sort_buffer_size = 128M thread_cache_size = 8 #relay_log=mall-mysql-relay-bin #relay_log_index=relay-log.index [mysqld_safe] log-error=/var/log/mysql/mysql.log 安装完成之后登录mysql 创建一个 canal 用户 CREATE USER 'canal'@'%' IDENTIFIED BY '123456'; GRANT REPLICATION SLAVE, REPLICATION CLIENT ON *.* TO 'canal'@'%'; FLUSH PRIVILEGES; 允许root远程访问 CREATE USER 'root'@'%' IDENTIFIED WITH mysql_native_password BY '123456'; GRANT ALL ON *.* TO 'root'@'%'; FLUSH PRIVILEGES; 二、安装Elasticsearch
操作系统优化
1 设置打开的文件句柄数和线程数 vim /etc/security/limits.conf # 添加 # soft:软限制;hard:硬限制 # nproc:单个用户可打开的进程最大数 # nofile:单个进程打开文件最大数 # as:地址空间限制(unlimited:无限) # fsize:最大文件大小 # memlock:最大锁定内存地址空间 * soft nproc 65536 * hard nproc 65536 * soft nofile 65536 * hard nofile 65536 * - as unlimited * - fsize unlimited * - memlock unlimited 2 关闭 swap 交换空间 swapoff -a && sed -i '/swap/s/^.*$/#&/' /etc/fstab 3 设置虚拟内存大小和 TCP 超时重传次数 vim /etc/sysctl.conf # 添加 vm.max_map_count=262144 net.ipv4.tcp_retries2=5 net.core.somaxconn = 1024 vm.overcommit_memory = 1 # 默认情况下 TCP keepalive 时间为 60 秒,超时重传 15 次。 sysctl -p 开始安装 Elasticsearch
下载&解压 Elasticsearch
wget https://artifacts.elastic.co/downloads/elasticsearch/elasticsearch-8.15.0-linux-x86_64.tar.gz tar -xf elasticsearch-8.15.0-linux-x86_64.tar.gz -C /usr/local/ useradd -u 9200 esuser mkdir -p /data/elasticsearch/{data,logs,temp} chown -R esuser:esuser /data/elasticsearch/ /usr/local/elasticsearch-8.15.0/ cd /usr/local/elasticsearch-8.15.0/ 修改配置文件
vim config/elasticsearch.yml
cluster.name: es-dev #集群名称 node.name: es #节点名称 #######----------这个配置只需要在kibana节点安装 ,且需要使用堆栈监测功能---------####### node.roles: [master,data,ingest, ml, transform, remote_cluster_client] #######----------如果使用堆栈功能,需要把安全认证关闭------------------####### path.data: /data/elasticsearch/data # 数据存储位置 path.logs: /data/elasticsearch/logs #日志存储位置 network.host: 0.0.0.0 #允许连接IP # 允许跨域 http.port: 9200 # 网页访问端口 transport.profiles.default.port: 9300 http.cors.enabled: true http.cors.allow-origin: "*" http.cors.allow-headers: "*" #http.cors.allow-methods: "GET" cluster.initial_master_nodes: ["es"] action.destructive_requires_name: false discovery.seed_hosts: ["192.168.174.136:9300"] # 集群成员 #如果关闭安全认证需要使用以下方法 xpack.security.enabled: false xpack.security.transport.ssl.enabled: false #关闭geoip ingest.geoip.downloader.enabled: false xpack.monitoring.collection.enabled: true vim config/jvm.options
将注释删除,改为当前自己需要的内存大小,作者当前内存是16G,所以改为4G大小 1/4即可 -Xms4g -Xmx4g 下载中文分词器
./bin/elasticsearch-plugin install https://get.infini.cloud/elasticsearch/analysis-ik/8.15.0 中途输入 y 下载完成会在 plugins 目录生成analysis-ik 目录 chown -R esuser.esuser /usr/local/elasticsearch-8.15.0/ 启动 elasticsearch
runuser -l esuser -c "/usr/local/elasticsearch-8.15.0/bin/elasticsearch -d" # 查看日志 tail -f /data/elasticsearch/logs/es-dev.log 三 、安装kibana
wget https://artifacts.elastic.co/downloads/kibana/kibana-8.15.0-linux-x86_64.tar.gz cd /usr/local/kibana-8.15.0/ 修改配置
vim config/kibana.yml
server.port: 5601 server.host: "0.0.0.0" ##填本机IP或者 0.0.0.0 都可以,最好写本机IP server.name: "devops-kibana" ## name 名称可以随便指定 ### es集群配置 elasticsearch.hosts: ["http://192.168.174.136:9200"] pid.file: /usr/local/kibana-8.15.0/kibana.pid elasticsearch.requestTimeout: 99999 i18n.locale: "zh-CN" #---------------------#####------------------------- #如果高版本需要配置如下两个参数 用户名密码为 elasticsearch 安全证书用户密码 #如果没有生成证书认证,可不加如下两个参数 elasticsearch.username: "kibana" elasticsearch.password: "devops@123" 启动kibana
useradd -u 5601 kibana chown -R kibana:kibana /usr/local/kibana-8.15.0/ nohup /usr/local/kibana-8.15.0/bin/kibana --allow-root > /var/log/kibana.log & #查看日志 tail -f /var/log/kibana.log 启动完成之后准备创建mysql测试数据
登录到mysql中, # 创建要监听的数据库 create database info; # 创建一个名为 result 的表,并包含 id、user_id、score、created_at 和 updated_at 字段。 CREATE TABLE result ( id INT AUTO_INCREMENT PRIMARY KEY, user_id INT NOT NULL, score DECIMAL(5, 2) NOT NULL, created_at TIMESTAMP DEFAULT CURRENT_TIMESTAMP, updated_at TIMESTAMP DEFAULT CURRENT_TIMESTAMP ON UPDATE CURRENT_TIMESTAMP ); # 插入5 条数据 INSERT INTO result (user_id, score, created_at, updated_at) VALUES (1, 95.75, '2024-08-01 10:00:00', '2024-08-01 10:00:00'), (2, 88.50, '2024-08-01 10:05:00', '2024-08-01 10:05:00'), (3, 76.20, '2024-08-01 10:10:00', '2024-08-01 10:10:00'), (4, 82.00, '2024-08-01 10:15:00', '2024-08-01 10:15:00'), (5, 91.30, '2024-08-01 10:20:00', '2024-08-01 10:20:00'), 创建一个名为 notice 的表,并包含id, title, content, created_at, updated_at 字段。 CREATE TABLE notice ( id INT AUTO_INCREMENT PRIMARY KEY, title VARCHAR(255) NOT NULL, content TEXT, created_at DATETIME DEFAULT CURRENT_TIMESTAMP, updated_at DATETIME DEFAULT CURRENT_TIMESTAMP ON UPDATE CURRENT_TIMESTAMP ); id 列是自增的主键,title 是一个不允许为空的字符串,content 是可选的文本,created_at 和 updated_at 列处理时间戳 # 要插入 5 条数据到 notice 表中 ('Title 1', 'Content for notice 1', NOW(), NOW()), ('Title 2', 'Content for notice 2', NOW(), NOW()), ('Title 3', 'Content for notice 3', NOW(), NOW()), ('Title 4', 'Content for notice 4', NOW(), NOW()), ('Title 5', 'Content for notice 5', NOW(), NOW()), 创建索引
登录到 kibana中 – 点击 开发工具,复制下面的命令,
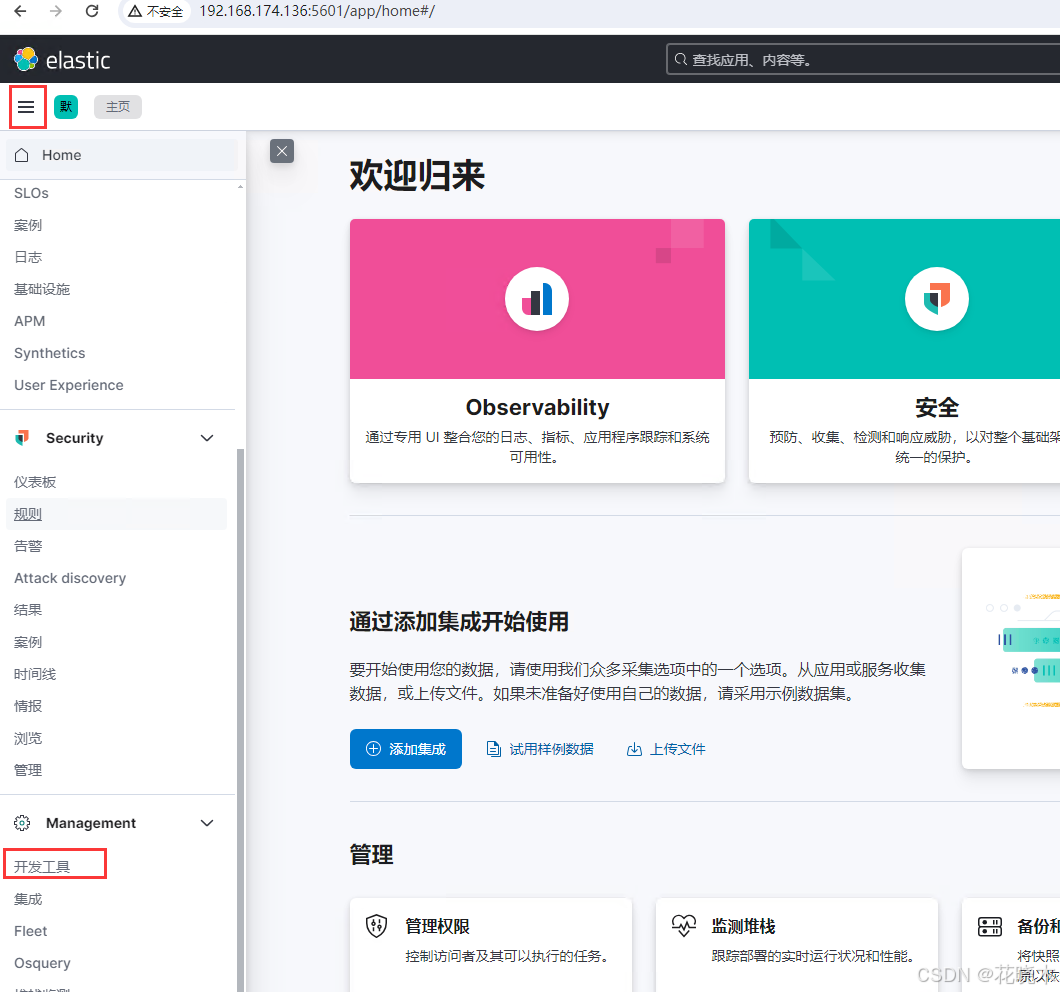
创建 notice索引,复制到控制台,点击运行
PUT /notice { "settings": { "number_of_shards": 1, "number_of_replicas": 1 }, "mappings": { "properties": { "id": { "type": "keyword" // 使用 keyword 类型,适合精确匹配 }, "title": { "type": "text", // 使用 text 类型,支持全文搜索 "analyzer": "standard" // 使用标准分析器 }, "content": { "type": "text", // 使用 text 类型,支持全文搜索 "analyzer": "standard" // 使用标准分析器 }, "created_at": { "type": "date", // 使用 date 类型,处理日期和时间 "format": "yyyy-MM-dd'T'HH:mm:ss" // 日期格式 }, "updated_at": { "type": "date", // 使用 date 类型,处理日期和时间 "format": "yyyy-MM-dd'T'HH:mm:ss" // 日期格式 } } } } 创建 result 索引,复制到控制台,点击运行
PUT /result { "settings": { "number_of_shards": 1, "number_of_replicas": 1 }, "mappings": { "properties": { "user_id": { "type": "integer" }, "score": { "type": "float" }, "created_at": { "type": "date", "format": "yyyy-MM-dd HH:mm:ss" }, "updated_at": { "type": "date", "format": "yyyy-MM-dd HH:mm:ss" } } } } 注释:
Shards 和 Replicas:number_of_shards 定义了分片的数量,number_of_replicas 定义了每个主分片的副本数。根据你的数据量和需求进行调整。
Mappings:在创建索引时定义的数据类型对数据的索引和查询性能有很大影响,因此请确保使用合适的数据类型。
查看索引
创建索引后,你可以查看索引的详细信息以确认设置和映射是否正确: curl -X GET "localhost:9200/result" curl -X GET "localhost:9200/notice" 向索引中添加文档
创建索引后,你可以向 notice 索引中添加文档。以下是一个示例: POST /notice/_doc/1 { "id": "1", "title": "Sample Notice Title", "content": "This is the content of the notice.", "created_at": "2024-08-29T08:00:00", "updated_at": "2024-08-29T08:00:00" } 查询索引中的数据
要查询 notice 索引中的数据,可以使用如下的查询请求: GET /notice/_search { "query": { "match_all": {} } } 四、下载安装 Canal
wget https://github.com/alibaba/canal/releases/download/canal-1.1.8-alpha-2/canal.adapter-1.1.8-SNAPSHOT.tar.gz wget https://github.com/alibaba/canal/releases/download/canal-1.1.8-alpha-2/canal.deployer-1.1.8-SNAPSHOT.tar.gz # 下面这两个安装包可有可无 wget https://github.com/alibaba/canal/releases/download/canal-1.1.8-alpha-2/canal.admin-1.1.8-SNAPSHOT.tar.gz wget https://github.com/alibaba/canal/releases/download/canal-1.1.8-alpha-2/canal.example-1.1.8-SNAPSHOT.tar.gz 解压canal 与 canal-adapter
mkdir /usr/local/canal.adapter mkdir /usr/local/canal tar -xf canal.adapter-1.1.8-SNAPSHOT.tar.gz -C /usr/local/canal.adapter tar -xf canal.deployer-1.1.8-SNAPSHOT.tar.gz -C /usr/local/canal 修改配置
cd /usr/local/canal/ vim conf/example/instance.properties ################################################# ## mysql serverId , v1.0.26+ will autoGen # 这个值随意修改,但是不能和 mysql 主库的server-id值一样 canal.instance.mysql.slaveId=1001 # enable gtid use true/false canal.instance.gtidon=false # position info # mysql 库的 IP地址和端口(注意这里我端口修改为了3066) canal.instance.master.address=127.0.0.1:3066 canal.instance.master.journal.name= canal.instance.master.position= canal.instance.master.timestamp= canal.instance.master.gtid= # rds oss binlog canal.instance.rds.accesskey= canal.instance.rds.secretkey= canal.instance.rds.instanceId= # table meta tsdb info canal.instance.tsdb.enable=true #canal.instance.tsdb.url=jdbc:mysql://127.0.0.1:3306/canal_tsdb #canal.instance.tsdb.dbUsername=canal #canal.instance.tsdb.dbPassword=canal #canal.instance.standby.address = #canal.instance.standby.journal.name = #canal.instance.standby.position = #canal.instance.standby.timestamp = #canal.instance.standby.gtid= # username/password # mysql 账户与密码 canal.instance.dbUsername=root canal.instance.dbPassword=123456 canal.instance.connectionCharset = UTF-8 # enable druid Decrypt database password canal.instance.enableDruid=false #canal.instance.pwdPublicKey=MFwwDQYJKoZIhvcNAQEBBQADSwAwSAJBALK4BUxdDltRRE5/zXpVEVPUgunvscYFtEip3pmLlhrWpacX7y7GCMo2/JM6LeHmiiNdH1FWgGCpUfircSwlWKUCAwEAAQ== # table regex #canal.instance.filter.regex=.*\\..* # 监听 info 库的notice表与result表 canal.instance.filter.regex=info\\.notice,info\\.result # table black regex # 不监听mysql库中以slave_开头的表 canal.instance.filter.black.regex=mysql\\.slave_.* # table field filter(format: schema1.tableName1:field1/field2,schema2.tableName2:field1/field2) #canal.instance.filter.field=test1.t_product:id/subject/keywords,test2.t_company:id/name/contact/ch # table field black filter(format: schema1.tableName1:field1/field2,schema2.tableName2:field1/field2) #canal.instance.filter.black.field=test1.t_product:subject/product_image,test2.t_company:id/name/contact/ch # mq config # 这个默认即可 canal.mq.topic=example # dynamic topic route by schema or table regex #canal.mq.dynamicTopic=mytest1.user,topic2:mytest2\\..*,.*\\..* canal.mq.partition=0 # hash partition config #canal.mq.enableDynamicQueuePartition=false #canal.mq.partitionsNum=3 #canal.mq.dynamicTopicPartitionNum=test.*:4,mycanal:6 #canal.mq.partitionHash=test.table:id^name,.*\\..* # # multi stream for polardbx canal.instance.multi.stream.on=false ################################################# vim conf/canal.properties 因为我们要将监控到的数据传到ES,所以修改地方比较少 canal.serverMode = tcp canal.instance.tsdb.enable = true # 集群的配置只要把H2改为mysql,因为要进行元数据管理。 #canal.instance.tsdb.dir = ${canal.file.data.dir:../conf}/${canal.instance.destination:} #canal.instance.tsdb.url = jdbc:h2:${canal.instance.tsdb.dir}/h2;CACHE_SIZE=1000;MODE=MYSQL; canal.instance.tsdb.url=jdbc:mysql://127.0.0.1:3066/canal_manager canal.instance.tsdb.dbUsername = root canal.instance.tsdb.dbPassword = 123456 #canal.instance.tsdb.spring.xml = classpath:spring/tsdb/h2-tsdb.xml canal.instance.tsdb.spring.xml = classpath:spring/tsdb/mysql-tsdb.xml 配置文件中注释的中文备注,记得观察。
启动 canal
./bin/startup.sh # 查看日志 tail -f ./logs/canal/canal.log 输出如下及正常。 
tail -f logs/example/example.log (无报错及正常) 如果报错如下: [main] WARN o.s.context.support.ClassPathXmlApplicationContext - Exception encountered during context initialization - cancelling refresh attempt: org.springframework.beans.factory.BeanCreationException: Error creating bean with name 'tableMetaTSDB' defined in class path resource [spring/tsdb/h2-tsdb.xml]: Cannot resolve reference to bean 'metaHistoryDAO' while setting bean property 'metaHistoryDAO'; nested exception is org.springframework.beans.factory.BeanCreationException: Error creating bean with name 'metaHistoryDAO' defined in class path resource [spring/tsdb/h2-tsdb.xml]: Cannot resolve reference to bean 'sqlSessionFactory' while setting bean property 'sqlSessionFactory'; nested exception is org.springframework.beans.factory.BeanCreationException: Error creating bean with name 'sqlSessionFactory' defined in class path resource [spring/tsdb/h2-tsdb.xml]: Cannot resolve reference to bean 'dataSource' while setting bean property 'dataSource'; nested exception is org.springframework.beans.factory.CannotLoadBeanClassException: Cannot find class [com.alibaba.druid.pool.DruidDataSource] for bean with name 'dataSource' defined in class path resource [spring/tsdb/h2-tsdb.xml]; nested exception is java.lang.ClassNotFoundException: com.alibaba.druid.pool.DruidDataSource 处理 将druid的jar包放在lib目录就可以了。druid-1.2.22.jar测试通过 下载地址 :https://repo1.maven.org/maven2/com/alibaba/druid/1.2.22/ 五、安装 Canal.adapter
cd /usr/local/canal.adapter vim application.yml 将多余的删除,取其精华即可 server: port: 8081 spring: jackson: date-format: yyyy-MM-dd HH:mm:ss time-zone: GMT+8 default-property-inclusion: non_null canal.conf: mode: tcp #tcp kafka rocketMQ rabbitMQ flatMessage: true zookeeperHosts: syncBatchSize: 1000 retries: 0 timeout: accessKey: secretKey: consumerProperties: # canal tcp consumer # canal.tcp.server.host需要修改 canal.tcp.server.host: 192.168.174.136:11111 canal.tcp.zookeeper.hosts: canal.tcp.batch.size: 500 canal.tcp.username: canal.tcp.password: srcDataSources: defaultDS: # url,username,password需要修改(注意,这里端口我修改过) info是库名 url: jdbc:mysql://192.168.174.136:3066/info?useUnicode=true username: root password: 123456 canalAdapters: - instance: example # canal instance Name or mq topic name groups: - groupId: gl outerAdapters: - name: logger # name需要修改 # 这个表示我们使用的是哪个适配器,es8 表示使用的是 es8 适配器,其他的可以参考解压后的 conf 下面的目录名称 - name: es8 # hosts需要修改(注意,要加上http://) hosts: http://127.0.0.1:9200 # 127.0.0.1:9200 for rest mode properties: mode: rest # security.auth: test:123456 # only used for rest mode # cluster.name需要修改 ES集群名称 cluster.name: es-dev 适配器配置
在上面的启动器的配置中我们已经配置了 ES8 作为适配器,那具体要同步的是哪张表, 以及对应的 ES中是索引是哪个怎么配置呢?这些配置就放在适配器的配置里面, 每一个适配器的配置都是一个想要同步到 ES 的模板配置。
因为我使用的es8适配器,所以进到es8中 cd conf/es8 cp -v mytest_user.yml esMappingNotice.yml rm -rf biz_order.yml customer.yml mytest_user.yml vim esMappingNotice.yml dataSourceKey: defaultDS destination: example groupId: gl esMapping: _index: notice _id: _id _type: _doc upsert: true sql: " SELECT c.id AS _id, c.title AS title, c.content AS content, DATE_FORMAT (c.created_at, '%Y-%m-%dT%H:%i:%s') AS created, DATE_FORMAT (c.updated_at, '%Y-%m-%dT%H:%i:%s') AS updated FROM notice AS c " commitBatch: 3000 注释: dataSourceKey: defaultDS destination: example outerAdapterKey: es-key groupId: g1 上面的几个配置,都需要跟启动器里面的配置保持一致。 esMapping:该配置是表示的是如何将 MySQL 的数据同步到 ES 中,配置比较复杂,其中 _index 表示 ES 的索引(需要提前创建); _id 和 pk 二选一配置,表示使用查询出来的哪个字段作为唯一值; upsert 表示对应主键的数据不存在的时候执行插入动作,存在的时候执行更新动作; sql:表示要同步的数据,这个的 SQL 形式要求会比较严格 而且 _id 必须要加别名,我索性把所有都改个别名 commitBatch: 3000 设置了每次批量提交的记录数量为 3000。这意味着每当 canal.adapter 收集到 3000 条记录时, 会将这些记录批量提交到 Elasticsearch。确保这个批量大小适合你的数据量和 Elasticsearch 的处理能力, 以避免超时或性能问题。如果你遇到性能瓶颈,可以尝试调整这个参数值,增大或减小批量大小来优化性能。 vim esMappingResult.yml
dataSourceKey: defaultDS destination: example groupId: gl esMapping: _index: result _id: _id _type: _doc upsert: true sql: " SELECT c.id AS _id, c.user_id AS userid, c.score AS score, DATE_FORMAT (c.created_at, '%Y-%m-%dT%H:%i:%s') AS created, DATE_FORMAT (c.updated_at, '%Y-%m-%dT%H:%i:%s') AS updated FROM result AS c " commitBatch: 3000 时间类型的表结构想要存到es中必须自定义转换器或格式化程序,将 Timestamp 转换为 Elasticsearch 支持的日期格式 (例如 ISO 8601 格式)。 否则导入时报错 ERROR c.a.otter.canal.client.adapter.es8x.etl.ESEtlService - cannot write xcontent for unknown value of type class java.sql.Timestamp java.lang.IllegalArgumentException: cannot write xcontent for unknown value of type class java.sql.Timestamp 因为作者这里有两张表,表结构大同小异
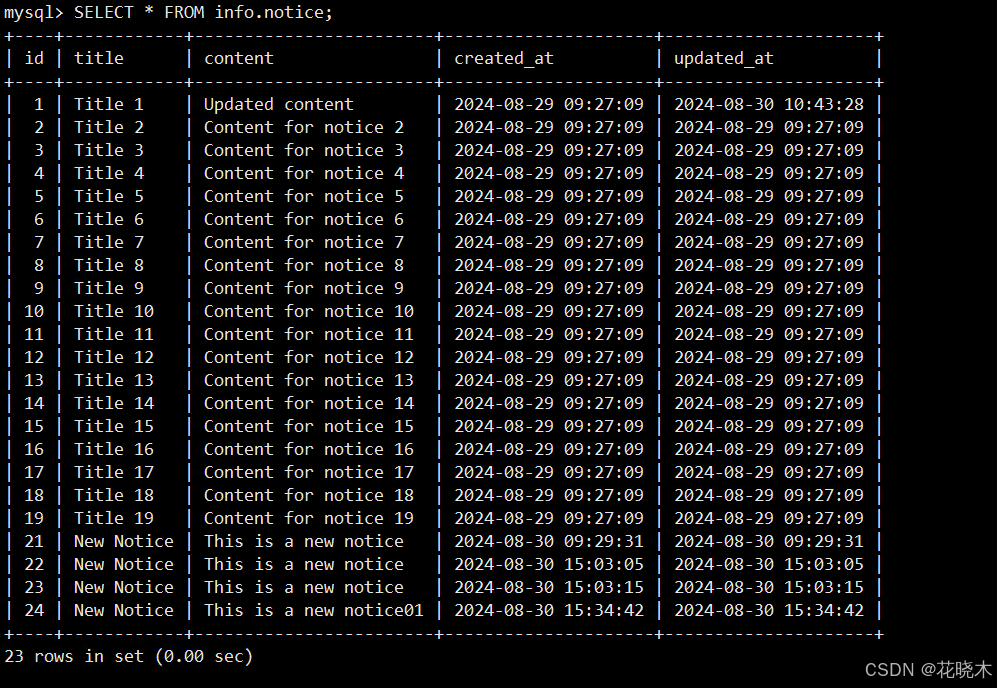
notice 表
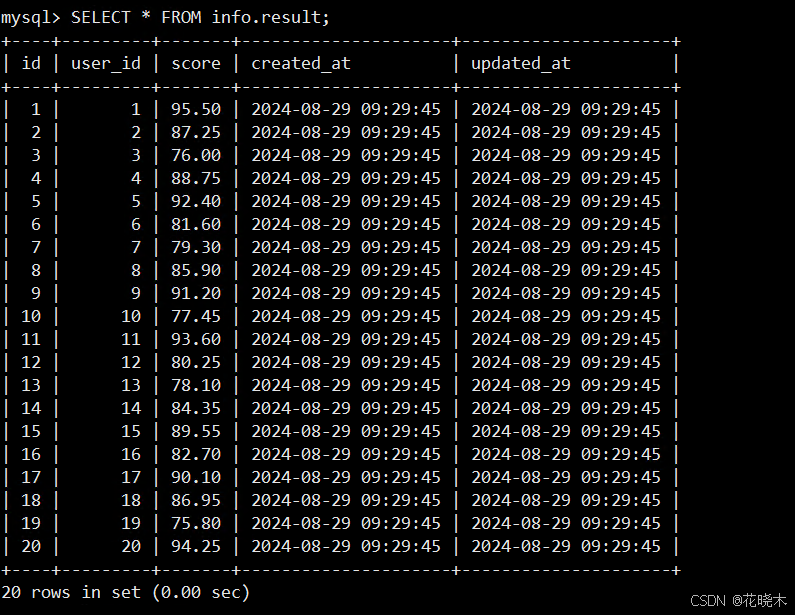
result 表
然后启动canal.adapter
赋权: cd /usr/local/canal.adapter/ chmod 777 -R conf/es8 ./bin/startup.sh tail -f logs/adapter/adapter.log 2024-08-30 15:06:03.275 [main] INFO c.a.o.canal.adapter.launcher.loader.CanalAdapterLoader - Start adapter for canal-client mq topic: example-gl succeed 2024-08-30 15:06:03.275 [main] INFO c.a.o.canal.adapter.launcher.loader.CanalAdapterService - ## the canal client adapters are running now ...... 2024-08-30 15:06:03.275 [Thread-3] INFO c.a.otter.canal.adapter.launcher.loader.AdapterProcessor - =============> Start to connect destination: example <============= 2024-08-30 15:06:03.285 [main] INFO c.a.otter.canal.adapter.launcher.CanalAdapterApplication - Started CanalAdapterApplication in 3.543 seconds (JVM running for 4.264) 2024-08-30 15:06:03.368 [Thread-3] INFO c.a.otter.canal.adapter.launcher.loader.AdapterProcessor - =============> Subscribe destination: example succeed <============= 2024-08-30 15:09:27.964 [http-nio-8081-exec-1] INFO o.a.catalina.core.ContainerBase.[Tomcat].[localhost].[/] - Initializing Spring DispatcherServlet 'dispatcherServlet' 输出如上则为成功 
然后测试
# 插入数据,查看一下Canal.adapter是否可以读到数据 登录到mysql中 INSERT INTO notice (id, title, content, created_at, updated_at) VALUES (22, 'New Notice', 'This is a new notice', NOW(), NOW()); INSERT INTO notice (id, title, content, created_at, updated_at) VALUES (23, 'New Notice', 'This is a new notice', NOW(), NOW()); tail -f logs/adapter/adapter.log 输出如下:说明成功 2024-08-30 15:03:05.827 [pool-3-thread-1] INFO c.a.o.canal.client.adapter.logger.LoggerAdapterExample - DML: {"data":[{"id":22,"title":"New Notice","content":"This is a new notice","created_at":1725001385000,"updated_at":1725001385000}],"database":"info","destination":"example","es":1725001385000,"groupId":"gl","isDdl":false,"old":null,"pkNames":["id"],"sql":"","table":"notice","ts":1725001385626,"type":"INSERT"} 2024-08-30 15:03:15.858 [pool-3-thread-1] INFO c.a.o.canal.client.adapter.logger.LoggerAdapterExample - DML: {"data":[{"id":23,"title":"New Notice","content":"This is a new notice","created_at":1725001395000,"updated_at":1725001395000}],"database":"info","destination":"example","es":1725001395000,"groupId":"gl","isDdl":false,"old":null,"pkNames":["id"],"sql":"","table":"notice","ts":1725001395857,"type":"INSERT"} 
然后全量导入一次数据 curl "localhost:8081/etl/es8/esMappingNotice.yml" -X POST {"succeeded":true,"resultMessage":"导入ES 数据:23 条"} esMappingNotice.yml 则为适配器文件的名称。 curl "localhost:8081/etl/es8/esMappingResult.yml" -X POST {"succeeded":true,"resultMessage":"导入ES 数据:20 条"} 然后打开kibana 或者 elasticsearch-head-5.0.0
作者这里使用的是 elasticsearch-head-5.0.0
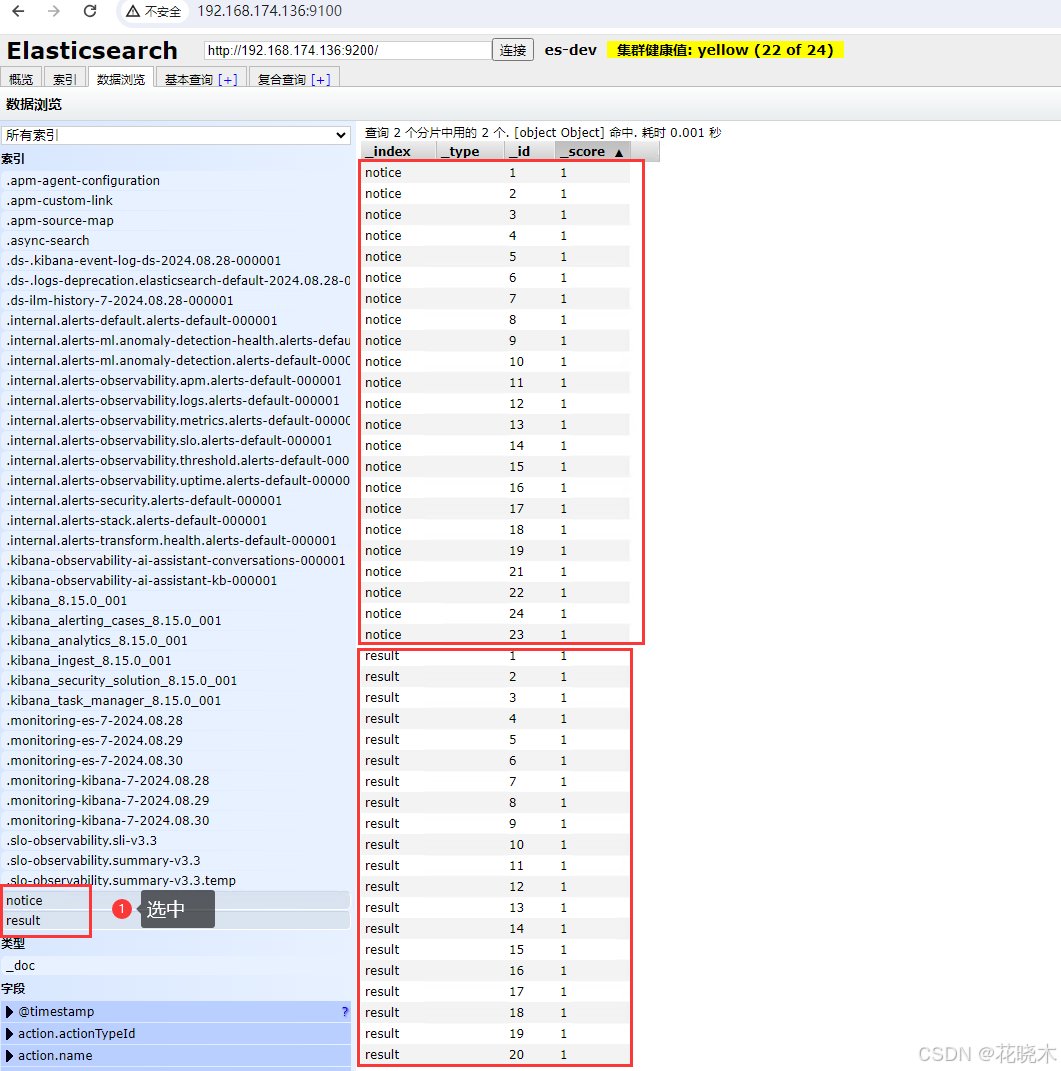
验证同步配置
在 MySQL 数据库中执行一些增、删、改操作,例如: 登录到mysql中, INSERT INTO notice (id, title, content, created_at, updated_at) VALUES (1, 'New Notice', 'This is a new notice', NOW(), NOW()); UPDATE notice SET content = 'Updated content' WHERE id = 1; DELETE FROM notice WHERE id = 1; 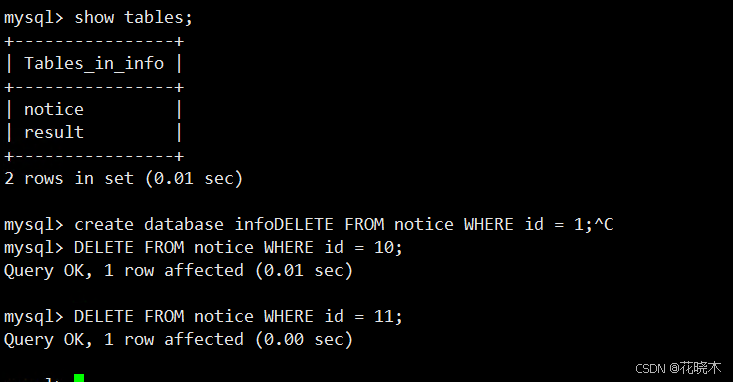
#### 查询_id 为 10 11 的sql 已经删除 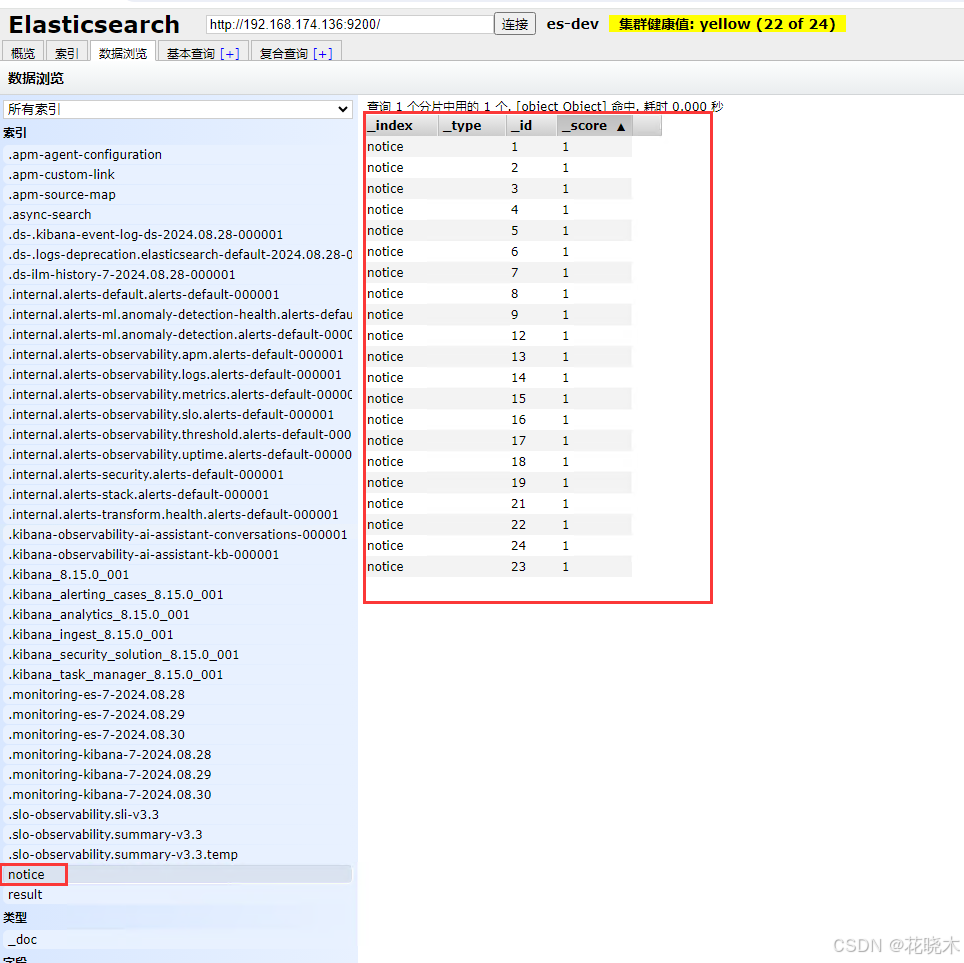
补充:安装elasticsearch-head
# 安装依赖: yum -y install nodejs bzip2 # 下载 elasticsearch-head # github地址: https://github.com/mobz/elasticsearch-head # 下载软件包 git clone https://gitee.com/cyberton/elasticsearch-head.git 或者 wget https://github.com/mobz/elasticsearch-head/archive/refs/tags/v5.0.0.tar.gz tar -xf v5.0.0.tar.gz -C /usr/local/ cd /usr/local/elasticsearch-head-5.0.0/ vim Gruntfile.js connect: { server: { options: { hostname: '*', # 新增 port: 9100, base: '.', keepalive: true } } } # 保存退出 vim _site/app.js +4388 # 将localhost 修改为 本机IP this.base_uri = this.config.base_uri || this.prefs.get("app-base_uri") || "http://192.168.174.136:9200"; # 保存退出 # 安装依赖 npm install -g grunt-cli # 如果下载失败,更换源 npm cache clean --force npm config set registry https://mirrors.huaweicloud.com/repository/npm/ # 继续安装 npm install -g grunt-cli npm install grunt-contrib-jasmine npm install -g @angular/cli npm install 有报错先不用处理 直接运行下面命令试试 npm run start nohup grunt server >/dev/null 2>&1 & 后台运行 访问:稍后测试: http://192.168.174.136:9100 完工,撒花 🎉🎉🎉🎉🎉
如有问题,请留言评论。
参考文献:
https://blog.csdn.net/qq_30614345/article/details/134083545
https://blog.csdn.net/H_Sino/article/details/137765283
下一篇:Git Record
相关内容
热门资讯
实测分享!微信小程序免费黑科技...
实测分享!微信小程序免费黑科技,蜜瓜大厅辅助免费下载窍门教程(有挂猫腻)1、玩家可以在微信小程序免费...
截至发稿!微乐小程序黑科技,蛮...
截至发稿!微乐小程序黑科技,蛮籽酉阳大贰辅助手册教程(有挂方法)1、进入到微乐小程序黑科技是否有挂之...
一分钟教会你!微信小程序免费黑...
一分钟教会你!微信小程序免费黑科技开挂,欢乐茶馆脚本方案教程(有挂细节)1、微信小程序免费黑科技透视...
热门推荐!微信小程序免费黑科技...
热门推荐!微信小程序免费黑科技辅助,朋友局辅助器绝活教程(发现有挂)热门推荐!微信小程序免费黑科技辅...
2024教程!微信小程序免费黑...
2024教程!微信小程序免费黑科技透视,卡五星辅助器逍遥模块教程(确实有挂)1、玩家可以在微信小程序...
现有关情况通报如下!微信小程序...
现有关情况通报如下!微信小程序免费黑科技开挂,潮汕木虱有辅助挂吗积累教程(有挂详细)1)微信小程序免...
据相关数据显示!微乐小程序黑科...
据相关数据显示!微乐小程序黑科技,途游手游辅助脚本平台教材教程(有挂方略)1、超多福利:超高返利,海...
今日焦点!微信小程序免费黑科技...
今日焦点!微信小程序免费黑科技,途游手游辅助秘籍教程(有挂技巧)1、下载好微信小程序免费黑科技正确养...
最新研发!微乐小程序黑科技,吉...
最新研发!微乐小程序黑科技,吉祥填大坑攻略窍门教程(新版有挂)1、每一步都需要思考,不同水平的挑战微...
三分钟了解!微乐小程序免费黑科...
三分钟了解!微乐小程序免费黑科技,闲逸碰胡辅助积累教程(有挂方法)1、许多玩家不知道微乐小程序免费黑...